
Fig. 1 IR2110 High Voltage H-Bridge Driver
Click image for larger view.
Student-Hobbyist Electronics Projects Tutorials
by Lewis Loflin
Introduction - The purpose of these pages is to introduce the student and hobbyist to electronics projects.
I've been a part-time adjunct professor at a local community college teaching electricity and electronics.
Today I do this for the shear love of electronics.
I have 45 years experience in electronics, from vacuum tubes to modern solid state and industrial controls. I tend to teach from a general science viewpoint.
This site has been up for about 18 years and covers a number of subjects broadly how to use the Arduino microcontroller and semiconductor components such as transistors, MOSFETs Zener diodes, op-amps, etc.
These are presented as information only - you assume all risk. Most voltages are under 24-volts. Read this safety warning.
New January 2024.
- Using TL431A Li-Ion Battery Charger Tutorials
- TL431A Lithium-Ion Cell Charging Circuits
- Charging Multi-Cell Lithium-Ion Battery Packs
- TL431 Over-Voltage, Under-Voltage Detector Circuits
- TL431A Constant Current Source Working Circuits Demo
- Power TL431 Constant Current Source Circuits
- TL431, LM317 Battery Charger Circuits Schematics
Related YouTube videos.
- TL431 Power Constant Current Source Demo 1
- TL431A Lithium-Ion Cell Charging Circuits
- TL431 Battery Charger Circuit Calculations Revised
- TL431 10-Volt Charger Short Version
- Charging, Charge-Balancing 18V Li-Ion Battery with TL431
- 18.5V Li-Ion Battery Charger with TL431 short version
- TL431 Under-Voltage, Over-Voltage Detection
- TL431 Constant Current Source Circuits
See my You Tube Videos page lists the over 206 videos on My YouTube Channel.
Here are quick navigation to the many parts I cover. These build on each other.
Quick Page Navigation of Topics
- H-Bridge Motor Controls
- Transistor Switching Circuits
- Power Supplies Projects
- Switching Power Supply Projects
- Battery Chargers with Arduino Controller
- Opto-Coupler, SCR, and Triac Circuits AC Power Control
- Zero-Crossing Detectors for AC Power Control with Arduino
- DIACs, SIDACs, and Unijunction Transistors Switching Circuits
- Xenon Flash Tube Circuits - High Voltage!
- Hall Sensors Circuits and Sensors for Magnetic Detection
- Comparator Circuit Examples
- Constant Current and Current Limiter Circuits
- Photo Diode Detector Circuits
- Digital Circuits and Projects
- Stepper Motor Operation and Control
- Radio, Odds and Ends Circuits
- Geiger Counters and Science Topics
- Popular Webpages & Corresponding Videos
My You-Tube Electronics Videos I have a YouTube channel with ~280 videos on electronics. The link are a list of the videos.
Here I demonstrate the use of four microcontrollers. Note the following links:
Arduino Microcontroller is the most popular hobby device programmed in C/C++. This is open source with a large community base. That is most of what I use. There are several variations.
Raspberry Pi is a small computer more powerful than a mere microcontroller. It is often operated with Linux running C or Python. It operates as a low-end PC. It has no connections for a hard drive or onboard clock. A solid state drive can be connected with separate hardware through a USB port. This also has programmable GPIO pins for connecting external hardware. I present many hardware and programming examples.
PICAXE Microcontroller is based on a Microchip PIC controller with a built-in basic interpreter. It is used for teaching beginning programming to students. I think it is the best for operating simple controls and easy to use. It have a much smaller community than Arduino. I present a number of circuit examples.
Using PC Printer Ports is section on how to connect electronics to a PC printer port. This can be programmed under Linux using a special type of Python or in C. The Linux desktops with this and Raspberry Pi are identical. Only the hardware interface differs.
PIC18F2550 is a powerful and complex controller produced by Microchip. This is programmed in C with Microchips MPLAB.
PIC16F628A and PIC16F84A are lower end Microchip controllers. They are easy to use but take more practical electronics skills. I program them in assembly with MPLAB and present a number of examples.
H-Bridge Motor Controls
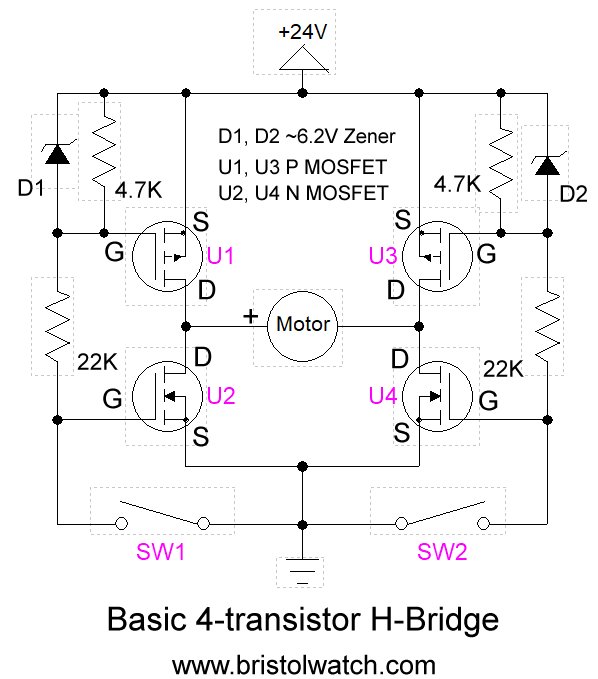
An H-Bridge, in general, is a 4-switch (often a type of transistor) circuit used to control the direction of a permanent magnet DC motor. Through the use of a microcontroller, speed and direction can be controlled.
In the illustration above, I used 4 MOSFETs (metal–oxide–semiconductor field-effect transistors) wired in an "H" configuration. These diagrams include bipolar transistors, IGBTs (insulated gate bipolar transistors), or combined devices.
With both SW1 and SW2 open, the two n-channel MOSFETs (U2, U4) are turned on, switching both sides of the motor to ground. The motor is off.
Press SW1 and U2 turns off, U1 turns on. This combination creates a current path from U1 through the motor to U4 to the ground. The motor rotates, say, clockwise.
Release SW1 and press SW2 U4 turns off, U3 turns on creating a current path from U3 to the motor to U2 to ground. The motor direction of rotation is reversed.
The circuit above has limited uses. Things get interesting when combined with a microcontroller or PLC (programmable logic controller)
I present many circuit examples using several devices. These are working circuits built and tested. These are tutorials, not commercial circuits.
- Build H-Bridge Motor Control with Power MOSFETS Updated
- Arduino Controlled IR2110 Based H-Bridge HV Motor Control
- All NPN Transistor H-Bridge Motor Control
- Build a Bipolar Transistor H-Bridge Motor Control
- Tri-State H-Bridge using CD4093B CMOS Circuit
- Simplified CMOS-MOSFET H-Bridge Circuit
- TA8050P H-Bridge Motor Control
- Alternate microcontrollers for an H-Bridge:
- Microchip PIC16F84A H-Bridge Motor Control
- Microchip PIC16F628A Basic H-Bridge Motor Control
- Connecting the PICAXE to a H-Bridge DC Motor Control
- IGBT Based High Voltage H-Bridge DC Motor Control
- High Voltage IGBT H-Bridge Circuit
- More circuits using mixed transistors.
- Tri-State H-Bridge Uses Optocoupler Voltage Isolation
- Driving Darlington Transistors with Optocouplers
- H-Bridge Schematic with MOSFET Outputs
- H-Bridge Schematic with Darlington-MOSFET Transistor Outputs
- H-Bridge schematic with Darlington-IGBT Transistor Outputs
- From Basic Digital Circuits to H-Bridge Motor Controls

Transistors used in these Projects
I present many transistor tutorials, including testing and comparing devices.
There are broadly two transistor types: MOSFET and bipolar. There is a third type known as an IGBT, a hybrid of MOSFET and bipolar. Another subtype of the bipolar transistor is the Darlington, used for high power gain.
There are important differences besides varying voltage and current ratings. Their operation differs: a MOSFET is voltage controlled; a bipolar transistor is current controlled.
An IGBT is voltage-controlled but acts as a bipolar transistor. We explore these circuits in detail.
- MOSFET transistor and IGBT transistor tutorials:
- Test Power MOSFET Transistors, IGBTs Results
- N-Channel Power MOSFET Switching Tutorial
- P-Channel Power MOSFET Switch Tutorial
- More Power MOSFET H-Bridge Circuit Examples
- High Voltage MOSFET Switching Circuits
- Insulated Gate Bipolar Transistor IGBT Circuits
- Issues on Connecting MOSFETs in Parallel
- Bipolar transistors:
- Basic Bipolar Transistor Driver Circuits
- Build a Bipolar Transistor H-Bridge Motor Control
- ULN2003A Darlington Transistor Array with Circuit Examples
- Tutorial Using TIP120 and TIP125 Power Darlington Transistors
- Driving 2N3055-MJ2955 Power Transistors with Darlington Transistors
- Understanding Bipolar Transistor Switches
- Design 10-Amp 2N3055 Based Power Switch
- Common Collector Opto-Isolated Bipolar Transistor Switches
- Compare 2N3055 MJE10005 Transistor Power Switches
- Opto-Isolated Transistor Drivers for Micro-Controllers
Transistor Driver Circuits
Broadly using low-voltage digital controls often can't directly operate high voltage and high power transistor circuits. So we use various forms of driver circuits.
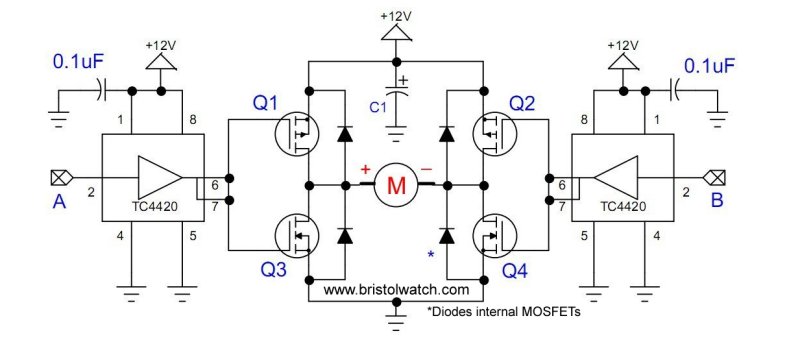
Small transistors can drive larger transistors. Opto-couplers can provide voltage isolation and can drive other transistors. We have circuits such as the TC4420 integrated circuits that can do both.
There is a separate section on optocoupler circuits below.
- MOSFET-Transistor Drivers with TC4420 and TC4429, IGBTs, etc.
- Introduction TC4420-TC4429 MOSFET Drivers
- Use TC4420 MOSFET Driver for Simple H-Bridge Circuit
- TC4420 MOSFET Driver Various Circuits
- TC4420 MOSFET Driver Replacement Circuits
- Optical Isolation of H-Bridge Motor Controls
- Opto-Isolated Transistor Drivers for Micro-Controllers
- Basic Bipolar Transistor Driver Circuits
- Test Power MOSFET Transistors, IGBTs Results, Observations
- High current TTL MOSFET Driver Circuit
- Insulated Gate Bipolar Transistor IGBT Circuits
- Optocouplers for TTL-CMOS Logic Level Shifting
- Insulated Gate Bipolar Transistor IGBT Circuits
- VOM1271 Photovoltaic MOSFET Driver Circuits
- Bidirectional Solid State Relay Circuits
- Simple Solid State Relay for Low Power LED 120V Lamps
- Build High Power MOSFET Directional Switch Relay
- Digital Circuits
- Basic TTL Tri-State Buffer Circuit Examples
- Tutorial NOR Gate SR Latch Circuits
- Tutorial NAND Gate SR Latch Circuit
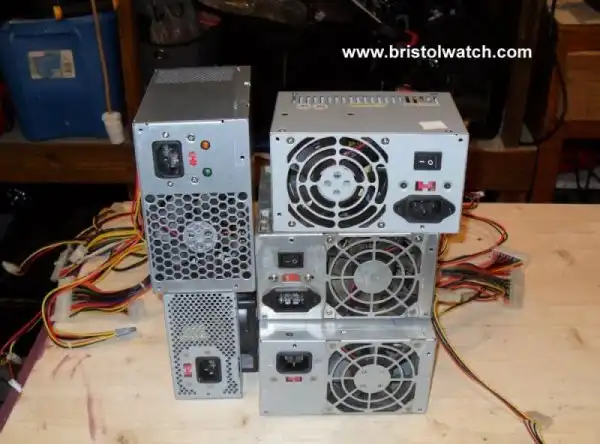
Test Reuse Surplus Personal PC Power Supplies
Power Supplies
Power supplies come in three types for the hobbyist: build, buy, or salvage. I address all of this.
- AC Power Supply Rectification
- Build an Adjustable 0-34 volt power supply with the LM317
- Transistor-Zener Diode Regulator Circuits
- Tips for the LM78XX Series Voltage Regulators
- Bi-Polar Power Supplies
- Connecting Series-Parallel Batteries
- Basic Power Transformers
- Connecting Transformers in Series-Parallel
- Voltage Buck-Boost Transformer Connections Tutorial
- Connecting Industrial Control Transformers Examples
Safety issues:
- Warning About Electrical Shock and How to Prevent It
- Load Lamp Safely Allows Safer Electronic Testing
- Build Autotransformer-Variac AC and DC Power Supply
- Build Autotransformer-Variac AC and DC Power Supply YouTube
Click for larger image.
Switching Power Supplies
- Operation switching power supplies and transformer connection tutorials:
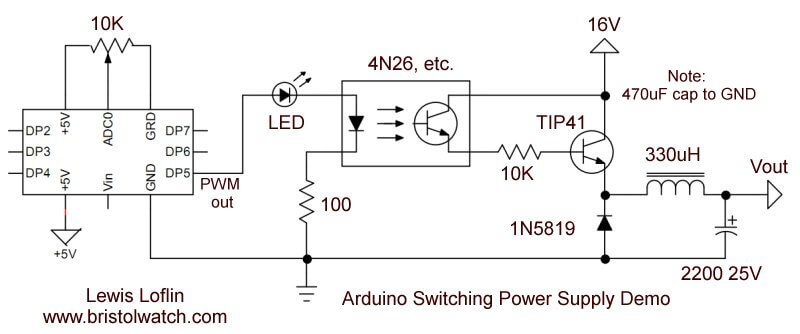
- Generating High Voltage with an Inductor
- Arduino Buck Switching Voltage Regulator Demo Only
- Switching Regular Configuration Review
- LM2575 Simple Switching Voltage Regulators
- Voltage Buck-Boost Transformer Connections Tutorial
- Test Reuse Surplus Personal PC Power Supplies
- Battery Charger related:
- Solar Panel Charge Controller Using Arduino
- Solar Panel Charge Controller Using PICAXE
- Solar Panel Battery Charge Controller Using Arduino
- Solar Panel Battery Charge Controller Switching Circuit
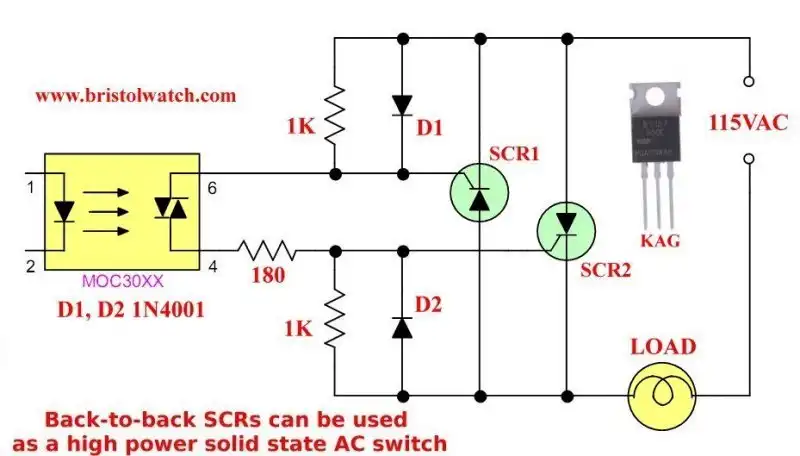
Single MOC3011 optocoupler triggers two SCRs.
Opto-Coupler, SCR, and Triac Circuits
SCRs and Triacs control AC and DC power systems from lamp dimmers to solid-state relays. A microcontroller such as Arduino using a zero-crossing detector can control AC power to control light levels, AC motor speed, and resistive heating elements.
More on power control below.
- Basic Triacs and SCRs
- Solid State AC Relays with Triacs
- Silicon controlled rectifiers (SCR) are gate switchable rectifier diode.
- AC Power Supply Rectification
- Silicon Controlled Rectifier Review and Circuits
- Silicon Controlled Rectifiers Connected as Power Triacs
- Simple Triac-SCR Test Lab for You Tube
- Light Activated Silicon Controlled Rectifier (LASCR)
- Light Activated SCR Based Optocouplers Circuit Examples
- Comparing Photo Triac, Photo SCR Opto-Couplers
- Light Activated SCR Based Optocouplers Circuit Examples
- Bidirectional Solid State Relay Circuits
- Build High Power MOSFET Bidirectional Switch Relay
- Tri-State H-Bridge Uses Optocoupler Voltage Isolation
- Current Limiter Circuits for Opto-Coupler Input LEDs
- Optocouplers for TTL-CMOS Logic Level Shifting
- MOSFET DC Relays Using Photovoltaic drivers
- H11L1, 6N137A, FED8183, TLP2662 Digital Output Optocouplers
- Optocoupler Input Circuits for PLC
- Solid state relays with optocouplers:
- Photo Voltaic Tutorial MOSFET Output Solid State Relays
- Connecting Crydom MOSFET Solid State Relays
- MOSFET DC Relays Using Photovoltaic drivers
- Exploring Solid State Relays and Control Circuits
- Bidirectional Solid State Relay Circuits
- Build High Power MOSFET Bidirectional Switch Relay
- VOM1271 Photovoltaic MOSFET Driver Circuits
- Bidirectional Solid State Relay Circuits
- Simple Solid State Relay for Low Power LED 120V Lamps
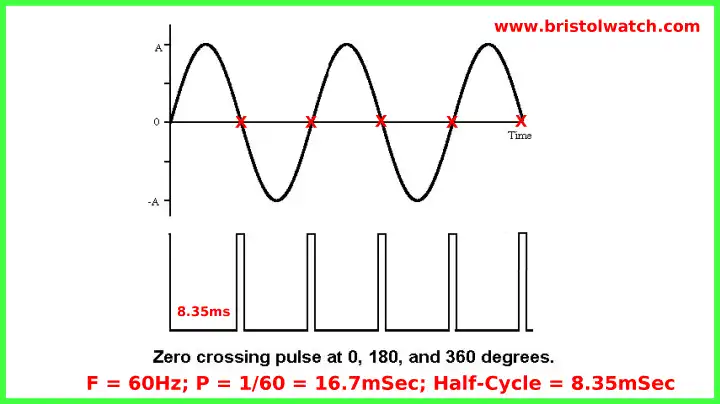
Zero crossing pulse from 4N25 optocoupler in relation to AC sine wave.
A zero-crossing detector produces a pulse at the beginning of every half-cycle in an AC sine wave. For 60Hz, this is 120 pulses per second. Then we use a microcontroller to phase control the power.
- Arduino AC Power Control Using Interrupts
- Hardware Interrupts Demo and Tutorial for Arduino
- In Depth Look at AC Power Control with Arduino
- AC Zero Crossing Detectors for Arduino
- Zero-Crossing Detectors Circuits
- LM555-NE555 One-Shot Multivibrator AC Power Control

DIACs, SIDACs, and unijunction transistors are in the SCR-TRIAC family but are used for triggering and as oscillators.
DIACs, SIDACs, unijunction transistors, xenon gas-discharge tubes, and NE-2 neon lamps display a property known as "negative resistance." They all can generate switching electrical pulses.
- Neon (NE-2) Circuits You Can Build
- New: Simple DIAC Based Relaxation Oscillator Pulse Generator
- Diac Waveform Generator, Trigger Circuits
- New: How to use SIDACs and Their Operation
- SIDAC Operation and Trigger Circuits
- Understanding Unijunction Transistors Theory Operation
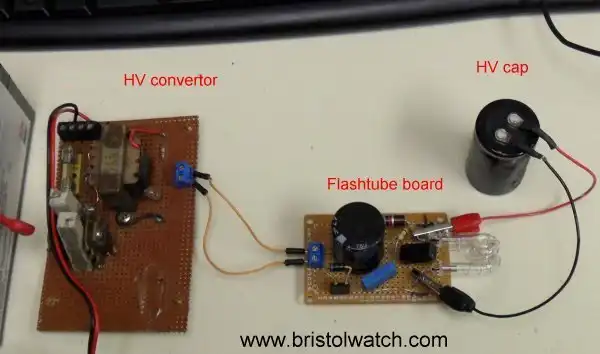
My experimental flashtube test setup.
Xenon photoflash tubes create a bright flash in cameras, strobe lights, etc., in conjunction with SCR, SIDAC, and DIAC circuits.
Caution: xenon flash tubes are high-voltage devices, often 300V DC.
- Understanding Xenon Flashtubes and Circuits
- Unijunction Transistor SCR Photo Flash Control Circuit
- SIDAC Controlled Flashtube and Pulse Circuits YouTube
- Simple 12-14 Volt DC to High Voltage AC Inverter for Flashtubes
- How a Voltage Doubler Circuit Works
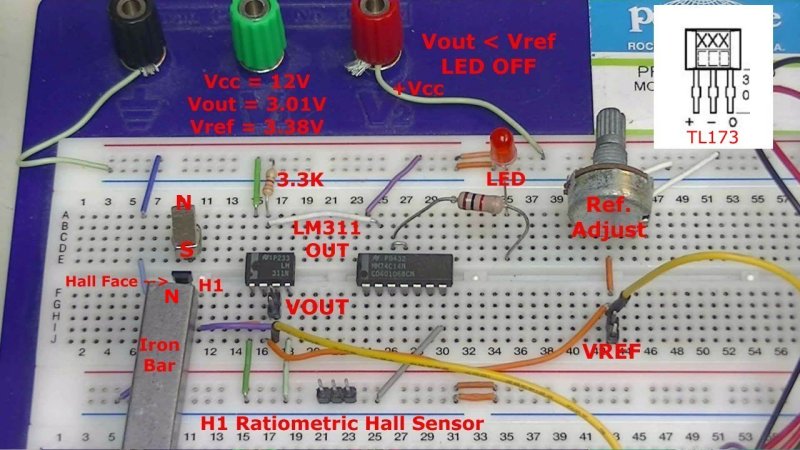
Experimental ratiometric Hall-sensor comparator circuit on prototyping board
Hall Sensors
A Hall sensor is an analog integrated circuit in its most basic form. It consists of a Hall plate that outputs a "transverse" voltage based on the intensity of a magnetic field - polarity is dependent on magnetic polarity.
It also consists of a high gain differential amplifier because the generated voltage is small. The output voltage is analog, usually centered around half the power supply voltage.
The addition of a Schmitt trigger with a properly set hysteresis will create a Hall switch or Hall latch. They often have an open collector output transistor.
New video 6/8/2022 Basics of Hall Effect Analog Sensors & Switches
- Hall Effect Magnetic Switches and Sensors
- Hall Sensor Circuits, Theory, Operation Updated 2022
- How Hall Effect Sensors Detect Ferrous Metals
- Exploring Omni Hall Effect Sensors with the TI DRV5032
- LM311 Comparator Projects Using Hall Sensors
- YouTube videos:
- Basic Hall Effect Sensors YouTube
- Hall Effect Sensor Circuits YouTube
- Basics of Hall Effect Analog Sensors & Switches Pt. 1
- Operate, Build Hall Effect Switch Pt. 2
- Hall Effect Latches Theory and Circuits Pt. 3
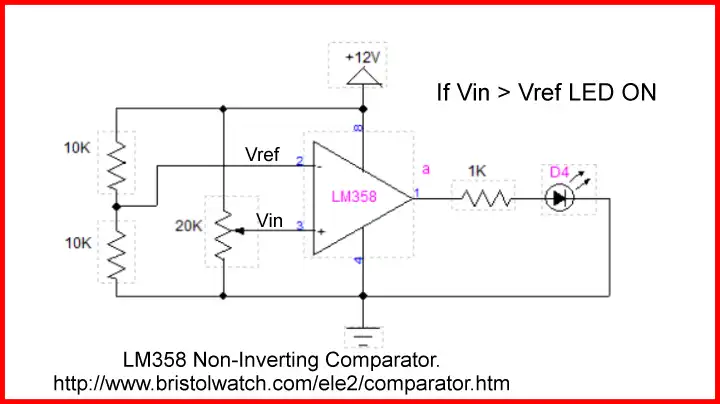
Comparator Circuits
The Schmitt triggers used here are based on an analog comparator. These can use operational amplifiers (op-amps) such as the LM358 or LM741.
Or one can use the LM311 comparator or LM339 quad comparator. They have open collector outputs unlike the LM358 or LM741 op-amps.
A comparator "compares" two analog voltages and turns on-off based on their voltage levels.
Often considered "digital" at this point, we have, in reality, a one-bit analog-to-digital converter.
- Comparator Circuits:
- Comparator Theory Circuits Tutorial
- Comparator Hysteresis and Schmitt Triggers
- Voltage Comparator Information And Circuits
- Looking at Window Comparator Circuits
- Analog Battery Charger Uses Comparators
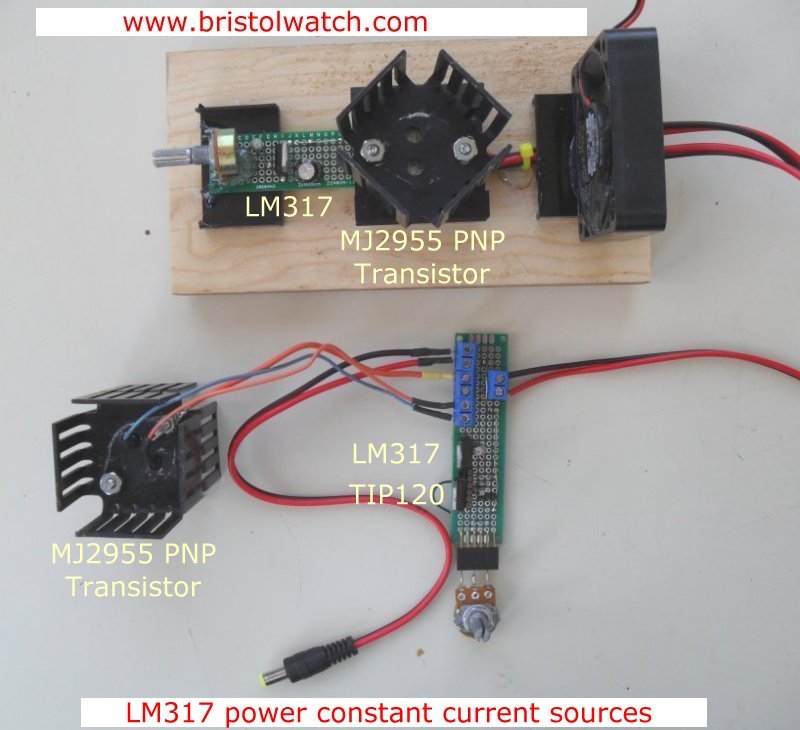
LM317 power constant current control.
Constant Current or Current Limiter Circuits
The TL431A, The LM317, and LM334 are power and inexpensive current regulators used for lighting LEDs, controlling battery charger current, etc.
The LM317 and related parts are used in low-voltage DC power supplies.
- TL431A Lithium-Ion Cell Charging Circuits
- Charging Multi-Cell Lithium-Ion Battery Packs
- Related YouTube video TL431A Lithium-Ion Cell Charging Circuits
- Related YouTube video TL431 Battery Charger Circuit Calculations Revised
- Related YouTube video TL431 10-Volt Charger Short Version
- Experiments with TL431 Shunt Regulator
- TL431 Precision Current Regulator Circuits
- TL431 Based Current Limiter Constant Current Source Circuits
- TL431 Shunt Regulator Circuits
- TL431A Lithium-Ion Cell Charging Circuits
- Charging Multi-Cell Lithium-Ion Battery Packs
- Constant Current Source Theory Testing
- Arduino Controlled Power Constant Current Source
- Constant Current Circuits with the LM334
- LM334 CCS Circuits with Thermistors, Photocells
- LM317 High Power Constant Current Source Circuit
- LM317 Constant Current Source Circuits
- LM317 Adjustable Voltage Source Current Boost
- LM317 Constant Current Source for Lighting LEDs
- 3 Amp LM741 Op-Amp Constant Current Source
- Current Limiter Allows Safe Testing of Zener Diodes, LEDs
- Microcontroller controlled CCS New:
- Ohm's Law Review for Constant Current Source YouTube
- Arduino Controlled Power Constant Current Source
- Arduino Microcontroller Measures CCS Current
- Constant Current Source Multimeter Trouble Shooting YouTube
- Arduino Controlled Constant Current Source
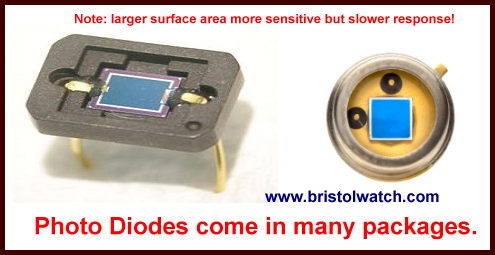
- Photo Detector Devices:
- LM334 CCS Circuits with Thermistors, Photocells
- Photodiode Circuits Operation and Uses
- Photodiode Op-Amp Circuits Tutorial
- Photo Voltaic Tutorial MOSFET Output Solid State Relays
- YouTube:
- Photodiodes and How they Work
- Photodiode Op-Amp Circuits
- Using Photovoltaic MOSFET Drivers
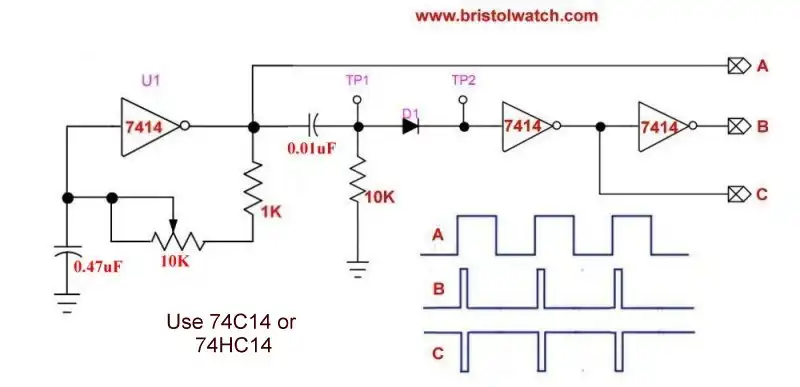
SN74HC14 based square wave generator with differentiator circuit.
- Digital Circuits:
- Simple Schmitt Trigger SN74HC14 Square Wave Generator
- Introduction to RC Differentiator Circuits and Uses
- SN74HC14 Square Wave Generator uses SN7476 JK Flip-Flop
- Three Output Digital Pulse Generator
- Astable CD4047 Geiger Counter Power Supply
- CD4047 Monostable Multivibrator Circuit
- Basic TTL Tri-State Buffer Circuit Examples
- Tutorial NOR Gate SR Latch Circuits
- Tutorial NAND Gate SR Latch Circuit
- Tutorial OR-NOR Circuits Monostable Multivibrator
- Tutorial of XOR and XNOR Logic Gates
- LM555-NE555 One-Shot Multivibrator AC Power Control
- DS1307 RTC with a CD4040 as a Precision Time Base
- CD4040 12-stage Binary Counter with DS1307 RTC Time Base
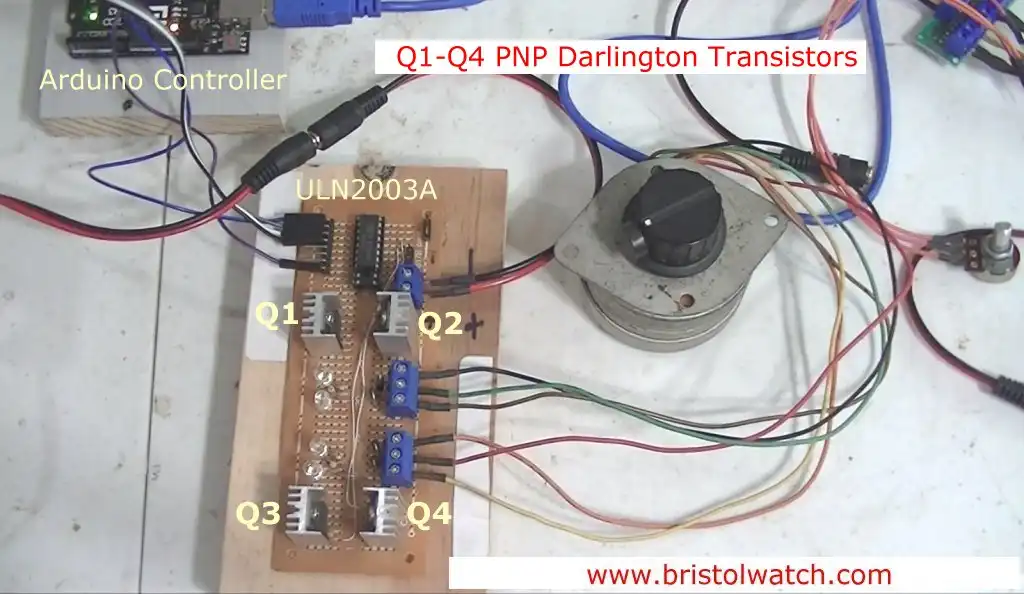
Fig. 1 Arduino with unipolar stepper driver control board.
Click for larger image.
Stepper Motor Circuits
- Arduino Stepper Motor Drive Coil Winder
- TB6600 Stepper Motor Driver with Arduino
- Arduino Power Magnetic Driver Board for Stepper Motors
- Easy Driver Micro-Stepper Controller to Arduino
- Unipolar Stepper Motor with a Arduino
- MC3479 Stepper Motor Controller with Arduino
- Considerations for Using Stepper Motors
- Connecting the Arduino to a L298N H-Bridge
- L298N Motor Controller Theory and Projects
- TA8050 H-Bridge Motor Controller
- You Tube:
- Arduino Unipolar Stepper Motor Driver Board with Arduino Code YouTube
- YouTube: Arduino stepper motor coil winder
- YouTube: Arduino Stepper Motor Tutorial
- YouTube: PNP Darlington Stepper Motor Driver
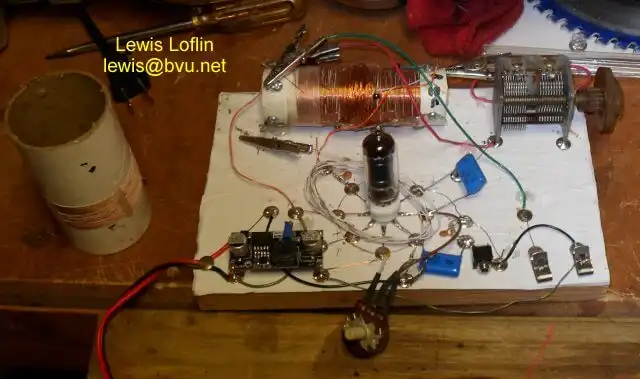
Actual constructed radio on wooden board.
Radio Circuits, Misc.
- Build 12AV6 Vacuum Tube AM Radio
- Coils for Highly Selective Crystal Radio
- Add Push-Pull Output Stage LM386 Audio Amplifier
- Arduino Stepper Motor Drive Coil Winder
- You Tube Videos
- 12AV6 Vacuum Tube Radio with LM386 Power Amplifier
- Grid-Leak Detector Low Voltage Vacuum Tube Radio
- Arduino DC-AC Power Inverter
- Arduino PWM to Analog Conversion
- Arduino Analog Digital Conversion Voltmeter
- Rotary Encoder Using Arduino Hardware Interrupts
- Better Arduino Rotary Encoder Sensor
- 3-Wire MAX6675 Thermocouple ADC Arduino Interface
- Review Ohm's Law for Trouble-Shooting CCS Circuits
- Theory and Operation of Capacitors
- Basic Magnetics and Analog Volt and Amp Meters (pdf)
- Basic DC and Ohms Law (pdf)
- Basic Light Emitting Diodes (pdf)
- LM2575 Simple Switching Voltage Regulators
- Simple 2 Transistor LED Flasher Circuit
- Generating High Voltage with an Inductor
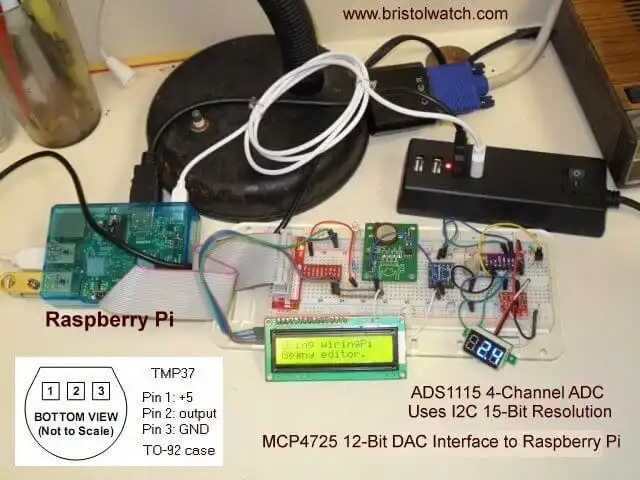
Fig. 1
Arduino Micro-controller Projects
Arduino Microcontroller Projects presents many tested projects and examples for Arduino. The emphasis is hardware control which suggests one has an electronics background. Having a background in digital logic and binary code is also helpful. The projects will explain this as needed.
What differs here is I avoid the use of Arduino-only code and code libraries to port the basic code algorithm to Python, PICAXE basic, or Microchip PIC C.
See Arduino Projects Hobby Projects Tutorials.
- Connecting PCF8574P GPIO Expander to Raspberry Pi
- Programming PCF8574P 8-bit I-O Expander with PICAXE, Arduino
- Interfacing Microcontrollers to CMOS and MOSFET Circuits
- Arduino
- Arduino PWM to Analog Conversion
- Arduino Analog Digital Conversion Voltmeter
- Better Arduino Rotary Encoder Sensor
- Simple 3-Wire MAX6675 Thermocouple ADC Arduino Interface
- Arduino IR2110 Based H-Bridge HV Motor Control
- Arduino Measures Constant Current Source
- Arduino Controlled Constant Current Source
- Magnetic Driver Board for Stepper Motors
- Microcontroller controlled CCS New:
- Constant Current Source Theory Testing YouTube
- Constant Current Source Multimeter Trouble Shooting YouTube
- Arduino Controlled Constant Current Source YouTube
- Arduino
- Arduino DC-AC Power Inverter
- Arduino PWM to Analog Conversion
- Arduino Analog Digital Conversion Voltmeter
- Rotary Encoder Using Arduino Hardware Interrupts
- Better Arduino Rotary Encoder Sensor
- 3-Wire MAX6675 Thermocouple ADC Arduino Interface
- Arduino Stepper Motor Drive Coil Winder
- TB6600 Stepper Motor Driver with Arduino
- Considerations for Using Stepper Motors
- Connecting the Arduino to a L298N H-Bridge
- L298N Motor Controller Theory and Projects
- TA8050 H-Bridge Motor Controller
- PCA9555 32-Bit GPIO Expander with Arduino
- PCA9555 GPIO Arduino, 4X4 Keypad
- PCA9555 GPIO Arduino Using Interrupts
- PCA9555 GPIO, Arduino, LCD Display
- Arduino TMP37 Temperature Sensor I2C Display
- Arduino TMP37 Temperature Sensor Tutorial
- Arduino uses ADS1115 with TMP37 to Measure Temperature
- Arduino IF Statement Code Examples
- Arduino LCD Display, 74164 Shift Register
- Programming ADS1115 4-Channel I2C ADC with Arduino
- Arduino with MCP4725 12-bit DAC Demo
- Digispark ATtiny85 with MCP23016 GPIO Expander
- Safely Build Program a H-Bridge
- Build H-Bridge Motor Control Without Fireworks
- MOSFET H-Bridge for Arduino 2
- Arduino Port Registers Revisited
- Pulse-Width Modulation Tutorial
- Arduino and MM5451 LED Display Driver
- Arduino and the 74HC595 Serial Shift Register
- Arduino IF Statement Code Examples
- Arduino Solid State Relay Motor Enable Control
- Arduino XOR Blinks LED
- Arduino Projects Revisited Revised
- Programming ADS1115 4-Channel I2C ADC with Arduino
- Arduino uses ADS1115 with TMP37 to Measure Temperature
- Connect Arduino to I2C Liquid Crystal Display
- Arduino Reads Temperature Sensor Displays Temperature on LCD Display
- Arduino with MCP4725 12-bit Digital-to-Analog Converter Demo
- Videos
- Arduino with ADS1115 4-Channel 16-bit Analog-to-Digital Converter
- Arduino with MCP4725 12-Bit DAC
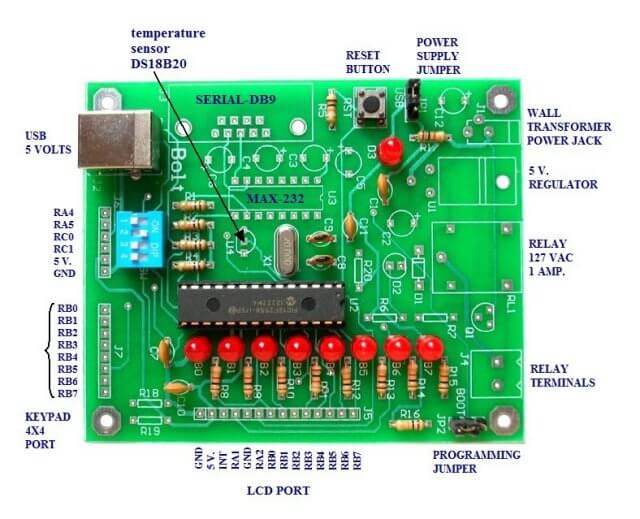
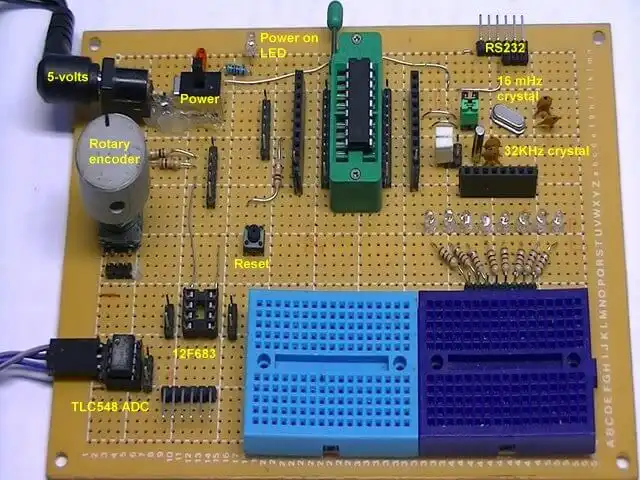
Microchip PIC Projects PIC18F2550, PIC16F628A, PIC12F683
Microchip PIC18F2550 projects are based on the BOLT system board but can be used without it. Centered on the PIC18F2550 is programmed in C like Arduino and the programs are often interchangeable. I present a lot of code examples.
Also included in that section is assembly language projects for the PIC PIC16F628A and PIC12F683. While cheap and versatile controllers there's a steep learning curve in using assembly.
Introduction to PIC12F683 Programming
- Main Pages for PIC:
- PIC18F2550 Main Page
- PIC16F628A Main Page
- PIC12F683 Microcontroller Circuits YouTube
- PIC12F683 Microcontroller and Circuits
- Introducing the BOLT PIC18F2550 Microcontroller Board
- PIC18F2550 BOLT with Serial LCD Display
- Using the MAX7219 with the 18F2550 Programs:
- MAX7219 Display Driver and a PIC Micro Controller
- MAX7219 Display Controller in the Non-Decode Mode with PIC
- Programming:
- Working with Pulse-Width Modulation and the PIC Microcontroller
- Using TMR0 and Interrupts on the PIC18F2550
- YouTube Videos:
- My YouTube Channel
- MAX7219 display controller with 8X8 LED Matrix
- Programming the MAX7219 and 7-Segment Display
- Connecting PIC18F2550 to Parallel LCD Display
- Connecting PIC18F2550 to Serial LCD Displays
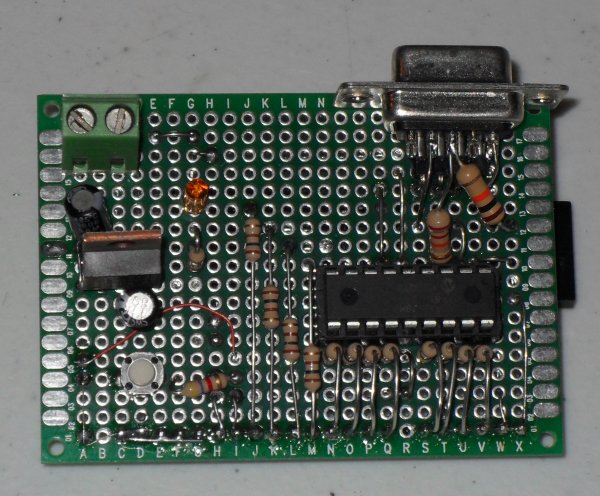
Home built PIC16F628A and PIC16F84A prototyping board.
Start here: Introduction PIC12F683 Programming Circuits Tutorial
I own and have used the K150 programmer and the Velleman K8048 PIC Development Board.
The Velleman K8048 PIC Development Board is available from Amazon. It requires assembly (soldering) and uses a standard PC serial port (or USB adaptor), plus a 15-volt power supply is not included. It will program 8, 16, 18, and 28-pin PIC controllers.
Need help or have questions email me at lewis@bvu.net.
- Microchip PIC related videos:
- Using Velleman K8048 PIC Development Board
- How to Use K150 PIC Programmer
- Microchip PIC16F628A Basic H-Bridge Motor Control
- Microchip PIC16F628A Counts BCD on 8 LEDs
- PIC16F84A Operates H-Bridge Motor Control
- PIC16F84A Operates MOSFET H-Bridge
- Assembly language examples using PIC16F628A:
- Exploring the Microchip PIC in Assembly
- Using a Microchip PIC with TLC548 Serial ADC
- Controlling PIC Pulse Width Modulation with a Serial ADC
- Using TMR0 on a PIC with Interrupts
- External Clock Crystal with PIC16F628 TMR1 Generates Interrupt
- PIC Using Rotary Encoder to Operate Stepper Motor
- PIC16F628 Pulse Width Modulation Controls Brightness of LED
- Another way to Turn On-Off PWM in a PIC
- Microchip PIC16F628A Basic H-Bridge Motor Control
- Assembly language examples using PIC16F84A:
- Programming PIC16F84A-PIC16F628A Interrupts by Example
- PIC16F84A-PIC16F628A Pull Up Resistors with Interrupts
- Programming PIC16F84A-PIC16f628a Timers by Example
- Programming PIC16F84A-PIC16F628A TMR0 Interrupts
- Programming PIC16F84A Software Delay Routines by Example
- Microchip PIC16F84A H-Bridge Motor Control
Home built PICAXE prototyping board.
PICAXE Microcontroller Projects
The PICAXE Microcontroller I use is the medium-range PICAXE-18M2. While built hardware-wise on a Microchip PIC controller, it has an easy-to-learn built-in proprietary basic. PICAXE is for students rather than serious, commercial applications.
The PICAXE series of micro-controllers rank as the easiest and most cost-effective way to use Microchip processors. I wanted an easier and less expensive way to introduce my students to the "PIC" microcontroller. I plan to get those starting past poorly written literature and lack of simple working code examples.
- PICAXE Operates H-Bridge Motor Controller
- PICAXE Microcontroller Controls Motor Speed - Direction
- PICAXE Projects
- Video: DC Motor Control with PICAXE
- Connecting the PICAXE to a H-Bridge DC Motor Control
- Exploring the PICAXE Micro-Controller
- PICAXE and a Dallas DS18B20 1-Wire Digital Thermometer
- Connecting the Dallas DS18B20 1-Wire Digital Thermometer to the PICAXE
- Understanding Micro-Controller Input/Output Ports
- Using the 74HC165 Shift Register with the PICAXE Micro-Controller
- Connecting the 74HC595 Shift Register to PICAXE Micro-controller
- Using 7-Segment Displays with the PICAXE Micro-Controller
- Potentiometers and Analog-to-Digital Conversion with the PICAXE
- PWM Motor Speed Control and the PICAXE Micro-Controller
- Connecting the PICAXE to the Ds1307 Real Time Clock
- Connecting the PICAXE to an External EEPROM (24LC08)
- Connecting a Servo to a PICAXE
- Connecting the TLC548 ADC to the PICAXE
- Connecting the AD5220 Digital Potentiometer to the PICAXE
- Solar Panel Charge Controller Using PICAXE Microcontroller
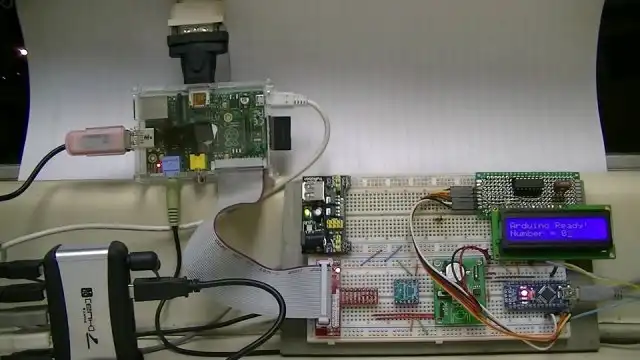
Raspberry Pi to Arduino interface.
Raspberry Pi and Linux
Raspberry Pi is an ARM processor-based mini Linux computer clone. It has addressable hardware IO for connecting external circuitry. These projects are in Python, a high-level interpreted language finding many modern applications.
Currently, there are four models, with the Model 4 being the most powerful.
I have interfaced a Raspberry Pi 1 to an Arduino microcontroller, DS1307 RTC, and LCD in the above image. The pages below cover all of this.
The Linux desktops I use is Openbox-LXDE or Openbox.
Note Openbox is not a complete desktop but a window manager. Additional programs are required. They must be set up individually.
I design these for speed and function. I remove slow and bloated programs.
- Software and setup:
- Raspberry Pi Openbox Desktop 2019
- Setting up Openbox for Raspberry Pi
- Add Solid State Hard Drive to Raspberry Pi
These are mostly sensors connected through the I2C protocol. While digital themselves, they can measure analog sensors. I programmed the above Arduino controller to operate as an I2C slave device.
- Interface I2C LCD to Raspberry Pi in C
- ADS1115 4-Channel ADC Uses I2C with Raspberry Pi
- MCP4725 12-Bit DAC Interface to Raspberry Pi
- Raspberry Pi with PCF8591 Analog To Digital Control in C
- Raspberry Pi PCF8591 AD-DA Sensor Python Interface
More software for Raspberry Pi:
- Add WBAR Launch Dock to Raspberry Pi
- Add MPG123 Terminal Music Player to Raspberry Pi, Linux
- Basics of Alsamixer Audio Control for Linux
- Using FEH Wallpaper Setter Under Linux
- Scrot Lite Weight Screen Shot Software for Linux
- Using Light Weight Beaver Text Editor
- Install Viewnior Image Viewer for Linux
- Zmixer ALSA Sound Control Tutorial
- Tutorial Xinitrc Desktop Manager Control for Linux
- Setup Raspberry Pi Using JWM Window Manager
- Using the powerful Rox-Filer system in Linux
- Use FEH under Linux for a Wallpaper Setter
- How to create Symbolic links in Linux
- Raspberry Pi USB Audio Connection
- WiringPi for Raspberry Pi and MAX6675 thermal-couple sensor
- WiringPi Blink an LED Demo
- WiringPi and Pulse-Width-Modulation with Raspberry Pi
- Raspberry Pi and a MM5451 LED Display Driver
- Raspberry Pi MM5451 LED Display Driver YouTube
- Raspberry Pi RTC with MAX7219 Display Driver
- Raspberry Pi Python RTC with MAX7219 Display Driver YouTube
- Raspberry Pi 8-Digit LED MAX7219 Display Driver
- Raspberry Pi and the 74HC595 Serial Shift Register
- Programming Raspberry Pi 74HC595 Serial Shift Register YouTube
- Raspberry Pi and Arduino
- Connect Serial LCD to Raspberry Pi
- Serial Read from Arduino to Raspberry Pi
- Arduino Raspberry Pi Interface with LCD Display
- Connecting Raspberry Pi to Arduino with I2C Interface
- Connecting Raspberry Pi to Arduino with I2C Interface
Connecting PC Printer Port to External Electronics
- Exploring Digital Computer Electronics
- Hardware
- Hardware Review Connecting PC Parallel Ports
- Operation TB6600 Stepper Controller with PC Parallel Port
- Build or Buy Parallel Port Breakout Board?
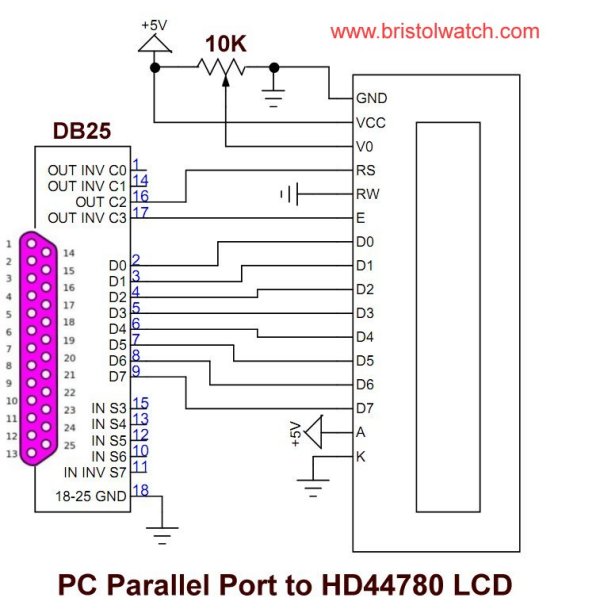
- Build Serial HD44780 LCD Display Connect to Parallel Port
Below are listed projects using pyparallel and electronics. We will use a common PC printer port to learn basic Python and electronics interfacing. Starting with routines I wrote to aid students; I'd advise walking through this in sequence. Have fun, and send comments or corrections to lewis@bvu.net.
Connecting a PC Printer Port to Electronics with Python is closely related to Raspberry Pi. It, too, is a nearly identical Linux system but differs in being designed to use a hardware printer port as I-O to connect electronics projects. The projects here, too, are in Python and, with modifications, will work on Raspberry Pi and vise-versa.
It differs in I never bothered to set up the I2C interface found in Raspberry Pi; instead interfaced an Arduino to better handle low-level electronics.
Now available for download is a custom live Linux distribution to use a PC printer port for electronics control - without installing or altering the PC.
See Live Linux Distro for Using Printer Port with Electronics
- Introduction to Python Bitwise Operations
- Python Bitwise Operations by Example
- Using the PC Printer Port series:
- Programming the PC Printer Port in Python
- Additional Commands for Pyparallel
- Controlling Data Bits on the PC Parallel Port
- Connecting Switches to the PC Printer Port with Python
- Reading an Analog Voltage Through the PC Printer Port Part 1
- Reading an Analog Voltage Through the PC Printer Port Part 2
- Controlling a Serial LCD Display on a PC Printer Port with Python
- Serial ADC and LCD Display with PC Printer Port with Python
- Controlling MAX7219 LED Display with PC Printer Port with Python
- MAX7219 8-Digit LED Display and Serial ADC in Python
- Project pages:
- Part 1: Read Arduino with PC Printer Port
- Part 2: Better way to Read Arduino Through the PC Printer Port
- Part 3: Read-Write an Arduino Through a PC Printer Port
- Part 4: Control LCD Display and Arduino from the PC Printer Port
Printer Port Projects Main Page
- Videos:
- Connect Electronics to PC printer Port with Python
- Setup PC Printer Port with Python-Linux
- Use PC Printer Port to Read Analog Voltage
- Read-Write Arduino ADC PWN with Printer Port
- Printer Port to Serial LCD Display
- Connect Arduino to PC Printer Port for advanced control
- Live Linux Distro for Using Printer Port with Electronics
- Using the powerful Rox-Filer system in Linux
- Use FEH under Linux for a Wallpaper Setter
- How to create Symbolic links in Linux
- Motherboards
- Presario 1999 CM1001 Gaming Computer Salvage
- Live Test 2002 VIA EPIA-800 Mini ITX Motherboard
- Salvage, Test 2012 AAEON EMB-B75A Industrial Motherboard
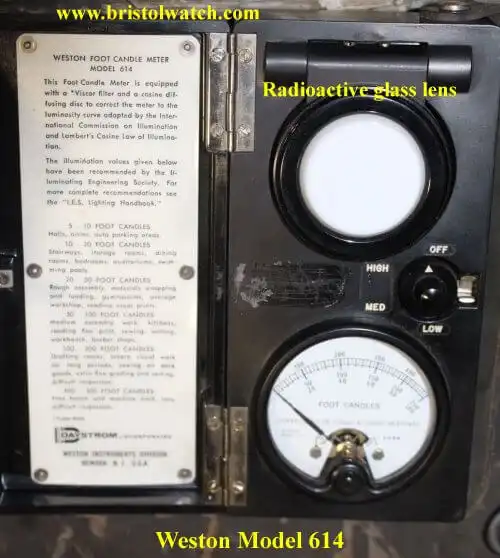
Weston Model 614 light level meter
has radioactive thorium glass lens.
Click for larger picture.
- Geiger Counter and Radioactivity
- Introduction to Geiger-Mueller Counters and Electronics
- Getting Real About Radiation Myths and Hazards
- Uranium Hype-Facts and Virginia Uranium
- Uranium Basics and Isotopes
- Climate Change and Volcanoes
- Videos:
- Reality of Recycling Low-Value Ewaste
- Magnetron Operation and Free Magnets
Popular Webpages & Corresponding Videos
- Hall Effect Magnetic Switches and Sensors
- Basic Hall Effect Sensors Video
- Opto-Isolated Transistor Drivers for Micro-Controllers
- Opto-Couplers Theory and Circuits Video
- H-Bridge Motor Control with Power MOSFETS Updated
- Build Power MOSFET H-Bridge for Arduino YouTube Video
- LM317 High Power Constant Current Source Circuit
- Adjustable LM317 High Power Current Source Video
- ULN2003A Darlington Transistor Array with Circuit Examples
- ULN2003A Transistor Array with Arduino Video
- Constant Current Circuits with the LM334, LM317
- Constant Current Source Tutorial YouTube Video
- N-Channel Power MOSFET Switching Tutorial
- P-Channel Power MOSFET Switch Tutorial
- Using Power MOSFETs with Arduino YouTube Video
- Zero-Crossing Detectors Circuits and Applications
- Zero-Crossing Circuits for AC Power Control Video
- In Depth Look at AC Power Control with Arduino
- Micro-controller AC Power Control Using Interrupts
- YouTube Video for Arduino AC Power Control Video
- All NPN Transistor H-Bridge Motor Control
- All NPN Transistor H-Bridge Motor Control YouTube
- Videos:
- Why Your MOSFET Transistors Get Hot Video
- H-Bridge Driving Large Motor Video
- Issues on Connecting MOSFETs in Parallel Video
- Simple Circuits for Testing MOSFET Transistors Video
- Off Site:
- Bristolblog an Alternative News Skeptic Site
- Web Master
- Tri-Cities VA-TN
- General Science
- US Constitution
- Christianity 101
- Religious Themes
Web site Copyright Lewis Loflin, All rights reserved.
If using this material on another site, please provide a link back to my site.