 Fig. 1
Arduino IF Statement Code Examples
by Lewis Loflin
Video for this page: Arduino Comparison IF Operators
Think of a micro-controller as a box full of basic logic circuits, gates, etc. To control the "box" we have to tell it what hardware to use. We must tell the "box" how to manipulate the gates and hardware. that is what machine code does.
I am using compiler Arduino-1.6.3. Results may vary with other compilers or a non-Nano Arduino board.
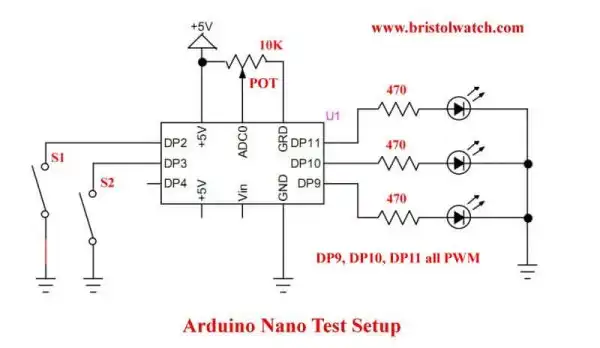
Fig. 1 shows the test setup for this series, in this case an Arduino Nano. I'll assume one can program their Arduino board. The Nano and most Arduino boards today have an LED on digital pin 13 (DP13).
The use of the I2C LCD display is optional but makes understanding the process easier.
This uses three LEDs on DP9, DP10, DP11. Two normally open push button switches are connected to DP2 and DP3 to ground. Internal pull ups are used - switch closed reads as false or 0. Instead of constantly typing digitalRead(PIN) I created subroutines S1() and S2().
If either S1() or S2() are called a closed switch returns 1 or open switch returns 0 - they also update the LCD display. I also wrote a subroutine called POT() that returns an value of 0-1023 from the potentiometer connect to analog pin 0.
The full set up for the above diagram is presented at the bottom of the page. This can be cut and pasted directly to your Arduino compiler.
In the electrical sense a HIGH or 1 is 5-volts; a LOW or 0 is 0-volts or ground.
And "true" can be replaced by "1" or any non-zero number; "false" can be replaced by "0". We are concerned with the following:
Comparison Operators
== (equal to)
!= (not equal to)
< (less than)
> (greater than)
<= (less than or equal to)
>= (greater than or equal to)

Boolean Operators
&& (and)
|| (or)
! (not)
From here on I'll address only the code within loop().
void loop() {
  delay(100);

  if ( S1() ) digitalWrite(LED1, 1);
  else digitalWrite(LED1, 0);

}
Test 1
Note: true = 1; false = 0.
Or should I say any value except 0 is TRUE.
Note the code above. An "if" statement has the general form of:
if (condition) light_led1;
else turn_off_led1;
The "else" part is optional. "Condition" is boolean term using "true" or "false" A "true" condition lights LED1, a "false" condition turns LED1 OFF.
The Arduino compiler defines "true" as the word "true", the number 1, or any non-zero number. The compiler defines "false" with the word "false" or the number 0.
The code above calls function S1(). If the switch on DP2 is open it returns 0 or false - thus "else" is executed and LED1 is turned OFF. LED1 is only ON while S1 is pressed by returning a 1 when called.
void loop() {
  delay(100);

  if ( S1() ) digitalWrite(LED1, 1);
  if ( S2() ) digitalWrite(LED1, 0);

}
Test 2
What if we want to press one switch (S1) to turn LED1 ON, then another (S2) to turn LED1 off? We must leave out the else part of the "if" function and use another "if" function.
Understand "if ( S1() )" is understood to be "if ( S1() == 1 )" On every iteration of "loop" S1() is called and returns a 1 (true) or 0 (false).
Another way to write this to do the very same thing is "if ( !S1() )" will turn OFF LED1 when pressed, ON when released.
The "!" means a logical NOT. A true is changed to false, a false is changed to true. What was "false" before keeping LED1 OFF is now "true" leaving it ON.
A logical NOT is the same thing as a bitwise XOR. if ( S1() ^ 1 ) is the same as if ( !S1() ).
Note the above code snippet.
Press S1 LED1 turns on and stays on. Press S2 and LED1 turns off and stays off. (This could also be a motor control for example.) In each case pressing S1 or S2 returns a 1 or 0; the "if" command does the rest.
Another note is the () must be used properly and in sets of 2.
void loop() {

  if ( S1() )   {
    byte temp = digitalRead(LED1);
    temp = !temp; // temp ^ 1
    digitalWrite(LED1, temp);
  } // end if

} // end loop
Test 3
In test 2 I used 2 switches to control 1 LED. What if I have only 2 switches and must control 2 LEDs? Now is time for electronics.
The LED IO pins were programmed as OUTPUT back in setup(). A digitalWrite() sends either a HIGH or 1 to the pin switching it to 5 volts turning the LED ON. A 0 or LOW switches the pin to ground turning OFF the LED. This 0 or 1 bit is stored in a hardware "latch" circuit connected to physical pin the LED is connected to.
Even if a pin is programmed as an output with pinMode(), digitalRead() can read the latch value returning a 1 or 0. Let's walk through the above code snippet.
Line 1 " if ( S1() ) {" is our "if" function plus an opening "{". 6 lines down is " } // end if" closing brace. This is needed are multiple commands are used is S1() is true.
There must always be a closing curly brace for every opening curly brace.
It is a good idea to label all closing braces to keep down confusion.
Line 2 "byte temp = digitalRead(LED1);" reads the latch pin state for LED1. This 1 or 0 is stored in the variable temp.
Line 3 " temp = !temp; // temp ^ 1". !temp will NOT or invert the value of temp. 1 becomes 0, 0 becomes 1. This is the same as temp = temp ^ 1.
Line 4 " digitalWrite(LED1, temp);" will write the opposite or inverted latch value back to the LED1 latch. Let us look closer at lines 1-4.
Line 2 could be rewritten as follows leaving out the need for line 3:
byte temp = !digitalRead(LED1);
One can NOT the value of digitalRead(). Or an alternative:
digitalWrite(LED1, !temp);
I NOTed the variable temp in the digitalWrite() command which is also legal. This also eliminates the need of line 3.
void loop() {

  if ( S1() )   {
    byte temp = !digitalRead(LED1);
    digitalWrite(LED1, temp);
    // wait for switch open
    while ( S1() ) { }
  } // end if

} // end loop
Test 4
I have rewritten the original code eliminating line 3 but added a new twist. When S1 is pressed I want to toggle the LED1 latch pin state. I don't want to leave the if statement until I release S1.
The "while ( S1() ) { } " does just that. A "while" command checks the state of S1() and returns "true" if I am pressing the switch. It will idle in an endless loop doing nothing ({}) until I release the switch.
Below is the code to turn OFF and ON LED1 and LED2 with 1 switch each.
void loop() {
  delay(100);

  if ( S1() )   {
    byte temp = !digitalRead(LED1);
    digitalWrite(LED1, temp);
    // wait for switch open
    while ( S1() ) { }
  } // end if

  if ( S2() )   {
    byte temp = !digitalRead(LED1);
    digitalWrite(LED1, temp);
    // wait for switch open
    while ( S2() ) { }
  } // end if

} // end loop
void loop() {

  if (S1()) digitalWrite(LED1, HIGH);
  else digitalWrite(LED1, LOW);

  if (S2()) digitalWrite(LED2, HIGH);
  else digitalWrite(LED2, LOW);

  if (S1() && S2()) digitalWrite(LED3, 1);
  else digitalWrite(LED3, 0);

} // end loop
Test 5
With the above code if S1 is pressed LED1 is ON until S1 is released. If S2 is pressed LED2 is ON until S2 is released. The third "if" statement is different.
Here we use a logical AND statement using a double "&" or "&&". A single "&" is a bitwise function and will produce a compile error.
Here we are checking S1 AND S2. Only when both are true (return 1) does LED3 turn on. A problem occurs when both S1 and S2 are pressed, all three LEDs are turned on. I want only LED3 turned ON. I want the other 2 LEDs staying OFF during the process.
On the next page we will program a complete motor control program for Arduino. It will operate an H-Bridge with speed control for both directions. Or will operate two single motors with independent speed control for each motor.
It will also have a master ON-OFF power control. It will go into more uses for "if-else" statement.
void loop() {
  delay(100);

  if ( S1()^1 ) digitalWrite(LED1, HIGH);
  else digitalWrite(LED1, LOW);

  if ( !S2() ) digitalWrite(LED2, HIGH);
  else digitalWrite(LED2, LOW);

} // end loop
Test 6
This is a variation of Test 5 to illustrate a logical NOT and bitwise XOR. They do the exact same thing and when compiled use the exact same amount of memory.
The functions S1() and S2() both return a true (1) when pressed. A NOT or XOR turns a true to false, false to true.
In both statements S1(), S2() when not pressed return a false. In both cases with NOT and XOR this is changed to true turning on LED1 and LED2.
When either switch is pressed they return a true which is NOTed or XORed to false turning OFF the LEDs.
Also see Program Hardware Interrupts for Arduino.
- Battery Charger related:
- Solar Panel Charge Controller Using Arduino Microcontroller
- Solar Panel Charge Controller Using PICAXE Microcontroller
- Solar Panel Battery Charge Controller Using Arduino
- Solar Panel Battery Charge Controller Switching Circuit
- Solar Battery Charger videos:
- Solar Panel Battery Charge Controller Operation
- Solar Panel Battery Charge Controller Circuitry
- Solar Panel Battery Charge Controller Programming
- Tutorial Arduino Measure Current with ACS712 Hall Sensor
- Using Zero-Crossing Detectors with Arduino
- Hardware Interrupts Demo and Tutorial for Arduino
- In Depth Look at AC Power Control with Arduino
- Micro-controller AC Power Control Using Interrupts
- Light Activated SCR Based Optocouplers Circuit Examples
- Solid State AC Relays with Triacs
- YouTube
- Zero-Crossing Detectors Circuits and Applications
- Zero-Crossing Circuits for AC Power Control
- In Depth Look at AC Power Control with Arduino
- Micro-controller AC Power Control Using Interrupts
- YouTube Video for Arduino AC Power Control
- Arduino
- Arduino PWM to Analog Conversion
- Arduino Analog Digital Conversion Voltmeter
- Better Arduino Rotary Encoder Sensor
- Simple 3-Wire MAX6675 Thermocouple ADC Arduino Interface
- YouTube:
- 3-Wire MAX6675 Thermocouple ADC Arduino Interface
- Arduino ADC Voltmeter YouTube video
- Arduino PWM to ADC YouTube video
- Connect Arduino to LCD Display with 74164 Shift Register
- Arduino with LCD Display and DS18B20 Temperature Sensor
- Below has differing code from the above. Works the same.
- Arduino with LCD Display and DHT11 Temperature-Humidity Sensor
- In Depth Look at AC Power Control with Arduino
- YouTube Video for Arduino AC Power Control
- Four part series:
- Experimenting with the PCA9555 32-Bit GPIO Expander with Arduino
- PCA9555 32-Bit GPIO Expander with Arduino and a 4X4 Keypad
- PCA9555 32-Bit GPIO Expander with Arduino Using Interrupts
- PCA9555 32-Bit GPIO Expander with Arduino and LCD Display
- YouTube Video for Series
- Connect-Program Arduino and a MM5451 LED Display Driver
- Arduino and a MM5451 LED Display Driver YouTube
- Programming Arduino and the 74HC595 Serial Shift Register
- Programming Arduino and the 74HC595 Serial Shift Register YouTube
- Arduino Projects Revisited Revised
- Programming ADS1115 4-Channel I2C ADC with Arduino
- Arduino uses ADS1115 with TMP37 to Measure Temperature
- Connect Arduino to I2C Liquid Crystal Display
- Arduino Reads Temperature Sensor Displays Temperature on LCD Display
- Arduino with MCP4725 12-bit Digital-to-Analog Converter Demo
- Videos
- Arduino with ADS1115 4-Channel 16-bit Analog-to-Digital Converter
- Arduino with MCP4725 12-Bit DAC