Build a Potato battery
PARTS AND MATERIALS
- One large potato
- (or) One lemon (optional)
- Strip of zinc, or galvanized metal
- Piece of thick copper wire
The basic experiment is based on the use of a potato, but many fruits and vegetables work as potential batteries! Note that various types of sheet metal such as copper and zinc could be available at a roofing supply.
The correct terminology is potato cell. A cell is a single electro-chemical unit, while a battery is a group of two or more cells.
For the zinc electrode, a large galvanized nail works well. Nails with a thick, rough zinc texture are preferable to galvanized nails that are smooth. Note: in the process the zinc or iron will be dissolved/corroded. If one uses sandpaper, etc. to clean the zinc the process will work better.
Another combination not mentioned is the use of saltwater, copper sulfate, dilute sulfuric (battery) acid, or vinegar in a glass. Be careful of all of these materials.
Any of these "batteries" can connected in series (positive/copper to negative/zinc) to produce higher voltages. For a series of kits to "build your own" visit www.miniscience.com. Note that I have no relation to this company and imply no endorsement.
LEARNING OBJECTIVES
- The importance of chemical activity in battery operation
- How electrode surface area affects battery operation
INSTRUCTIONS
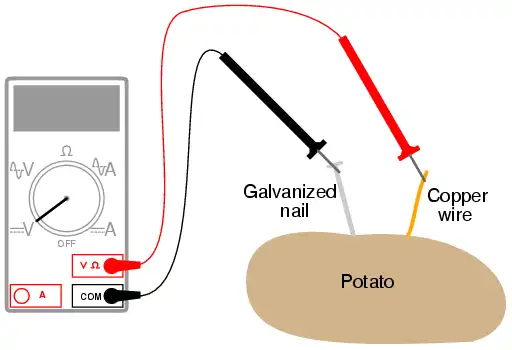
Push both the nail and the wire deep into the potato. Measure voltage output by the potato battery with a voltmeter. Now, wasn't that easy?
Seriously, though, experiment with different metals, electrode depths, and electrode spacings to obtain the greatest voltage possible from the potato. Try other vegetables or fruits and compare voltage output with the same electrode metals.
It can be difficult to power a load with a single "potato" battery, so don't expect to light up an incandescent lamp or power a hobby motor or do anything like that. Even if the voltage output is adequate, a potato battery has a fairly high internal resistance which causes its voltage to "sag" badly under even a light load. With multiple potato batteries connected in series, parallel, or series-parallel arrangement, though, it is possible to obtain enough voltage and current capacity to power a small load.
Three potato cells wired in series can operate a light emitting diode. (LED)
Published under the terms and conditions of the Creative Commons Attribution License
Modified by Lewis Loflin
Original URL www.allaboutcircuits.com (Modified)
Copyright 1999-2000 Michael Stutz stutz@dsl.org
- Quick navigation of this website:
- Basic Electronics Learning and Projects
- Basic Solid State Component Projects
- Arduino Microcontroller Projects
- Raspberry Pi Electronics, Programming
- Simple 12-14 Volt DC to High Voltage AC Inverter for Flashtubes
- Understanding Xenon Flashtubes and Circuits
- Unijunction Transistor SCR Photo Flash Control Circuit
- Understanding Unijunction Transistors Theory Operation
- Used with photo flash circuits:
- How to use SIDACs and Their Operation
- SIDAC Controlled Flashtube and Pulse Circuits YouTube
- DIAC Waveform Generator, Trigger Circuits Part 1
- DIAC Relaxation Oscillator Pulse Generator Part 2
- Neon NE-2 Lamp Trigger Photoflash
Web site Copyright Lewis Loflin, All rights reserved.
If using this material on another site, please provide a link back to my site.