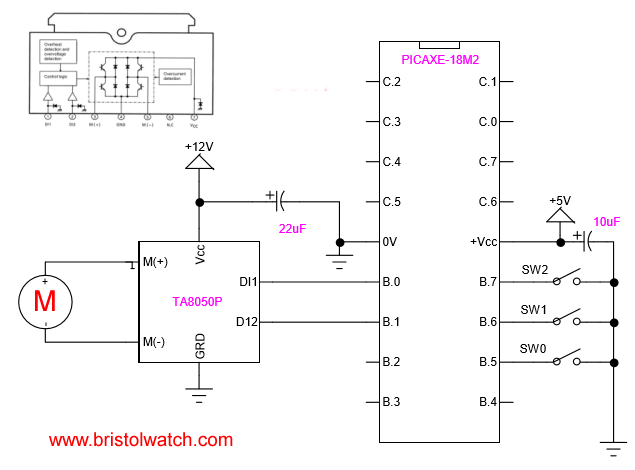
PICAXE-18M2 connected to TA8050P H-Bridge Motor Control
PICAXE 18M2 H-Bridge DC Motor Control
by Lewis Loflin
Updated versions of this page:
- PICAXE Operates H-Bridge Motor Controller
- PICAXE Micorcontroller Controls Motor Speed - Direction
- PICAXE Projects
; setfreq m4  ; All M2 parts internal k31,
; k250, k500, m1, m2, m4, m8,m16,m32
; Use terminal at 9600 at 8 mHz
; if using 4 mHz set terminal 4800

let dirsB = %00001111 ; PB0-PB3 output, PB4-PB7 input
pullup on ; enable pullups PORTB
pullup %11110000 ; pullup B.7 - B.4

let pinsB = pinsB & 0xF0 ; outputs off

symbol SW0 = pinB.5 ; all HIGH when open
symbol SW1 = pinB.6
symbol SW2 = pinB.7

main:
if SW0 = 0 then goto OFF1 ;endif
if SW1 = 0 then goto REV1 ;endif
if SW2 = 0 then goto FOR1 ;endif
goto main


REV1:
let pinsB = pinsB & 0xF0 ; motor off
pause 500
; let pinsB = pinsB | %00000001 ; motor on
high B.0
goto main

FOR1:
let pinsB = pinsB & 0xF0 ; motor off
pause 500
;let pinsB = pinsB | %00000010 ; motor on
high B.1
goto main

OFF1:
let pinsB = pinsB & 0xF0 ; motor off
pause 500
goto main
Picaxe Micro-controller Projects!
The PICAXE series of micro-controllers rank as the easiest and most cost effective way to use Microchip processors. I wanted an easier and less expensive way to introduce my students to the "PIC" micro-controller. Here I hope to get those starting out past poorly written literature and lack of simple working code examples.
- PICAXE Related videos Oct. 2016:
- Tutorial: Programming-Using PICAXE-18M2 Microcontroller
- How to setup PICAXE Pulse Width Modulation
- PICAXE TA8050P H-Bridge with Motor Control
- PICAXE TA8050P H-Bridge with Motor Speed Control
- PICAXE-18M2 Operates MOSFET H-Bridge
- PICAXE-18M2 Uses MCP23016 GPIO Expander
- Solar Panel Charge Controller Using PICAXE Microcontroller
- Exploring the PICAXE Micro-Controller
- Understanding Micro-Controller Input/Output Ports
- Using the 74HC165 Shift Register with the PICAXE Micro-Controller
- Connecting the 74HC595 Shift Register to PICAXE Micro-controller
- Using 7-Segment Displays with the PICAXE Micro-Controller
- Potentiometers and Analog-to-Digital Conversion with the PICAXE
- Pulse-Width Modulation Motor Speed Control and the PICAXE Micro-Controller
- Connecting the PICAXE to the DS1307 Real Time Clock
- Connecting the PICAXE to an External EEPROM (24LC08)
- Connecting a Servo to a PICAXE
- Connecting the TLC548 to the PICAXE
- Connecting the Ad5220 Digital Potentiometer to the PICAXE
See How I got into Electronics
