Arduino Stepper Motor Drive Coil Winder
by Lewis Loflin
Follow @Lewis90068157
Videos for this project:
Arduino stepper motor coil winder
Arduino Stepper Motor Tutorial
PNP Darlington Stepper Motor Driver
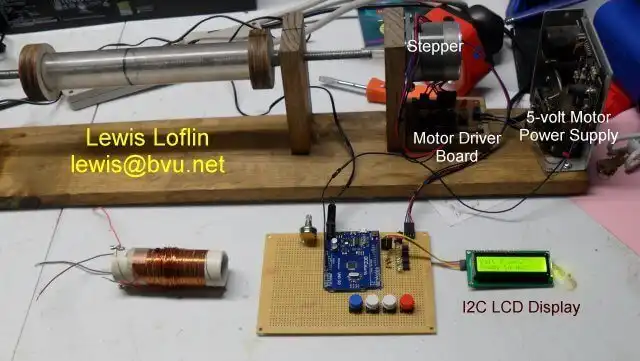
As an amateur radio builder winding RF coils is a tedious and often hit and miss process. Based on a combination of earlier and some new programming an Arduino micro-controller based board in combination with a 5-volt unipolar stepper motor solved the problem.
Most of the coils use a 2 inch diameter mailing tube held in place with nuts in a threaded rod. The end pieces were cut with keyhole bits on a drill press. The threaded rod was connected directly to the stepper motor shaft with vinyl tubbing. See video for construction details.
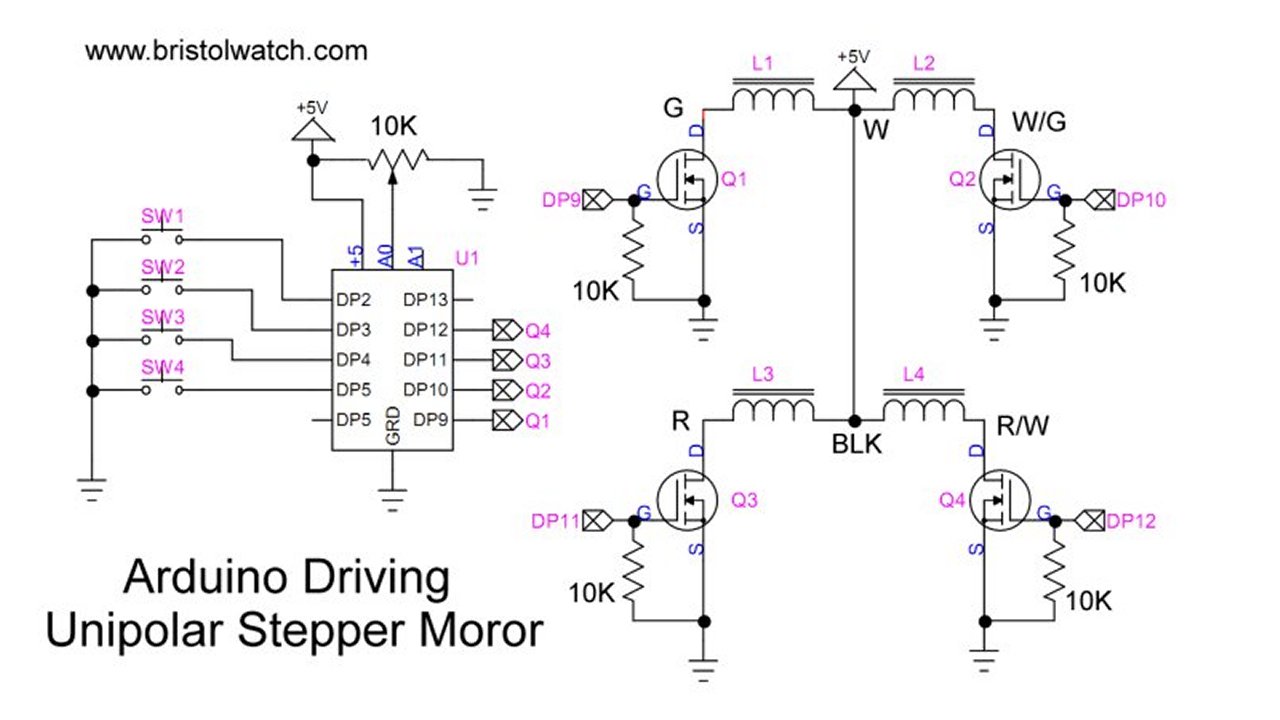
The four switches are connected to DP2-DP5 allows the user to program the number of turns by holding down SW1 while adding 1 by pressing SW2 or adding 10 by pressing SW3. SW4 is the run switch - the count is decremented by 1 every 360 degree (or 200 steps with a 1.8 degree stepper) until the count is zero. Pressing reset clears the count back to 0.
The control board can use any Arduino controller. The outputs to the stepper motor driver uses 4 opto-couplers in the image. The motor and Arduino in this case have separate power supplies.
Also note the control in the upper left-hand corner can act as a speed control.

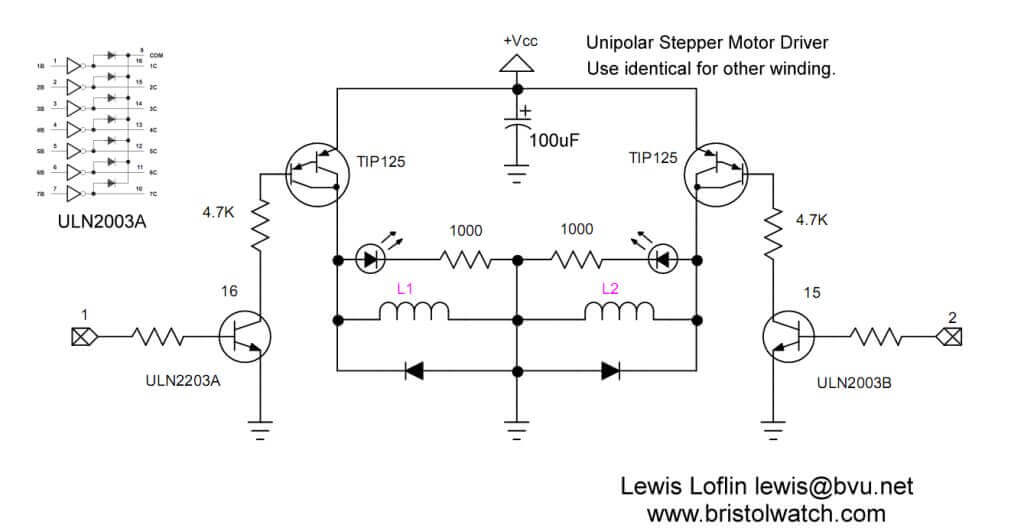
An alternative PNP Darlington Driver Board.
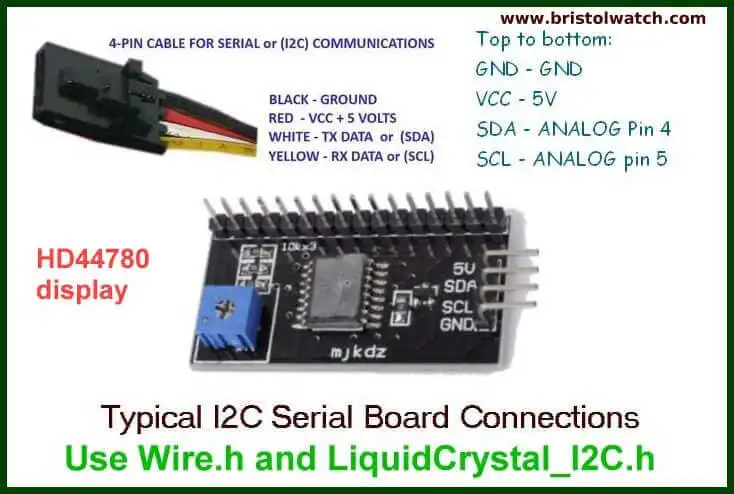
Connections I2C LCD Display to Arduino
To connect the I2C LCD display see Connect Arduino to I2C Liquid Crystal Display
Arduino code for this project: winder2.ino.
/*

  http://www.bristolwatch.com/radio/arduino_coil_winder.htm
  Arduino Stepper Motor Coil Winder
  Lewis Loflin
  lewis@bvu.net

*/

#define Q1 9
#define Q2 10
#define Q3 11
#define Q4 12

#define SW1 2
#define SW2 3
#define SW3 4
#define SW4 5

#include <OneWire.h>
#include <Wire.h>
#include <LiquidCrystal_I2C.h>

// set the LCD address to 0x27, 2 lines, 16 char
LiquidCrystal_I2C lcd(0x27, 16, 2);


int i, j;

void setup()  {

  pinMode(SW1, INPUT);
  pinMode(SW2, INPUT);
  pinMode(SW3, INPUT);
  pinMode(SW4, INPUT);

  digitalWrite(SW1, INPUT_PULLUP);
  digitalWrite(SW2, INPUT_PULLUP);
  digitalWrite(SW3, INPUT_PULLUP);
  digitalWrite(SW4, INPUT_PULLUP);

  lcd.init(); // initialize the lcd
  lcd.backlight();

  pinMode(Q4, OUTPUT);
  pinMode(Q3, OUTPUT);
  pinMode(Q2, OUTPUT);
  pinMode(Q1, OUTPUT);
  all_coils_off();

  lcd.clear();
  lcd.home();
  lcd.print("Wait 2 sec.");

  delay(2000); // wait for 2 seconds
  lcd.setCursor(0, 1); // is Home
  lcd.print("Ready to go!");

}

void loop() {

  // set turns
  if (!digitalRead(SW1) == 1)   {
    delay(1000);
    j = 0;
    lcd.clear();
    lcd.home();
    lcd.print("Turns = 0  ");
    while (!digitalRead(SW1) == 1)   {
      delay(1000);
      if (!digitalRead(SW2) == 1) j = j + 1;
      if (!digitalRead(SW3) == 1) j = j + 10;
      lcd.setCursor(8, 0);
      lcd.print(j);
    } // end while
    lcd.setCursor(0, 1);
    lcd.print("Ready to wind.");
  } // end if

  if (!digitalRead(SW4))  {
    lcd.clear();
    lcd.home();
    lcd.print("Turns 0  ");
    for (i = 1; i <= j; i++)   {
      // 1.8 Deg. per step = 360 Deg.
      steps(200);
      lcd.setCursor(6, 0);
      lcd.print(i);
    } // end for
    all_coils_off();
    lcd.setCursor(0, 1);
    lcd.print("Finished ");
  } // end if

} // end loop


void all_coils_off(void)  {
  digitalWrite(Q4, 0);
  digitalWrite(Q3, 0);
  digitalWrite(Q2, 0);
  digitalWrite(Q1, 0);

}

void steps(int i) {
  while (1)   {
    digitalWrite(Q4, 1);
    digitalWrite(Q3, 0);
    digitalWrite(Q2, 0);
    digitalWrite(Q1, 1);
    delay(analogRead(0) / 4 + 5);
    i--;
    if (i < 1) break;

    digitalWrite(Q4, 0);
    digitalWrite(Q3, 1);
    digitalWrite(Q2, 0);
    digitalWrite(Q1, 1);
    delay(analogRead(0) / 4 + 5);
    i--;
    if (i < 1) break;

    digitalWrite(Q4, 0);
    digitalWrite(Q3, 1);
    digitalWrite(Q2, 1);
    digitalWrite(Q1, 0);
    delay(analogRead(0) / 4 + 5);
    i--;
    if (i < 1) break;

    digitalWrite(Q4, 1);
    digitalWrite(Q3, 0);
    digitalWrite(Q2, 1);
    digitalWrite(Q1, 0);
    delay(analogRead(0) / 4 + 5);
    i--;
    if (i < 1) break;
  }
}
Arduino Stepper Motor Coil Winder Revisited 2024 YouTube
12AV6 Vacuum Tube Radio with LM386 Power Amplifier
Grid-Leak Detector Low Voltage Vacuum Tube Radio
- Build 12AV6 Vacuum Tube AM Radio
- Coils for Highly Selective Crystal Radio
- Add Push-Pull Output Stage LM386 Audio Amplifier
- Arduino Stepper Motor Drive Coil Winder
- Easy Driver Micro-Stepper Controller to Arduino
- Using the MC3479 Stepper Motor Controller with Arduino
- Unipolar Stepper Motor with a Arduino
- Considerations for Using Stepper Motors
- Connecting the Arduino to a L298N H-Bridge
- L298N Motor Controller Theory and Projects
- TA8050 H-Bridge Motor Controller
- Quick navigation of this website:
- Basic Electronics Learning and Projects
- Basic Solid State Component Projects
- Arduino Microcontroller Projects
- Raspberry Pi Electronics, Programming
- Added Nov. 16, 2014
- ULN2003A Darlington Transistor Array with Circuit Examples
- Tutorial Using TIP120 and TIP125 Power Darlington Transistors
- Driving 2N3055-MJ2955 Power Transistors with Darlington Transistors
- Understanding Bipolar Transistor Switches
- N-Channel Power MOSFET Switching Tutorial
- P-Channel Power MOSFET Switch Tutorial
- More Power MOSFET H-Bridge Circuit Examples
- Build a High Power Transistor H-Bridge Motor Control
Web site Copyright Lewis Loflin, All rights reserved.
If using this material on another site, please provide a link back to my site.