Click for larger image.
I2C LCD to Raspberry Pi in C
by Lewis Loflin
Follow @Lewis90068157
See YouTube video Interface I2C LCD to Raspberry Pi in C
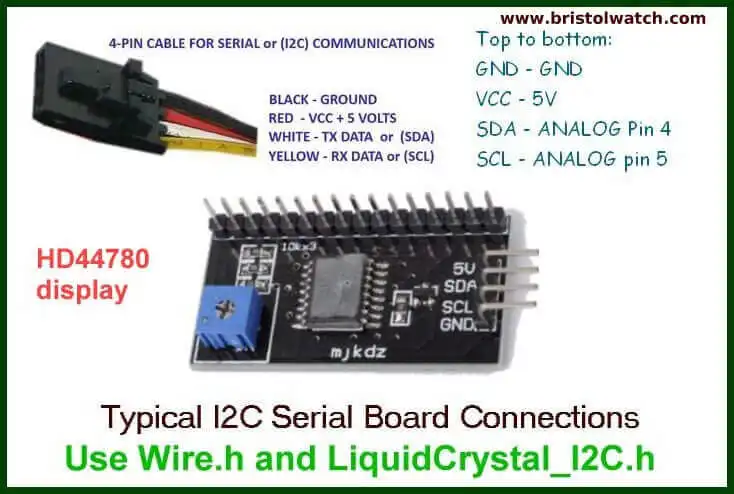
In this project I'll use WiringPi I2C to interface an I2C LCD display module. This is an interface board with a small microcontroller that controls a HD44780 type liquid crystal display.
There are libraries for operating this device with Arduino but getting the actual operating codes to avoid the libraries was useless. I found a program in Python and ported that over to WiringPi and used C directly.
Above illustrates the type of connection in the module. (This is not the actual schematic, but can be programmed to do the same thing if one wanted to build their own.) One must write each command or data byte as two half bytes or nibbles. This is done using two small functions lcd_byte(int bits, int mode) and lcd_toggle_enable(int bits).
Here we can pass display control data or ASCII character data.
// added by Lewis
void typeInt(int i);
void typeFloat(float myFloat);
void lcdLoc(int line); //move cursor
void ClrLcd(void); // clr LCD return home
void typeln(const char *s);
void typeChar(char val);
The above commands were used with Arduino C and Microchip PIC C and ported over to Raspberry Pi C. TypeFloat() and typeInt() functions use the sprintf() function to convert the integers and floats to as string. Then both are sent to typeln() function which needs a little explanation.
In fact we can send a simple text string director to the typeln() function: typeln("Hello world!"). lcdLoc() sets the cursor location for the next character even is programmed to display no blinking cursor. Ox80 (LINE1) is the address for ROW 0 COL 0 while 0xC0 (LINE2) is ROW 1 COL 0.
Assuming a 2-line display and I wanted send a "F" three places to the right on the first line would be lcdLoc(LINE1 + 3).
// this allows use of any size string
void typeln(const char *s)   {
  while ( *s ) lcd_byte(*(s++), LCD_CHR);
}
Recall that a text string is an array of characters numbered from zero through n-1 terminated with a null character I believe zero. We pass with the "*" the address pointer to the beginning memory address of the string not the string itself.
The function typeln() will output to the display via lcd_byte() function one character at a time incrementing the address pointer "s" until the null character is reached terminating the "while" loop.
For full code see i2clcd.txt
/*
*
* by Lewis Loflin www.bristolwatch.com lewis@bvu.net
* http://www.bristolwatch.com/rpi/i2clcd.htm
* Using wiringPi by Gordon Henderson
*
*
* Port over lcd_i2c.py to C and added improvements.
* Supports 16x2 and 20x4 screens.
* This was to learn now the I2C lcd displays operate.
* There is no warrenty of any kind use at your own risk.
*
*/

#include <wiringPiI2C.h>
#include <wiringPi.h>
#include <stdlib.h>
#include <stdio.h>

// Define some device parameters
#define I2C_ADDR   0x27 // I2C device address

// Define some device constants
#define LCD_CHR  1 // Mode - Sending data
#define LCD_CMD  0 // Mode - Sending command

#define LINE1  0x80 // 1st line
#define LINE2  0xC0 // 2nd line

#define LCD_BACKLIGHT   0x08  // On
// LCD_BACKLIGHT = 0x00  # Off

#define ENABLE  0b00000100 // Enable bit

void lcd_init(void);
void lcd_byte(int bits, int mode);
void lcd_toggle_enable(int bits);

// added by Lewis
void typeInt(int i);
void typeFloat(float myFloat);
void lcdLoc(int line); //move cursor
void ClrLcd(void); // clr LCD return home
void typeln(const char *s);
void typeChar(char val);
int fd;  // seen by all subroutines

int main()   {

  if (wiringPiSetup () == -1) exit (1);

  fd = wiringPiI2CSetup(I2C_ADDR);

  //printf("fd = %d ", fd);

  lcd_init(); // setup LCD

  char array1[] = "Hello world!";

  while (1)   {

    lcdLoc(LINE1);
    typeln("Using wiringPi");
    lcdLoc(LINE2);
    typeln("Geany editor.");

    delay(2000);
    ClrLcd();
    lcdLoc(LINE1);
    typeln("I2c  Programmed");
    lcdLoc(LINE2);
    typeln("in C not Python.");

    delay(2000);
    ClrLcd();
    lcdLoc(LINE1);
    typeln("Arduino like");
    lcdLoc(LINE2);
    typeln("fast and easy.");

    delay(2000);
    ClrLcd();
    lcdLoc(LINE1);
    typeln(array1);

    delay(2000);
    ClrLcd(); // defaults LINE1
    typeln("Int  ");
    int value = 20125;
    typeInt(value);

    delay(2000);
    lcdLoc(LINE2);
    typeln("Float ");
    float FloatVal = 10045.25989;
    typeFloat(FloatVal);
    delay(2000);
  }

  return 0;

}


// float to string
void typeFloat(float myFloat)   {
  char buffer[20];
  sprintf(buffer, "%4.2f",  myFloat);
  typeln(buffer);
}

// int to string
void typeInt(int i)   {
  char array1[20];
  sprintf(array1, "%d",  i);
  typeln(array1);
}

// clr lcd go home loc 0x80
void ClrLcd(void)   {
  lcd_byte(0x01, LCD_CMD);
  lcd_byte(0x02, LCD_CMD);
}

// go to location on LCD
void lcdLoc(int line)   {
  lcd_byte(line, LCD_CMD);
}

// out char to LCD at current position
void typeChar(char val)   {

  lcd_byte(val, LCD_CHR);
}


// this allows use of any size string
void typeln(const char *s)   {

  while ( *s ) lcd_byte(*(s++), LCD_CHR);

}

void lcd_byte(int bits, int mode)   {

  //Send byte to data pins
  // bits = the data
  // mode = 1 for data, 0 for command
  int bits_high;
  int bits_low;
  // uses the two half byte writes to LCD
  bits_high = mode | (bits & 0xF0) | LCD_BACKLIGHT ;
  bits_low = mode | ((bits << 4) & 0xF0) | LCD_BACKLIGHT ;

  // High bits
  wiringPiI2CReadReg8(fd, bits_high);
  lcd_toggle_enable(bits_high);

  // Low bits
  wiringPiI2CReadReg8(fd, bits_low);
  lcd_toggle_enable(bits_low);
}

void lcd_toggle_enable(int bits)   {
  // Toggle enable pin on LCD display
  delayMicroseconds(500);
  wiringPiI2CReadReg8(fd, (bits | ENABLE));
  delayMicroseconds(500);
  wiringPiI2CReadReg8(fd, (bits & ~ENABLE));
  delayMicroseconds(500);
}


void lcd_init()   {
  // Initialise display
  lcd_byte(0x33, LCD_CMD); // Initialise
  lcd_byte(0x32, LCD_CMD); // Initialise
  lcd_byte(0x06, LCD_CMD); // Cursor move direction
  lcd_byte(0x0C, LCD_CMD); // 0x0F On, Blink Off
  lcd_byte(0x28, LCD_CMD); // Data length, number of lines, font size
  lcd_byte(0x01, LCD_CMD); // Clear display
  delayMicroseconds(500);
}
- Software and setup:
- Raspberry Pi Openbox Desktop 2019
- Setting up Openbox for Raspberry Pi
- Add Solid State Hard Drive to Raspberry Pi
These are mostly sensors connected through the I2C protocol. While digital themselves, they can measure analog sensors.
- Interface I2C LCD to Raspberry Pi in C
- ADS1115 4-Channel ADC Uses I2C with Raspberry Pi
- MCP4725 12-Bit DAC Interface to Raspberry Pi
- Raspberry Pi with PCF8591 Analog To Digital Control in C
- Raspberry Pi PCF8591 AD-DA Sensor Python Interface
- Using the powerful Rox-Filer system in Linux
- Use FEH under Linux for a Wallpaper Setter
- How to create Symbolic links in Linux
- Raspberry Pi USB Audio Connection
- WiringPi for Raspberry Pi and MAX6675 thermal-couple sensor
- WiringPi Blink an LED Demo
- WiringPi and Pulse-Width-Modulation with Raspberry Pi
- Raspberry Pi and a MM5451 LED Display Driver
- Raspberry Pi MM5451 LED Display Driver YouTube
- Raspberry Pi RTC with MAX7219 Display Driver
- Raspberry Pi Python RTC with MAX7219 Display Driver YouTube
- Raspberry Pi 8-Digit LED MAX7219 Display Driver
- Raspberry Pi and the 74HC595 Serial Shift Register
- Programming Raspberry Pi 74HC595 Serial Shift Register YouTube
- Raspberry Pi and Arduino
- Connect Serial LCD to Raspberry Pi
- Serial Read from Arduino to Raspberry Pi
- Arduino Raspberry Pi Interface with LCD Display
- Connecting Raspberry Pi to Arduino with I2C Interface
- Connecting Raspberry Pi to Arduino with I2C Interface
Web site Copyright Lewis Loflin, All rights reserved.
If using this material on another site, please provide a link back to my site.