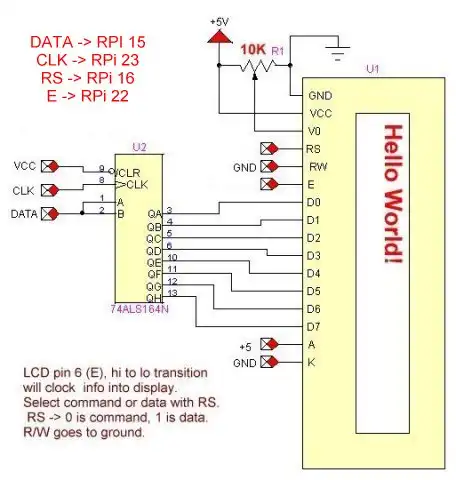
LCD connection to Arduino
Raspberry Pi Arduino I2C Interface
YouTube video Raspberry Pi, Arduino, and Learning Linux
What follows is the code used in my YouTube video above and an explanation of its operation. This is a very basic demo that will be used as a basis for more complex programs.
The Arduino is connected to the above display circuit. Then the Raspberry Pi connects to Arduino by I2c.
The first program was written for the Raspberry Pi in python. Python is a high level, general purpose interpreted language. High level in the fact it's remote from the underlying hardware. Being an interpreted language means each line of code is read, interpreted, and implemented as it's running. Python is best used for numbers and strings.
It's for those reasons python is worthless for machine control. Yes it has some GPIO and an I2C interface, but those can be accessed only with additional libraries but the system is still slow being an interpreted language. While it can read some I2C or SPI sensors it would be far better to use a micro-controller such as Arduino to deal with hardware control, while the Raspberry Pi using Tkinter would create a general user interface.
These two programs, one for Raspberry Pi, the other for Arduino respectively, demonstrate how both devices exchange information back in forth in single bytes over I2C.
While the GPIO and I2C on Raspberry Pi are three volts, my Arduino Nano was operating at five volts. Raspberry Pi has it's own pull ups for I2C so don't use external resistors tied to five volts. The Arduino works just fine.
Note that the Arduino is operating in the SLAVE mode with Raspberry Pi as MASTER that limits Arduino's access to the I2C buss. I borrowed my serial LCD program and modified it for this demo. One could rewrite this to operate a non-serial LCD connection by re-writing the ssrWrite() routine and some changes in electrical connections.
For more on that see http://www.bristolwatch.com/arduino/arduino4a.html.
The codes are at rpi_arduino.txt.
- Software and setup:
- Raspberry Pi Openbox Desktop 2019
- Setting up Openbox for Raspberry Pi
- WiringPi and Pulse-Width-Modulation with Raspberry Pi
- WiringPi for Raspberry Pi and MAX6675 thermal-couple sensor
- WiringPi Blink an LED Demo
- Interface I2C LCD to Raspberry Pi in C
- ADS1115 4-Channel ADC Uses I2C with Raspberry Pi
- MCP4725 12-Bit DAC Interface to Raspberry Pi
- Raspberry Pi with PCF8591 Analog To Digital Control in C
- Raspberry Pi PCF8591 AD-DA Sensor Python Interface
This is a collection of programs and hardware hacks related to mainly Raspberry Pi and Debian Linux.
- Main Light Fast Linux Desktops with Openbox, JWM
- Test Reuse Surplus PC Power Supplies
- Add WBAR Launch Dock to Raspberry Pi
- Add MPG123 Terminal Music Player to Raspberry Pi, Linux
- Basics of Alsamixer Audio Control for Linux
- Add Solid State Hard Drive to Raspberry Pi
- Beep a PC Speaker Add Beeper to Raspberry Pi
- Using FEH Wallpaper Setter Under Linux
- Scrot Lite Weight Screen Shot Software for Linux
- Using Light Weight Beaver Text Editor
- Install Viewnior Image Viewer for Linux
- Zmixer ALSA Sound Control Tutorial
- Tutorial Xinitrc Desktop Manager Control for Linux
- Setup Raspberry Pi Using JWM Window Manager
Web site Copyright Lewis Loflin, All rights reserved.
If using this material on another site, please provide a link back to my site.