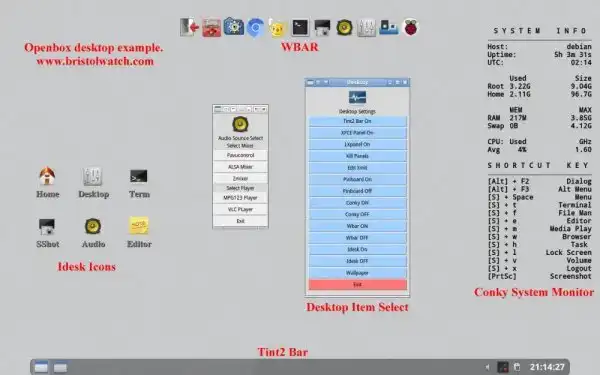
Fig. 1 example Openbox Desktop.
Click for larger image.
Raspberry Pi Openbox Desktop Setup
by Lewis Loflin
Follow @Lewis90068157
This will pertain to the Raspberry Pi 3 and 4 are much more powerful. Recent versions of Raspbian already have many early issues fixed. It is still Debian based and one must boot in with the command line.
What is Openbox? It is NOT a desktop, but a window manager. It is used by the native LXDE Desktop. We can reuse parts of the LXDE desktop.
This page assumes one has some knowledge of Linux. We will be using the terminal command line get used to it.
Because I'm using the ARM version of Debian Linux the programs work the same way with a normal PC Openbox system.
Here are useful Linux programs that work for Raspberry Pi and several programs I compiled for Raspberry Pi at the bottom of the page.
Light Fast Linux Desktops with Openbox, JWM
I have also included a reference PDF for basic Linux commands you will need. See Linux Command Line Cheat Sheet.
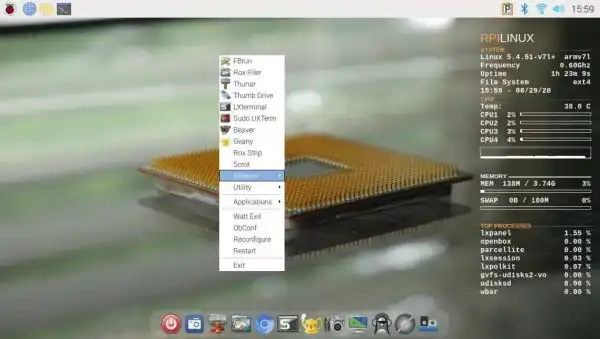
Fig. 2 example Openbox LXDE Desktop.
Click for lager image.
There are two ways to go here - create Openbox from scratch or modify the existing LXDE Desktop as shown in Fig, 2. I'll start with scratch.
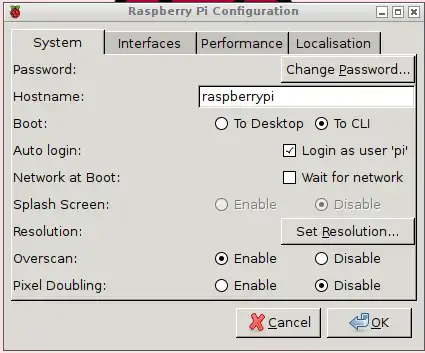
Fig. 3 Raspberry Pi bootup configuration.
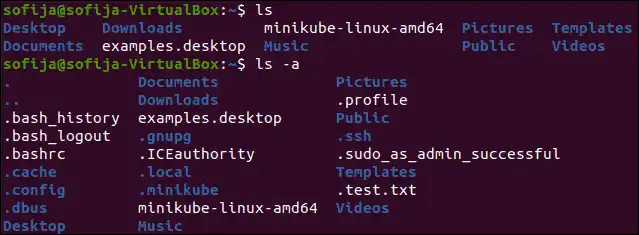
Fig. 4
Getting Started
One must log in with the command line typing "startx".
The system searches home folder "Pi" (or whomever you log in as) for a file .xnintrc. See my webpage Tutorial Xinitrc Desktop Manager Control for Linux.
If not there it boots to the default LXDE.
This file doesn't come with the system the user has to create it. Open lxterminal (comes with LXDE) and type "pwd" to make sure you are in your home directory.
Next type "touch .xinitrc" and you have created a blank file. You can also create the file from the file manager.
Any file or directory that begins with a period is a hidden file. Your home directory can be filled with these hidden files. These are mostly configuration files for the system and installed programs.
Type "ls" and you will not see the file. Now type "ls -a" and you should see the blank file you created along with others. See Fig. 2 above for an example.
The .xinitrc tell the system what programs to open such as a wallpaper setter, pinboard, taskbar, backgrounds, etc. Now we have to decide what desktop features we want. I go for speed and utility. New let's install Openbox. From the terminal:
pi@raspberrypi:~ $ sudo apt-get update (enter)
pi@raspberrypi:~ $ sudo apt-get install openbox obmenu menu (enter)
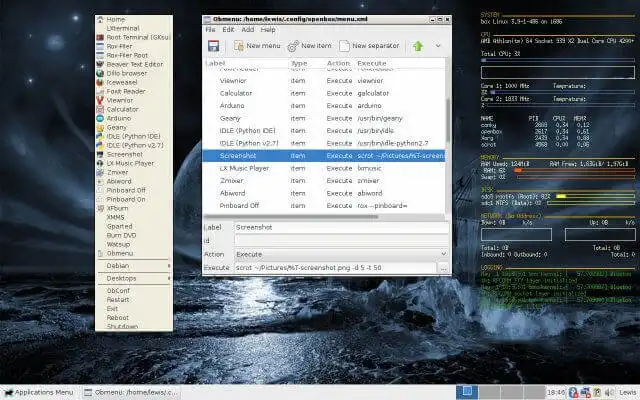
Example Openbox desktop with the XFCE4 Panel,
OBmenu, and Conky system monitor.
Click image for larger view.
Raspberry Pi Openbox Desktop Setup Part 2
Note I'm dealing only with Debian based distributions in particular in the Raspberry Pi. This will work for other Debian based distributions when starting from the command line startx based on your .xinitrc file. If you haven't installed Openbox already then:
sudo apt-get install openbox obconf menu obmenu conky parcellite feh rox-filer tint2 xfce4-panelIf one has a regular Debian distribution on a PC with a display manager such as lightdm and have installed Openbox select Openbox from the menu then log in.
Note .xinitrc doesn't work with a display manager! One must boot to command line and type "startx".
First we add user pi to various groups to access sudo, USB, audio, etc. if you haven't already:
 ~ $ sudo su your_password
 ~ $ adduser pi root
 ~ $ adduser pi sudo
 ~ $ adduser pi audio
 ~ $ adduser pi dialout
 ~ $ adduser pi video
 ~ $ adduser pi games
 ~ $ adduser pi netdev
 ~ $ adduser pi users
Also see Connecting Plugable USB Audio Adaptor to Raspberry Pi.
Let's assume the user is pi. Open this folder and add the following as root:
~ $ leafpad /etc/sudoers You should see something like this - add what isn't there:
# User privilege specification
root	ALL=(ALL:ALL) ALL

# Allow members of group sudo
# to execute any command
%sudo	ALL=(ALL:ALL) ALL

# add this below
pi ALL=(ALL) NOPASSWD: ALL
Save and close leafpad. This gives user pi sudo access without having to type in a password with sudo every time. Type reboot (enter) to reboot RPi, log back in. Open a terminal, then type "sudo su" and you should be logged in as root if everything worked.
FSTAB
Date April 26, 2019. Due to changes in the newest Raspbian I've deleted this section. Do not tamper with FSTAB or it will wreck your system.
Screenshots examples
Openbox 1 Openbox 2 Openbox 3 Openbox 4 Openbox 5
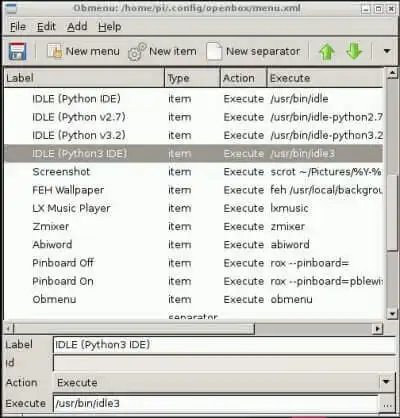
Openbox obmenu program.
Setting Up Openbox Menu
This is called the Openbox desktop and from here we will construct our own fast operating system. What do we really need? Right click the mouse and a small selection box comes up with a terminal program and web browser (Midori) and little else.
At this point we are going to add these items to the menu in order to learn how to setup the menu and get direct access to those programs. Let's add those items already installed to the menu first and add more later.
Open the terminal and I'm assuming you logged in as root. Type obmenu (enter) and we can now open Obmenu as shown above. The top bar should say "Obmenu /root/.config/openbox/menu.xml". Click on "Openbox 3" to open the main menu.
Put the dark bar below the terminal and web browser and select "New Item" and put in:
Label - PCmanFM ; Execute - pcmanfm and once again select "New Item" and do the same for the following:
Label - Leafpad ; Execute leafpad ; etc. whatever programs you want to enter.
Now save and right click on the menu "restart" and the now items you entered are in the menu. You should also see "Debian" if menu was installed and opens up to a number of other small programs.
PCmanfm is a file manager that came with LXDE and leafpad is a text editor. As one adds new programs they can return here to add those to the menu.
If one is in their home directory (which is where you should be if not root) the top black bar will have "~/.config/openbox/menu.xml".
This can also be done from a text editor in order to add small icons:
$ sudo leafpad ~/.config/openbox/menu.xmlAnd this is a sample where "label" and "execute is what you entered with Obmenu. (This example uses thunar.)
<item icon="/usr/share/icons/thunar.png" label="Thunar">
			<action name="Execute">
				<execute>thunar</execute>
			</action>
		</item>
Here is great screen shot of my Openbox menu: sshot3.png and that pre-made menu can be downloaded via wget and will need some editing unless one is following this entire series.
$ sudo mv ~/.config/openbox/menu.xml  ~/.config/openbox/menu_bak.xml


$ sudo wget http://www.bristolwatch.com/rpi/dl/menu.xml


$ sudo cp menu.xml ~/.config/openbox
What one did above was rename the old menu.xml, downloaded the replacement, then copied it to ~/.config/openbox.
Closer view of menu . Also XFCE menu.
How to Configure Openbox
This assumes the following programs have been installed if not do so now.
~ $sudo apt-get tint2, xfce4-panel, feh, parcellite, conky, rox-filerWhen Openbox loads it will run the file "autostart" in the "~/.config/openbox" folder if not over ridden by .xinitrc. Open a terminal and:
$ leafpad ~/.config/openbox/autostart Copy what's below and uncomment what you want and save.
#start up for openbox
# uncomment what you want if not selected from .xinitrc
# this assumes these programs are installed
# wallpaper -
sh ~/.fehbg &

#bottom tray/bar choose only 1
#exec tint2 &
#exec xfcer4-panel &

# clipboard
#exec parcellite &

# system monitor
#exec conky &

#rox-filer pinboard. If using with conky set both to same background
# may not work with conky
#exec rox --pinboard=pblewis &
$ sudo chmod +x autostartThis will work if one doesn't have a .xinitrc file over riding it. To find out more see Raspberry Pi Window Manager Control with Xinitrc
- Software and setup:
- Raspberry Pi Openbox Desktop 2019
- Setting up Openbox for Raspberry Pi
- Add Solid State Hard Drive to Raspberry Pi
These are mostly sensors connected through the I2C protocol. While digital themselves, they can measure analog sensors.
- Interface I2C LCD to Raspberry Pi in C
- ADS1115 4-Channel ADC Uses I2C with Raspberry Pi
- MCP4725 12-Bit DAC Interface to Raspberry Pi
- Raspberry Pi with PCF8591 Analog To Digital Control in C
- Raspberry Pi PCF8591 AD-DA Sensor Python Interface
- Using the powerful Rox-Filer system in Linux
- Use FEH under Linux for a Wallpaper Setter
- How to create Symbolic links in Linux
- Raspberry Pi USB Audio Connection
- WiringPi for Raspberry Pi and MAX6675 thermal-couple sensor
- WiringPi Blink an LED Demo
- WiringPi and Pulse-Width-Modulation with Raspberry Pi
- Raspberry Pi and a MM5451 LED Display Driver
- Raspberry Pi MM5451 LED Display Driver YouTube
- Raspberry Pi RTC with MAX7219 Display Driver
- Raspberry Pi Python RTC with MAX7219 Display Driver YouTube
- Raspberry Pi 8-Digit LED MAX7219 Display Driver
- Raspberry Pi and the 74HC595 Serial Shift Register
- Programming Raspberry Pi 74HC595 Serial Shift Register YouTube
- Raspberry Pi and Arduino
- Connect Serial LCD to Raspberry Pi
- Serial Read from Arduino to Raspberry Pi
- Arduino Raspberry Pi Interface with LCD Display
- Connecting Raspberry Pi to Arduino with I2C Interface
- Connecting Raspberry Pi to Arduino with I2C Interface
Web site Copyright Lewis Loflin, All rights reserved.
If using this material on another site, please provide a link back to my site.