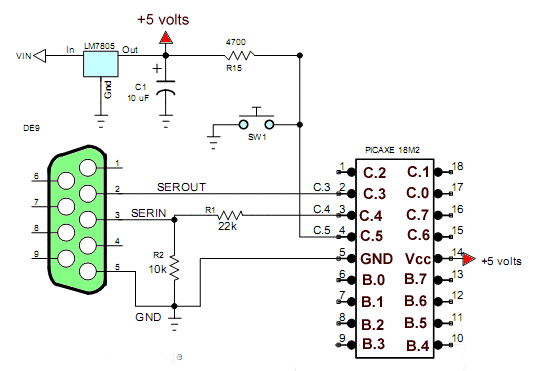
Fig. 1 Schematic to my home built test board minus I/O resistors.
AD5220 Digital Potentiometer and 18M2 PICAXE Microcontroller
The purpose of this demo is to connect the AD5220B digital potentiometer to the PICAXE micro-controller. This will introduce several PICAXE commands in a practical demonstration. The AD5220 can found at www.parallax.com.
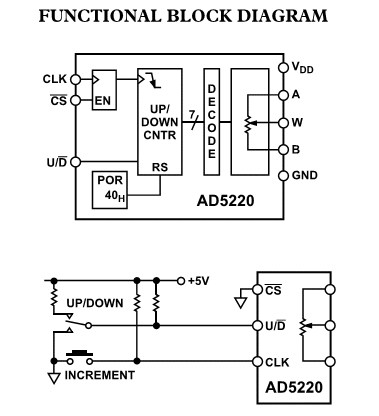
Fig. 2
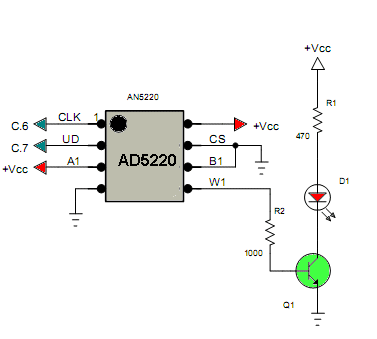
Fig. 3
Fig. 3 shows the actual electrical connections. C.6 is electrical pin 15 and C.7 is electrical pin 16 on the PICAXE. R2 can be between 4.7k and 10k, Q1 any general purpose NPN transistor.
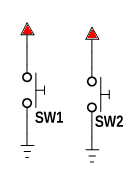
Fig. 4
Ignore the SW1 designation from figure 1. SW1 is connected to electrical pin 7 and SW2 is connected to electrical pin 10 on the PICAXE. Both SW1/SW2 are normally-open push button switches.
Begin Program Code
#rem

AD5220B10 demo to control intensity of LED by
pressing two switches.

The AD5220 is 128 position single channel digital potentiometer.
R = 10k

Pin layout:

        ------
    CLk|1    8|Vcc
    U/D|      |CS
     A1|      |B1
    GND|4    5|W1
        ------


1. serial clock input negative edge triggered
2. U/D HIGH is up, LOW is down
3. Pot terminal A1 connect to Vcc
4. GND
5. Pot wiper connected to LED via external transistor
6. Pot terminal B1 connect to GND
7. CS active LOW connect to GND
8. +5 volts

'HIGH' in the electrical sense is 5-volt
; 'LOW' switch to ground.

Page references pertain to PICAXE Manual 2 Basic Commands

#endrem

#picaxe 18M2 ; type chip used

symbol CLK = C.6
symbol UD = C.7 ; up/down control
symbol SW1 = B.1 ; active LOW when pressed
symbol SW2 = B.4 ; active LOW when pressed

;SW1 and SW2 could be pulled HIGH via two 4.7k resistors
; Note: will use internal pullups,
; which only works on PORT B 18M2 parts:
; see page 159
pullup on ; enable pullups
pullup %00010010; enable pullups on portB B.1 and B.4


symbol val = b0 ; user variable
;BUTTON  pin, downstate, delay, rate,
; bytevariable, targetstate ,subroutine
; setup 'button' command see page 40
symbol delay = 200
symbol downstate = 0
symbol rate = 100
symbol targetstate = 1

HIGH CLK ; initialize to HIGH

main:
; go to 'UP' routine
button SW1,downstate,delay,rate,val,targetstate,UP
; go to 'DN' routine
button SW2,downstate,delay,rate,val,targetstate,DN

pause 200
goto main


UP: ; LED brightens
HIGH UD
pulsout CLK, 200
pause 100
goto main


DN: ; LED dims
LOW UD
pulsout CLK, 200
pause 100
goto main
Picaxe Micro-controller Projects!
The PICAXE series of micro-controllers rank as the easiest and most cost effective way to use Microchip processors. I wanted an easier and less expensive way to introduce my students to the "PIC" micro-controller. Here I hope to get those starting out past poorly written literature and lack of simple working code examples.
- PICAXE Related videos Oct. 2016:
- Tutorial: Programming-Using PICAXE-18M2 Microcontroller
- How to setup PICAXE Pulse Width Modulation
- PICAXE TA8050P H-Bridge with Motor Control
- PICAXE TA8050P H-Bridge with Motor Speed Control
- PICAXE-18M2 Operates MOSFET H-Bridge
- PICAXE-18M2 Uses MCP23016 GPIO Expander
- Solar Panel Charge Controller Using PICAXE Microcontroller
- Exploring the PICAXE Micro-Controller
- Understanding Micro-Controller Input/Output Ports
- Using the 74HC165 Shift Register with the PICAXE Micro-Controller
- Connecting the 74HC595 Shift Register to PICAXE Micro-controller
- Using 7-Segment Displays with the PICAXE Micro-Controller
- Potentiometers and Analog-to-Digital Conversion with the PICAXE
- Pulse-Width Modulation Motor Speed Control and the PICAXE Micro-Controller
- Connecting the PICAXE to the DS1307 Real Time Clock
- Connecting the PICAXE to an External EEPROM (24LC08)
- Connecting a Servo to a PICAXE
- Connecting the TLC548 to the PICAXE
- Connecting the Ad5220 Digital Potentiometer to the PICAXE
See How I got into Electronics
