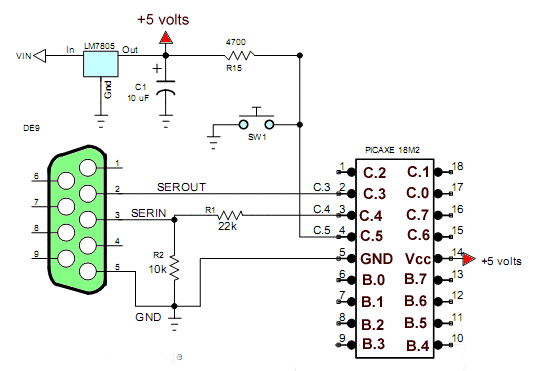
Fig. 1 Schematic to my home built test board minus I/O resistors.
PICAXE 18M2 Servo Control
by Lewis Loflin
The three simple routines below go further than the PICAXE manual. The programs are self explanatory.
For more on the operation of hobby servos see Basics of Hobby Servos.
For more on the operation of hobby servos see Basics of Hobby Servos.
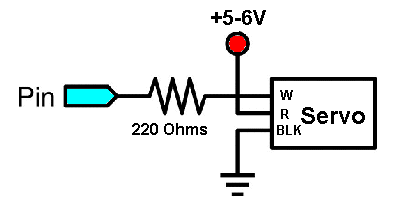
Fig. 2 how to connect a servo. Connect to pin B.0.
Program 1
#rem

Page references pertain to PICAXE Manual 2 Basic Commands

#endrem

; uses command 'servo'

symbol pulse_pin = B.0
symbol val = b0

init: servo pulse_pin,75  ;initialize servo

main:

    readadc control, val ;read ADC1 8-bit mode into variable b0 p. 170
    val = val * 1  MIN 75 MAX 225 ; set limit on val
    servo pulse_pin, val
    pause 20

goto main   ;loop back to start
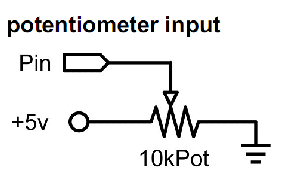
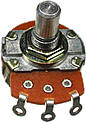
Fig 3 connecting a potentiometer. Connect wiper to C.1.
Program 2 Position with Potentiometer
Related: also see Potentiometers and Analog-to-Digital Conversion with the PICAXE
; uses pulsout command (p. 161), uses no servo commands
; uses a potentiometer to position a servo

symbol pulse_pin = B.0
symbol control = C.1 ; position control wiper
symbol val = b0

LOW pulse_pin

main:

    readadc control, val ;read ADC1 into variable b0 p. 170
    val = val * 1  MIN 75 MAX 225 ; set limits on val
    pause 19
    pulsout pulse_pin, val ; val * 10uS at 4mHz

goto main   ;loop back to start
Program 3 Sweep Back and Forth
; Operate a servo sweep back and forth.

symbol pulse_pin = B.5
symbol val = b1

init: servo pulse_pin,75  ;initialize servo

main:

   for val = 75 to 224
    servo pulse_pin, val
    pause 20
   next val

   for val = 224 to 75 step -1
    servo pulse_pin, val
    pause 20
   next val

goto main   ;loop back to start
Picaxe Micro-controller Projects!
The PICAXE series of micro-controllers rank as the easiest and most cost effective way to use Microchip processors. I wanted an easier and less expensive way to introduce my students to the "PIC" micro-controller. Here I hope to get those starting out past poorly written literature and lack of simple working code examples.
- PICAXE Related videos Oct. 2016:
- Tutorial: Programming-Using PICAXE-18M2 Microcontroller
- How to setup PICAXE Pulse Width Modulation
- PICAXE TA8050P H-Bridge with Motor Control
- PICAXE TA8050P H-Bridge with Motor Speed Control
- PICAXE-18M2 Operates MOSFET H-Bridge
- PICAXE-18M2 Uses MCP23016 GPIO Expander
- Solar Panel Charge Controller Using PICAXE Microcontroller
- Exploring the PICAXE Micro-Controller
- Understanding Micro-Controller Input/Output Ports
- Using the 74HC165 Shift Register with the PICAXE Micro-Controller
- Connecting the 74HC595 Shift Register to PICAXE Micro-controller
- Using 7-Segment Displays with the PICAXE Micro-Controller
- Potentiometers and Analog-to-Digital Conversion with the PICAXE
- Pulse-Width Modulation Motor Speed Control and the PICAXE Micro-Controller
- Connecting the PICAXE to the DS1307 Real Time Clock
- Connecting the PICAXE to an External EEPROM (24LC08)
- Connecting a Servo to a PICAXE
- Connecting the TLC548 to the PICAXE
- Connecting the Ad5220 Digital Potentiometer to the PICAXE
See How I got into Electronics
