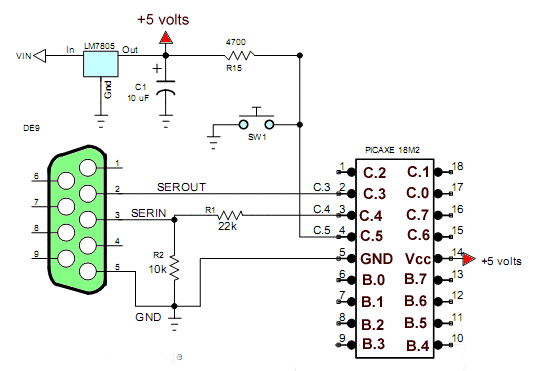
Fig. 1 Schematic to my home built test board minus I/O resistors.
PICAXE 18M2 Microcontroller Operating 24LC08 EEPROM
This demo demonstrates the use of the PICAXE 18M2 internal EEPROM and a separate program using the 24LC08 external EEPROM. It's similar to a program I wrote for the Arduino micro-controller. The second program also shows how to use indirect addressing (bptr) with the PICAXE chip. both programs use the terminal in the PICAXE compiler.
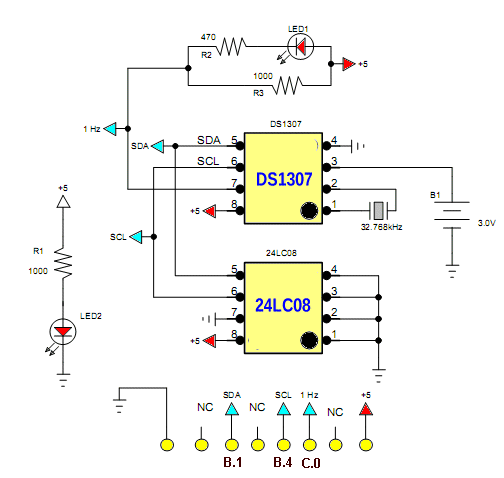
Fig. 2 DS1307-24LC08 test board.
This is a module I constructed to combine an EEPROM and the DS1307 RTC. One could just connect only the 24LC08 section by itself. Don't connect the 1 Hz out pin to C.0 on the PICAXE if just using the EEPROM section.
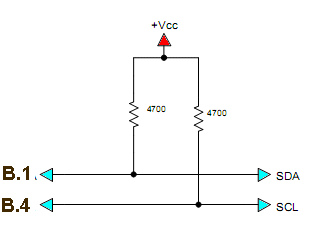
Fig. 3 These pullup resistors must be connected between the PICAXE and DS1307 module.
These 4.7k pullup resistors must be connected as shown between the module in Fig. 2 and the PICAXE.
Program 1 Internal EEPROM
; uses internal EEPROM

; PICAXE- 18M2 Program memory 1792 up to 2048 is EEPROM 0 to 255

#picaxe 18m2 ; type chip used
#terminal 4800 ; set default baud rate serial terminal and open

EEPROM 0,("Hello World   "); save string values in internal EEPROM

main:

   for b0 = 0 to 12   ; start a loop
     read b0,b1  ; read value from EEPROM
     sertxd (b1)  ; transmit to serial
   next b0  ; next character

 sertxd(13,10) ; LF-CR
 pause 500
 goto main
Program 2 External 24LC08 EEPROM
; demonstrate use of I2C with 24L08 EEPROM
; use storage variables from 28- 255 (0x1C - 0xFF)
; Use indirect addressing
; Page references pertain to PICAXE Manual 2 Basic Commands

#picaxe 18m2 ; type chip used
#terminal 4800 ;set baud rate serial terminal and open

symbol SW1 = pinC.5 ; use for input
symbol LED1 = C.7 ; optional LED to ground
symbol LED2 = C.6 ; optional LED to ground
symbol val = b13  ; user variable if needed


hi2csetup i2cmaster,  %10100000,  i2cfast,  i2cbyte  ; 24LC08 1kb p. 76

hi2cout 0, ("Hello World!   ",13,10)  ; initialize EEPROM message p. 76

main:

if SW1 = 0   then new_message ; jump to write new message

bptr = 50
; read EEPROM message ref. p. 72
hi2cin 0,(@bptrinc,@bptrinc,@bptrinc,@bptrinc,@bptrinc,
@bptrinc,@bptrinc,@bptrinc,@bptrinc,@bptrinc,@bptrinc,@bptrinc)

bptr = 50

for bptr = 50 to 63  ;enter upto 16 char plus LF-CR
sertxd(@bptr)
if @bptr = 10 then EXIT ; exit after LF-CR

next bptr

pause 1000 ; wait a while

goto main


new_message:

HIGH LED1

sertxd("Input name: ")

disconnect

for bptr = 28 to 44

serrxd [1000],@bptr

sertxd(@bptr) ; echo input

if @bptr = 10 then EXIT  ; break loop on LF-CR

next bptr

reconnect

bptr = 28 ; @bptrinc will inc bptr by 1

hi2cout 0, (@bptrinc,@bptrinc,@bptrinc,@bptrinc,@bptrinc,@bptrinc,
@bptrinc,@bptrinc,@bptrinc,@bptrinc,@bptrinc,@bptrinc)

pause 500  ; wait for EEPROM

LOW LED1

goto main
Picaxe Micro-controller Projects!
The PICAXE series of micro-controllers rank as the easiest and most cost effective way to use Microchip processors. I wanted an easier and less expensive way to introduce my students to the "PIC" micro-controller. Here I hope to get those starting out past poorly written literature and lack of simple working code examples.
- PICAXE Related videos Oct. 2016:
- Tutorial: Programming-Using PICAXE-18M2 Microcontroller
- How to setup PICAXE Pulse Width Modulation
- PICAXE TA8050P H-Bridge with Motor Control
- PICAXE TA8050P H-Bridge with Motor Speed Control
- PICAXE-18M2 Operates MOSFET H-Bridge
- PICAXE-18M2 Uses MCP23016 GPIO Expander
- Solar Panel Charge Controller Using PICAXE Microcontroller
- Exploring the PICAXE Micro-Controller
- Understanding Micro-Controller Input/Output Ports
- Using the 74HC165 Shift Register with the PICAXE Micro-Controller
- Connecting the 74HC595 Shift Register to PICAXE Micro-controller
- Using 7-Segment Displays with the PICAXE Micro-Controller
- Potentiometers and Analog-to-Digital Conversion with the PICAXE
- Pulse-Width Modulation Motor Speed Control and the PICAXE Micro-Controller
- Connecting the PICAXE to the DS1307 Real Time Clock
- Connecting the PICAXE to an External EEPROM (24LC08)
- Connecting a Servo to a PICAXE
- Connecting the TLC548 to the PICAXE
- Connecting the Ad5220 Digital Potentiometer to the PICAXE
See How I got into Electronics
