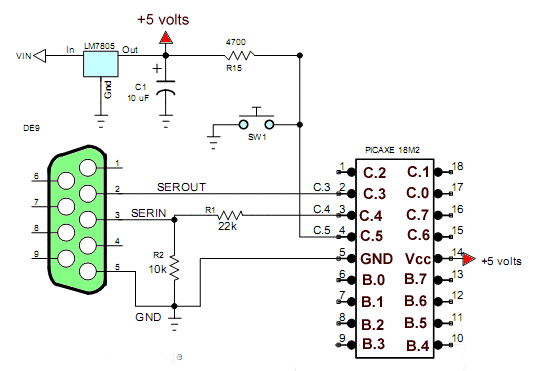
Schematic to my home built test board minus I/O resistors.
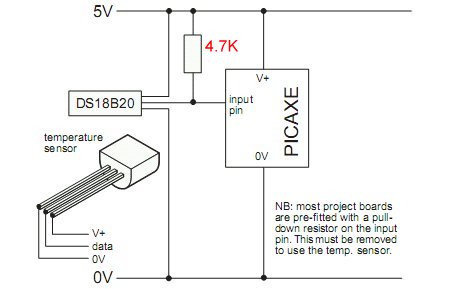
PICAXE 18M2 Microcontroller Reading Dallas DS18B20 1-Wire Digital Thermometer
Here we're going to connect a Dallas DS18B20 1-Wire Digital Thermometer to a PICAXE microcontroller. This is very easy because the M2 series of parts have a direct, single line command to access the part. It has an operating temperature range of -55 degrees C to +125 degrees C.
Here I'm not concerned with the really advanced features of the DS18B20 but the main feature that will be used 90 percent of the time; to simply read the temperature. To use the really advanced features use the Arduino microcontroller.
The commands READTEMP pin, variable and READTEMP12 pin, word variable are explained on pages 184-185 in the PICAXE literature. Here I'm simply concerned with READTEMP because to use READTEMP12 is a mess and just not worth the effort. Understand the PICAXE microcontroller has a built-in interpreted basic that in the smaller versions I use have limitations. This is more than offset by ease of use and easy to learn.
Below is sample, debugged code that should work on any version to test the sensor. DS18B20_Pin can be any input pin. In my case I used the PICAXE-18M2 and converted the Celsius reading to Fahrenheit that displayed the reading on the terminal.
About the readtemp command:
This command only functions at 4MHz. M2, X1 and X2 parts automatically use the internal 4MHz resonator for this command.
The temperature is read back in whole degree steps, and the sensor operates from -55 to + 125 degrees Celsius. Note that bit 7 is 0 for positive temperature values and 1 for negative values (ie negative values will appear as 128 + numeric value).
Note the readtemp command does not work with the older DS1820 or DS18S20 as they have a different internal resolution. This command is not designed to be used with parasitically powered DS18B20 sensors, the 5V pin of the sensor must always be connected.
symbol DS18B20_Pin = C.1

main:


readtemp DS18B20_Pin, w1  ; read value into w1
if w1 > 127 then negative  ; test for negative
w1 = w1 * 9 / 5 + 32 ; covert to Fahrenheit
sertxd ("+", #w1, " degrees ", 13, 10)  ; transmit value to term

goto main


negative: ; label

let w1 = w1 - 128  ; adjust neg value
w1 = w1 * 9 / 5 + 32 ; covert to Fahrenheit
sertxd ("-", #w1, " degrees ", 13, 10)  ; transmit to term

goto main
Picaxe Micro-controller Projects!
The PICAXE series of micro-controllers rank as the easiest and most cost effective way to use Microchip processors. I wanted an easier and less expensive way to introduce my students to the "PIC" micro-controller. Here I hope to get those starting out past poorly written literature and lack of simple working code examples.
- PICAXE Related videos Oct. 2016:
- Tutorial: Programming-Using PICAXE-18M2 Microcontroller
- How to setup PICAXE Pulse Width Modulation
- PICAXE TA8050P H-Bridge with Motor Control
- PICAXE TA8050P H-Bridge with Motor Speed Control
- PICAXE-18M2 Operates MOSFET H-Bridge
- PICAXE-18M2 Uses MCP23016 GPIO Expander
- Solar Panel Charge Controller Using PICAXE Microcontroller
- Exploring the PICAXE Micro-Controller
- Understanding Micro-Controller Input/Output Ports
- Using the 74HC165 Shift Register with the PICAXE Micro-Controller
- Connecting the 74HC595 Shift Register to PICAXE Micro-controller
- Using 7-Segment Displays with the PICAXE Micro-Controller
- Potentiometers and Analog-to-Digital Conversion with the PICAXE
- Pulse-Width Modulation Motor Speed Control and the PICAXE Micro-Controller
- Connecting the PICAXE to the DS1307 Real Time Clock
- Connecting the PICAXE to an External EEPROM (24LC08)
- Connecting a Servo to a PICAXE
- Connecting the TLC548 to the PICAXE
- Connecting the Ad5220 Digital Potentiometer to the PICAXE
See How I got into Electronics
