Fig. 1
Click for larger image.
Arduino Measures Constant Current Source
by Lewis Loflin
Open the alternate schematic. Schematic Arduino Current Measurement.
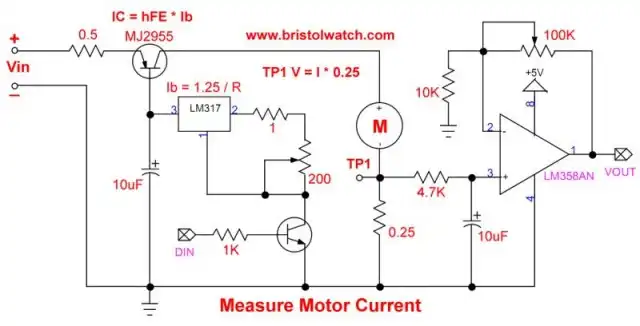
This is a continuing series on Arduino projects. This circuit enables Arduino to measure current from the constant current source projects below.
I used two parallel 0.5 Ohm resistors for 0.25 Ohms. The small voltage from resistors is amplified by an LM358 op-amp. Gain is set by R2 / R1.
An RC filter is created by a 4.7K resistor and 10uF capacitor. This enables measurement of DC current or pulse-width-modulated current produced by the Arduino PWM from digital pin 9. The output is a clean DC readable on a microcontroller analog-to-digital input pin.
Calibration is as follows; replace the motor with a dummy load (I use an auto headlight) with an ammeter in series. At 100% pulse-width-modulation adjust the 200-Ohm potentiometer for 1-amp on the amp meter.
Adjust the 100K pot for 1-volt on pin 1 of the LM358. Adjust the current from the 200-Ohm potentiometer to 2-amps. Output should be close to 2V.
The main idea is the 200-Ohm pot sets maximum current (CCS max) from the PNP pass transistor. The Arduino PWM operates from 0% (CCS OFF) to 100% (CCS max).
This provides real to feedback to compensate for current drift with the PNP pass transistor by changing the input duty cycle. This could also detect a stalled motor, etc.
The test program for an I2C LCD display and serial monitor.
Download code ccs_lm358.txt.
See
- Measure Current from Constant Current Source with Arduino YouTube video
- Arduino Controlled Power Constant Current Source
- Arduino Controlled Constant Current Source YouTube video
/* Arduino Measures Current from Constant Current Source
   https://www.bristolwatch.com/ele4/ccs_lm358.htm
   by Lewis Loflin lewis@bvu.net

   also see:
   Arduino Controlled Power Constant Current Source
   https://www.sullivan-county.com/ele/ard_css.htm
*/

// Arduino code:

#include < Wire.h >
#include < LiquidCrystal_I2C.h >
LiquidCrystal_I2C lcd(0x27, 16, 2);
//set the LCD address to 0x27
//for a 16 chars and 2 line display

#define pwmPin 9
#define pot 0
#define analog1 1
int analogValue = 0;
// variable to hold the analog value

int total, average;
float volts;

void setup() {
  // open the serial port at 9600 bps:
  Serial.begin(9600);
  lcd.init();
  lcd.backlight();
}

void loop() {
  // read the analog input on pin 0:
  analogValue = analogRead(0) ;
  Serial.print("Pot value = ");
  Serial.print(analogValue);
  Serial.print("\n");
  analogWrite(pwmPin, analogValue / 4);

  analogValue = analogRead(pot);

  lcd.setCursor(0, 0);
  lcd.print("POT =         ");
  lcd.setCursor(6, 0);
  lcd.print(analogValue);

  analogValue = analogRead(analog1);

  lcd.setCursor(0, 1);
  lcd.print("AMPs =       ");
  lcd.setCursor(11, 1);
  lcd.print(analogValue * .00467 );

  Serial.print("AMPs = ");
  Serial.print(analogValue * .00475);
  Serial.print("\n");
  delay(500);
}
- TL431 Battery Charger Voltage Detector Circuits Schematics
- Arduino Constant Current H-Bridge Motor Control
- TL431 Battery Charger Voltage Detector Circuits Schematics
- TL431 Sink Mode Constant Current Circuits
- Quick navigation of this website:
- You Tube Channel
- Basic Electronics Learning and Projects
- Homepage Lewis Loflin
- Follow on X
- Skeptic Site
- Religion 1
- Religion 2
- Coils for Highly Selective Crystal Radio
- Neon (NE-2) Circuits You Can Build
- Understanding Xenon Flashtubes and Circuits
- Hall Effect Magnetic Switches and Sensors
- Transistor-Zener Diode Regulator Circuits
- Build an Adjustable 0-34 volt power supply with the LM317
- Simple 2 Transistor LED Flasher Circuit
- LM2575 Simple Switching Voltage Regulators
- LM317 Constant Current Source for Lighting LEDs
- IGBT Based High Voltage H-Bridge DC Motor Control
- Arduino Controlled IR2110 Based H-Bridge HV Motor Control
- Understanding Unijunction Transistors Theory Operation
- Arduino Measures Current from Constant Current Source
- Constant Current Source Theory Testing
- Review Ohm's Law for Trouble-Shooting CCS Circuits
- Arduino Power Magnetic Driver Board for Stepper Motors
- Arduino Controlled Power Constant Current Source
- Theory and Operation of Capacitors
Related video to above:
- Measure Current from Constant Current Source with Arduino
- Constant Current Source Multimeter Trouble Shooting
- Ohm's Law Review for Constant Current Source
- Arduino Unipolar Stepper Motor Driver Board with Arduino Code
- Arduino Controlled Constant Current Source
- LM317 Adjustable Current Boost Power Supply
- Constant Current Circuits LM334, LM317
- Build LM317 0-34 Volt Power Supply
- LM334 Constant Current Source with Resistive Sensors
- LM317 High Power Constant Current Source Circuit
- LM317 Constant Current Source Circuits
- Test SCRs and Triacs
- Basic MOSFET Transistor Test Circuits
- High Voltage MOSFET Switching Circuits
- 3 Amp LM741 Op-Amp Constant Current Source
- Current Limiter Testing of Zener Diodes
- Current Limiter for Opto-Coupler Inputs
- LM317 CCS for Light Emitting Diodes
Web site Copyright Lewis Loflin, All rights reserved.
If using this material on another site, please provide a link back to my site.