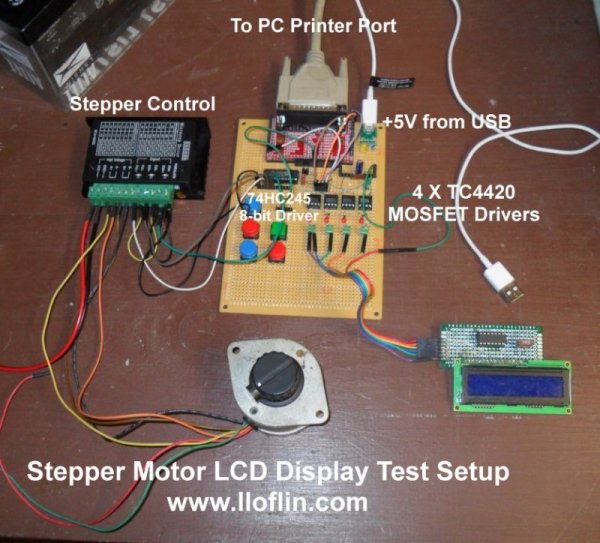
Fig. 1 Parallel port demo with stepper motor and serial LCD display.
Build Serial HD44780 LCD Display Connect to Parallel Port
Here I'll look at my serial HD4470 based serial LCD display. It is shown in Fig. 1. It has 4 input pins plus 5-volts and ground.
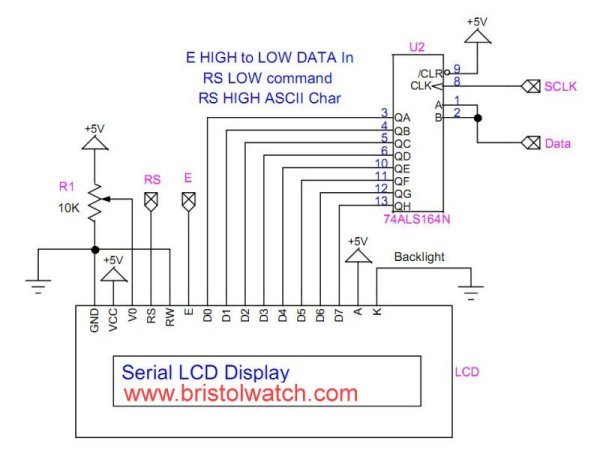
Fig. 2 HD4470 based serial LCD display schematic.
The schematic to the serial LCD display is in fig. 2. There are 4 input connections: E, RS, DATA, SCLK. They are connected to the printer port CONTROL pins.
These can be direct connections or through a breakout board. For more on this see Build or Buy Parallel Port Breakout Board? for connections.
This can also be done without the serial shift register if one wants to use the 8-bit DATA port.
This has been ported over from Arduino and Raspberry Pi. My code is designed to move between platforms.
A 74HC595 can work just as well with minor coding and wiring differences.
- Raspberry Pi 74164 Serial Shift Register Interface Liquid Crystal Display
- Connecting Arduino to a 74C164 Shift Register
- Connect Arduino to LCD Display with 74164 Shift Register
Serial LCD Display You Tube:
74C164 shift register with Microchip PIC
74C164 shift register with Arduino
SN74164 SSR with a LCD Display and Arduino
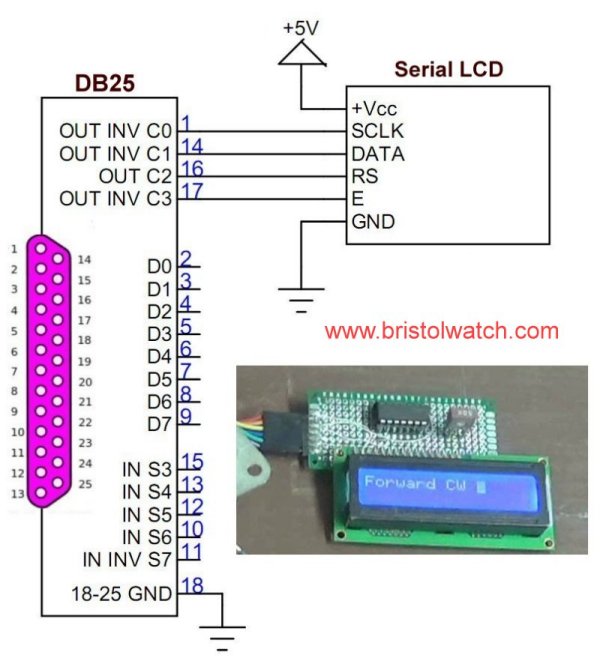
Fig. 3 Serial HD44780 circuit connected PC parallel port.
Fig. 3 illustrates the serial LCD connections to a PC parallel port.
A byte (8-bit) ASCII character or control code is shifted into the 74LS165. A control code sets the LCD cursor position, etc.
RS is set HIGH for ASCII character or LOW for control code. The following list is for control codes. Write command is a subroutine I wrote for Arduino.
Note the first line is designated 0 and the second line designated 1.
  Hd44780 display commands:
  0x0f = initiate display cursor on blinking
  0x0c = initiate display cursor off
  0x01 = clear display fills display with spaces (0x20).
  0x02 = HOME returns to line zero first character
  0x38 = 2 lines X 16 char 8 bits mode.
  Defaults to 1 line mode.
  0x10 = cursor left
  0x14 = cursor right
  0x18 = Shifts entire display left
  0x1c = Shifts entire display right

  One can also go to a specific location.
  writeCom(0x80); // begin on line 0.
  writeCom(0x80 + 0x40); // begin line 1.

  writeCom(0x38); // setup for 2 lines.
  writeCom(0x0F); // blinking cursor.

  writeCom(0x02); // home
  writeCom(0x01); // clear
Will display strings and characters.
Base address 0x37A - four bits 0-3;
bit C0 pin 1 inverted connected to 74LS164 SCLK pin 9;
bit C1 pin 14 inverted connects to 74LS164 DATA pins 1 and 2;
bit C2 pin 16 not inverted connect to RS on LCD;
bit C3 pin 17 inverted connect to E on LCD;
bit C5 is data direction bit for the data port at 0x378. We won't use that here.
The 8-bit data byte be it ASCII or command code is shifted into a 74LS164 serial shift register. This is most significant bit (D7) first. After data is shifted in, RS selects ASCII (HIGH) or control code (LOW), E switches from HIGH-LOW-HIGH. Byte is input to LCD.
LCD line 0 position 0 is at 0x80. Characters are displayed 0x80-0x8F. LCD line 1 position 0 is 0xC0. Characters are displayed 0xC0-0xCF. Home is considered line 0 position 0.
Now we will look at some code snippets. Let's define some names:
#define LOW 0
#define HIGH 1

#define RS 4
#define E 8

#define C0 1
#define C1 2
#define C2 4
#define C3 8

#define ln1 0x80 // line 0
#define ln2 0xC0 // line 1
The bits in the control register 0x37A are defined as powers of 2. This is use in subroutine setCbit(int bit, int state). This works the same way as Arduino digitalWrite().
The pulseE(void) togglee E from HIGH-LOW-HIGH. typeChar(char)
The subroutine ssrWrite(char) is a serial shift routine.
void ssrWrite(char val)  {
  // shift data into 74164
  setCBit(C0, HIGH); // inverted to LOW
  int j, temp;
  for (j = 1; j <= 8; j++)  { // shift out MSB first
    temp = val & 0b10000000; // MSB out first
    if (temp == 0x80) setCBit(C1, LOW);
    else setCBit(C1, HIGH);
    pulseE();
    val = val << 1; // shift one place left
  }  // next j
}  // end ssrWrite
The typeChar(char) uses ssrWrite() sets RS to HIGH, toggles E with pulseE().
void typeChar(char val)   {
  // HIGH is ASCII mode
  setCBit(RS, HIGH); // non-inverted
  ssrWrite(val); // serial out
  pulseE();
}
The subroutine writeCom() is nearly identical to typeChar() other than RS is set LOW.
The subroutine typeln(*s) will output a string of text on the LCD starting at the position pointer. The location or position must be set first. This is a memory address within the LCD. This text is passed as a string or character array terminated by a zero. If the string is longer than 16 characters the extra characters won't be seen.
void typeln(char *s)   {
  while (*s)  typeChar(*(s++));
}
Let's do a simple program to print a text string at the beginning of lines 0 and 1 on the LCD display.
int main(void)   {

  // must include to access port
  if (ioperm(0x378, 3, 1))
    fprintf(stderr, "Access denied to %x\n", 0x378), exit(1);

  char myString[] = "Hello world!";

  initLCD();
  writeCom(0x80); // goto line 0
  typeln(myString);
  writeCom(0xC0); // got line 1
  typeln("Hello world!");
  return 0;
}
What did we just do? First ioperm(0x378, 3, 1) under Linux on a PC gives us access to the IO hardware. This must either be done as root or with proper sudo permissions. If this fails the program is exited.
The command initLCD() sets up the LCD for proper operation, writeCom(0x80) is a memory location as is 0xC0.
The typeln(char*) passes a string location starting at myString[0]. In reality it also directly with a string name as well.
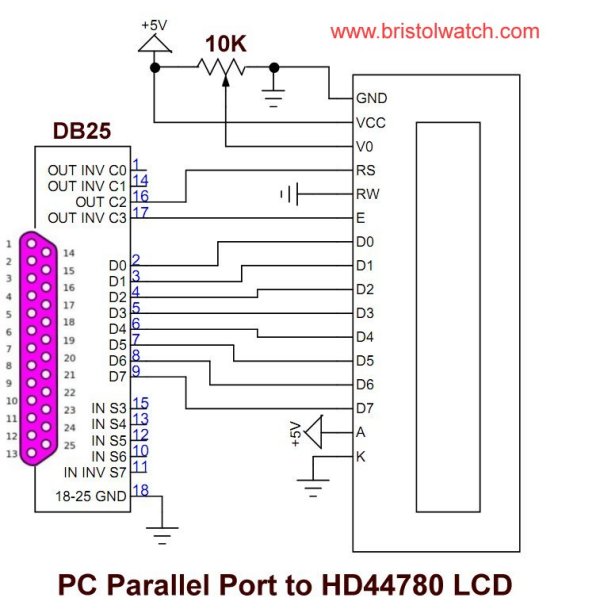
Fig. 4 Parallel connected HD44780 to PC printer DATA port.
Fig. 4 is the schematic for direct DATA port connection of the LCD display at address 0x378. The only change needed is to change where ever ssrWrite() is use the outb() command:
void typeChar(char val)   {
  // HIGH is ASCII mode
  setCBit(RS, HIGH); // non-inverted
  outb(val, 0x378);
  pulseE();
}
The complete code can be cut-pasted at the bottom of this webpage.
- Hobby Electronics Home Page
- Donate
- Exploring Digital Computer Electronics
- Hardware
- Hardware Review Connecting PC Parallel Ports
- Operation TB6600 Stepper Controller with PC Parallel Port
- Build or Buy Parallel Port Breakout Board?
- Build Serial HD44780 LCD Display Connect to Parallel Port
- Motherboards
- Presario 1999 CM1001 Gaming Computer Salvage
- Live Test 2002 VIA EPIA-800 Mini ITX Motherboard
- Salvage, Test 2012 AAEON EMB-B75A Industrial Motherboard
View all of my You Tube Videos
Also visit and subscribe to My YouTube Channel
- Main Light Fast Linux Desktops with Openbox, JWM
- Test Reuse Surplus PC Power Supplies
- Add WBAR Launch Dock to Raspberry Pi
- Add MPG123 Terminal Music Player to Raspberry Pi, Linux
- Basics of Alsamixer Audio Control for Linux
- Add Solid State Hard Drive to Raspberry Pi
- Beep a PC Speaker Add Beeper to Raspberry Pi
- Using FEH Wallpaper Setter Under Linux
- Scrot Lite Weight Screen Shot Software for Linux
- Using Light Weight Beaver Text Editor
- Install Viewnior Image Viewer for Linux
- Zmixer ALSA Sound Control Tutorial
- Tutorial Xinitrc Desktop Manager Control for Linux
- Setup Raspberry Pi Using JWM Window Manager
- Off Site:
- Web Master
- Tri-Cities VA-TN
- General Science
- Hobby Electronics
- US Constitution
- Christianity 101
- Religious Themes
Web site Copyright Lewis Loflin, All rights reserved.
If using this material on another site, please provide a link back to my site.
#include <stdio.h>
#include <stdlib.h>
#include <unistd.h>
#include <sys/io.h>
#include <string.h>

#define LOW 0
#define HIGH 1


#define RS 4
#define E 8

#define C0 1
#define C1 2
#define C2 4
#define C3 8

#define ln1 0x80 // line 0
#define ln2 0xC0 // line 1

void initLCD(void);
void CLR(void);
void HOME(void);
void gotoLoc(int);
void setCBit(int, int);
void ssrWrite(char);
void pulseE(void);
void typeChar(char);
void writeCom(char);
void typeln(char*);


void ssrWrite(char val)  {
  // shift data into 74164
  setCBit(C0, HIGH); // inverted to LOW
  int j, temp;
  for (j = 1; j <= 8; j++)  { // shift out MSB first
    temp = val & 0b10000000; // MSB out first
    if (temp == 0x80) setCBit(C1, LOW);
    else setCBit(C1, HIGH);
    // serial clk D0 clock in LOW to HIGH
    setCBit(C0, LOW); // inverted to HIGH
    // usleep(100);
    setCBit(C0, HIGH); // inverted to LOW
    val = val << 1; // shift one place left
  }  // next j
}  // end ssr


// clear or set individual bits in control register
void setCBit(int bit, int state)   {

  int x, y, z;
  x = inb(0x37A);
  y = x & bit; // determine bit state HIGH or LOW
  // bit is a numeric value based on powers of 2
  // keep in mind bit 2 pin 16 output is NOT inverted
  if (state == 0  && y != 0)   {
    z = x & (0xFF - bit); // bitwise AND clear bit
    outb(z, 0x37A);
  }

  if (state == 1)   {
    z = x | bit; // bitwise OR set bit
    outb(z, 0x37A);

  }

}

void printBinary(int num1)   {

  int i, j;
  for (i = 0; i < 8; i++)   {
    j = num1 & 0x80; // mask high bit
    if (j > 0) printf(" 1");
    else printf(" 0");
    num1 = num1 << 1; // left shift 1 bit
  }
  printf("\n");
}

void pulseE()   {
  // bit is inverted
  // setCBit(E, LOW);
  setCBit(E, HIGH);
  usleep(100);
  setCBit(E, LOW);
}

void initLCD()   {

  // LOW is command mode
  setCBit(RS, LOW); // non-inverted
  setCBit(E, LOW); // inverts to HIGH
  setCBit(C0, HIGH);
  // HIGH To LOW clock in DATA
  ssrWrite(0x38);
  // outb(0x38, Data); // setup for 2 lines
  pulseE();
  ssrWrite(0x0F);
  // outb(0x0F, Data); // blinking cursor
  pulseE();
  ssrWrite(0x01);
  // outb(0x01, Data); // clear
  pulseE();
  ssrWrite(0x02);
  // outb(0x02, Data); // home
  pulseE();
  usleep(10000); // 10mS wait
}

// clear display
void CLR(void)   {
  // LOW is command mode
  setCBit(RS, LOW);
  ssrWrite(0x01);
  pulseE();
  // back to ASCII
  setCBit(RS, HIGH);
}

// clear display
void gotoLoc(int pos)   {
  // LOW is command mode
  setCBit(RS, LOW);
  ssrWrite(pos);
  pulseE();
  // back to ASCII
  setCBit(RS, HIGH);
}

// go to line 0 pos 0
void HOME()   {
  // LOW is command mode
  setCBit(RS, LOW);
  ssrWrite(0x02);
  pulseE();
  // back to ASCII
  setCBit(RS, HIGH);
}


void typeChar(char val)   {
  // HIGH is ASCII mode
  setCBit(RS, HIGH); // non-inverted
  ssrWrite(val); // serial out
  // outb(val, Data);
  // usleep(100);
  pulseE();
}

void writeCom(char val)   {
  ssrWrite(val);
  // outb(val, Data); // send byte to port
  // LOW is inverted to HIGH
  setCBit(RS, LOW); // make sure RS in Command mode
  // usleep(100);
  pulseE();
}

// Below we pass a pointer to array1[0].
void typeln(char *s)   {
  // usleep(1000);
  // writeCom(pos); // where to begin
  while (*s)  typeChar(*(s++));
}  // end typeln


int count;
char result[16];

int main(void)   {

  // must include to access port
  if (ioperm(0x378, 3, 1))
    fprintf(stderr, "Access denied to %x\n", 0x378), exit(1);

  initLCD();
  gotoLoc(ln1);
  typeln("Hello Lewis!");

  // sleep(1);
  // CLR();
  gotoLoc(ln2);
  typeln("Count = "); // 8 chars
  for (count = 0; count <= 255; count++)   {
    gotoLoc(ln2 + 8);
    if (count < 15) typeChar('0');
    // gotoLoc(0xC0); // ln 2
    sprintf(result, "%X", count);
    printf("Count = %X \n", count);
    typeln(result);
    usleep(500000);
  }

  return 0;

}
Web site Copyright Lewis Loflin, All rights reserved.
If using this material on another site, please provide a link back to my site.