|
Display Time/Date with Arduino, LCD Display, and Ds1307 RTC
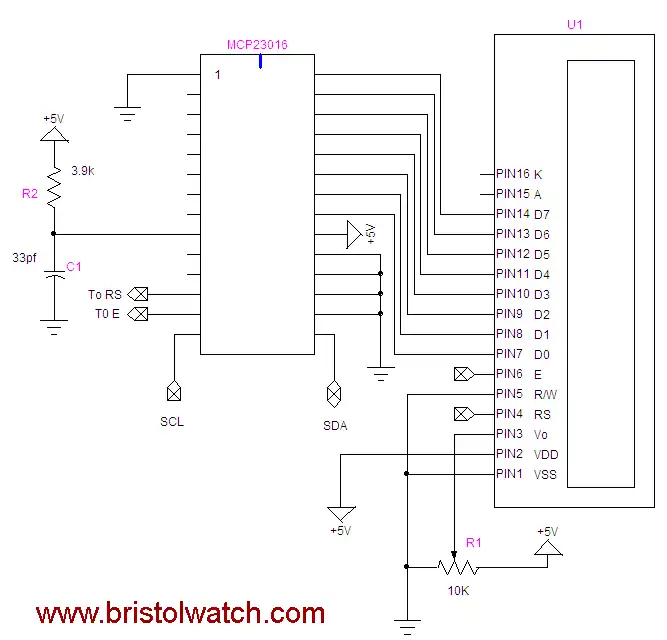
This project demonstrates the use of the MCP23016 I/O expander being used with a LCD display and a Ds1307 RTC to display time/date. It combines several other earlier demonstrations. I used the MCP23016 I/O expander due to the lack of output pins on the ATMEGA168/Arduino.
#include <Wire.h> byte blinkPin = 13; byte swIn = 2; // square wave or pulse in byte SW0 = 4; byte SW1 = 5; byte SW2 = 6; volatile byte irq_flag = LOW; // declare IRQ flag // names can't have number as fist char. const byte HOME = 0x02; const byte Line2 = 0x0c; const byte CL = 0x10; // cursor left const byte CR = 0x14; // cursor right const byte SL = 0x18; // Shifts entire display left const byte SR = 0x1c; // Shifts entire display right int j; void setup() { Wire.begin(); // join i2c bus (address optional for master) pinMode(blinkPin, OUTPUT); digitalWrite(blinkPin, 0); attachInterrupt(0, set_irq_flag0, FALLING); // interupt 0 pin 2 pinMode(swIn, INPUT); // pullups on connect to DS1307 Square wave output pin pinMode(SW0, INPUT); // N.O. push button switch pinMode(SW1, INPUT); // N.O. push button switch pinMode(SW2, INPUT); // N.O. push button switch // activate internal pullups: digitalWrite(swIn, HIGH); digitalWrite(SW0, HIGH); digitalWrite(SW1, HIGH); digitalWrite(SW2, HIGH); Wire.beginTransmission(0x20); // set mcp23016 output configuration: Wire.send(0x06); // pointer Wire.send(0x00); // DDR Port0 all output Wire.send(0x0F); // DDR 0-3 input 4-7 output Wire.endTransmission(); // setup port 1 D7 = E; D6 = RS Wire.beginTransmission(0x20); Wire.send(0x01); //pointer to port 1 Wire.send(B10000000); // setup for command mode Wire.endTransmission(); writeCommand(0x38); // 2 line mode writeCommand(0x0F); // blinking cursor CLR(); // clear dispaly writeCommand(HOME); // optional } void loop() { if (irq_flag == HIGH) { displayTime(); // write time/date to display irq_flag = 0; // clear IRQ flag. } // end if if (digitalRead(SW0) != HIGH) set_time(); // hold the switch to set time } // end loop // output time to display void displayTime() { Wire.beginTransmission(0x68); // access ds1307 RTC Wire.send(0); Wire.endTransmission(); Wire.requestFrom(0x68, 7); byte secs = Wire.receive(); byte mins = Wire.receive(); byte hrs = Wire.receive(); byte day = Wire.receive(); byte date = Wire.receive(); byte month = Wire.receive(); byte year = Wire.receive(); typeln("Time: \n", 1); typeBCD(hrs); type(':'); typeBCD(mins); type(':'); typeBCD(secs); // use MM-DD-YYYY typeln("Date: \n", 2); typeBCD(month); type('-'); typeBCD(date); type('-'); type('2'); type('0'); typeBCD(year); toggle(blinkPin); } // end display time // sets IRQ flag on iterrupt from digital pin 2. void set_irq_flag0() { irq_flag = HIGH; // set flag } // set time subroutine void set_time() { byte minutes = 0; byte hours = 0; byte day_of_week = 0x03; byte day = 0x17; byte month = 0x02; byte year = 0x10; while (digitalRead(SW1) != 0) // set minutes { CLR(); if (digitalRead(SW2) == 0) minutes++; if ((minutes & 0x0f) > 9) minutes = minutes + 6; if (minutes > 0x59) minutes = 0; typeln("Minutes = \n", 1); typeBCD(minutes); delay(1000); } delay(1000); while (digitalRead(SW1) != 0) // set hours { CLR(); if (digitalRead(SW2) == 0) hours++; if ((hours & 0x0f) > 9) hours = hours + 6; if (hours > 0x23) hours = 0; typeln("Hours = \n", 1); typeBCD(hours); delay(1000); } Wire.beginTransmission(0x68); // activate DS1307 Wire.send(0); // where to begin Wire.send(0x00); //seconds Wire.send(minutes); //minutes Wire.send(0x80 | hours); //hours (24hr time) Wire.send(day_of_week); // Day 01-07 Wire.send(day); // Date 0-31 Wire.send(month); // month 0-12 Wire.send(year); // Year 00-99 Wire.send(0x10); // Control 0x10 produces a 1 HZ square wave on pin 7. Wire.endTransmission(); } // end setime() // Below we pass a pointer to array1[0]. If no '\n' then the limit is 16. (0 - 15) void typeln(char *array1, int i) { delayMicroseconds(1000); if (i == 1) writeCommand(0x80); // begin on 1st line if (i == 2) writeCommand(0x80 + 0x40); // begin on 2nd line for (int j = 0; (array1[j] != '\n') && (j < 16); j++) type(array1[j]); } // send command to HD44780 display // E High to Low transition write command or data to HD44780 display // RS 0 for command, default 1 for data // setup port1 D7 = E; D6 = RS void writeCommand(char c) { Wire.beginTransmission(0x20); // mcp23016 Wire.send(0x00); // begin here Wire.send(c); // command code Wire.endTransmission(); Wire.beginTransmission(0x20); // mcp23016 Wire.send(0x01); // pointer Wire.send(B10000000); // command mode E high Wire.endTransmission(); Wire.beginTransmission(0x20); // mcp23016 Wire.send(0x01); // pointer Wire.send(B00000000); // char mode E low Wire.endTransmission(); delayMicroseconds(100); Wire.beginTransmission(0x20); // mcp23016 Wire.send(0x01); // pointer Wire.send(B10000000); // E high back to command mode Wire.endTransmission(); } // send char to HD44780 display // E High to Low transition write command or data to HD44780 display // RS 0 for command, default 1 for data // setup port1 D7 = E; D6 = RS void type(char c) { Wire.beginTransmission(0x20); // mcp23016 Wire.send(0x00); // begin here Wire.send(c); // data Wire.endTransmission(); Wire.beginTransmission(0x20); // mcp23016 Wire.send(0x01); // pointer Wire.send(B11000000); // char mode E high Wire.endTransmission(); Wire.beginTransmission(0x20); // mcp23016 Wire.send(0x01); // pointer Wire.send(B01000000); // char mode E low Wire.endTransmission(); delayMicroseconds(100); Wire.beginTransmission(0x20); // mcp23016 Wire.send(0x01); // pointer Wire.send(B10000000); // E high back to command mode Wire.endTransmission(); } // clear display void CLR() { writeCommand(0x01); // clear } // this routine types a Hex values to HD44780 display // the value from be in BCD form void typeBCD(byte val) { byte n = val; n = (n >> 4) + 48; type(n); val = (val & B00001111) + 48; type(val); } // bascspace on display void BS() { writeCommand(CL); } // toggle the state on a pin void toggle(int pinNum) { int pinState = digitalRead(pinNum); pinState = !pinState; digitalWrite(pinNum, pinState); }
You Tube Arduino Microcontroller Video Series March 2012:
Arduino demos:
» About me » Bristol VA/TN » E-Mail » Hobby Electronics » Arduino Microcontroller
General Electronics
Added January 2012: PICAXE Micro-controller Projects!The PICAXE series of micro-controllers rank as the easiest and most cost effective way to use Microchip processors. I wanted an easier and less expensive way to introduce my students to the "PIC" micro-controller. Here I hope to get those starting out past poorly written literature and lack of simple working code examples.
|