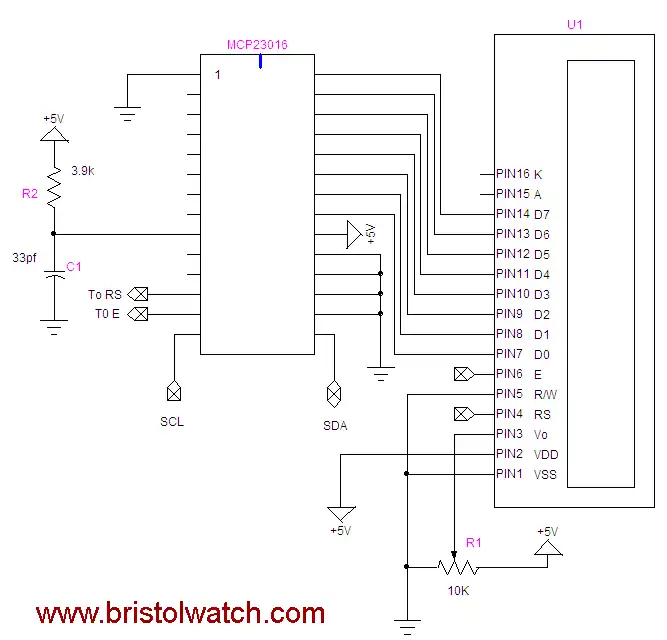
Basic diagram.
Arduino Interface MCP23016 GPIO Expander Driving LCD Display
by Lewis Loflin
The MCP23016 is available in a DIP package from www.mouser.com.
Mfr. Part # MCP23016-I/SP, Mouser Part # 579-MCP23016-I/SP, Cost: Qty. 1: $2.37 as of March 2023.
The address of the MCP23016 is 0x20.
The data or command is written from port 0 (GP0) of the MCP23016
Note: RS register select pin 4 on display is connected to MCP23016 pin 13 (GP1.7). 0 for command, 1 for data R/W of display goes to ground. C1 is 39pf and R2 is 3.9K. The MCP23016 pin 12 (Gp1.6) is E pin 6 on display.
E = connected display pin 6 (E), hi to lo transition will clock info into display.
Register for command or data is selected by RS. Data is output in port0, two bits of port1
on the MCP23060 (bits 6, 7) are to control E and RS. R/W goes to ground.
Hd44780 display commands:
0x0f = initiate display cursor on blinking
0x0c = initiate display cursor off
0x01 = clear display fills display with spaces (0x20).
0x02 = HOME returns to line one first character
0x38 = 2 lines X 16 char 8 bits mode. Defaults to 1 line mode.
0x10 = cursor left
0x14 = cursor right
0x18 = Shifts entire display left
0x1c = Shifts entire display right
Explanation of subroutines:
void BS() - backspace cursor on display. No return value.
void CLR() - clears display. No return value.
void type(char c) - outputs a character to display wherever
cursor is at. Returns no value.
void writeCommand(char c) - will execute single command listed above.
For example to clear the display to set the 2 line mode:
writeCommand(0x38); // two line mode
writeComaand(0x02); // clear display
More sample code:
 void typeln(char *array1, int i) - type one line of text to display.
 his can be a quoted text string or array of characters while i
 selects line to be written to. The value of i is '1' for line one
 and '2' for line 2. All text strings or arrays must have a "\n" to
 terminate. Maximum 16 characters plus the '\n'.

 Note the "\n" not needed in the 0017 compiler.

The line:
for (int j = 0; (array1[j] != '\n') && (j < 16); j++) type(array1[j]);
Has been modified to:
for (int j = 0; (array1[j] != 0) && (j < 16); j++) type(array1[j]);

The following examples go in the void loop() {  )

 Example 1:
 typeln("Hello word. \n", 1);
 // displays "Hello world." on line one.

 Example 2:
 char textArray[] = "Hello world.\n";
 typeln(textArray, 2); // displays "Hello world." on line 2.

 Example 3 Convert int number to string
 and output to display.
 int intNumber = 1023;
 // the inter number range is from -32767 to 32767.
 char St1[10]; //char array or string
 itoa(intNumber, St1, 10);
 // covert an integer number to text string.
 typeln(St1, 1); // displays 1023 on line 1.


 Example 4 using PString.h from
 http://arduiniana.org/libraries/pstring/
 The ZIP file must be downloaded and
 the unzipped folder (PSstring) must
 be placed in arduino-0017/hardware/libraries/
 Restart the compiler!

Be sure use PSring.h under Wire.h.

 PString has all the functions of print
 but instead of the serial port
 will print to a text buffer/array.
 This can then be output with typeln().

 Ex. 4A: Will print PI
  float PI = 3.141596;
  char buffer[16];
  PString(buffer, sizeof(buffer), pi);
  // PI as text into buffer
  typeln(buffer, 2); // prints 3.14 on line 2

  Ex. 4B:
  char buffer[16];
  PString(buffer, sizeof(buffer), "Hello World!");
  typeln(buffer, 2); // prints Hello World! on line 2

  Ex. 4C:
  char buffer[16];
  int SECS = 255;
  PString(buffer, sizeof(buffer), SECS);
  typeln(buffer, 2); // will print 255 on line 2


  Ex. 4D:
  char buffer[16];
  int SECS = 255;
  PString(buffer, sizeof(buffer), SECS, HEX);
  typeln(buffer, 2);
  // will print FF (HEX for 255) on line 2

  Ex. 4E:
  char buffer[16];
  int SECS = 255;
  PString(buffer, sizeof(buffer), SECS, OCT);
  typeln(buffer, 2); // will print 377 (OCT for 255) on line 2

  Ex. 4F:
  char buffer[16];
  int SECS = 255;
  PString(buffer, sizeof(buffer), SECS, BIN);
  typeln(buffer, 2);
  // will print 11111111 (binary for 255) on line 2

  Ex. 5:
  float Pi = 3.1415;
  char buffer[16];
  PString str(buffer, sizeof(buffer));
  str.print("Pi = ");
  str.print(Pi);
  typeln(buffer, 2);
  // will print Pi = 3.14 on display line 2

  Ex. 6:
  float Pi = 3.1415;
  char buffer[16];
  PString str(buffer, sizeof(buffer));
  str.print("Pi = ");
  str.print(Pi);
  typeln(buffer, 1);
  // will print "Pi = 3.14" on display line 1

  str.begin(); // re-use buffer
  str.print("Length is ");
  str.print(str.length());
  typeln(buffer, 2); will display "Length = 10" in line 2

  Ex. 7:
  char buffer[16];
  PString str(buffer, sizeof(buffer));
  str.print("Capacity is ");
  str.print(str.capacity());
  typeln(buffer, 2); // prints "Capacity is 16" in line 2.

Where to connect the MCP23016.
- Interfacing the Arduino to the MCP23016 I/O Expander
- Connecting the Arduino to MCP23016 and LCD Display
- Arduino with a DS1307 Real Time Clock and MCP23016
Arduino code for this project: mcp23016_lcd_display.txt.
- Quick navigation of this website:
- Basic Electronics Learning and Projects
- Basic Solid State Component Projects
- Arduino Microcontroller Projects
- Raspberry Pi Electronics, Programming
Stepper Motors
- Easy Driver Micro-Stepper Controller to Arduino
- Unipolar Stepper Motor with a Arduino
- Considerations for Using Stepper Motors
- Connecting the Arduino to a L298N H-Bridge
- L298N Motor Controller Theory and Projects
- TA8050 H-Bridge Motor Controller
- Battery Charger related:
- Solar Panel Charge Controller Using Arduino
- Solar Panel Battery Charge Controller Using Arduino
- Solar Panel Battery Charge Controller Switching Circuit
- Arduino AC Power Control Tutorial
- Rotary Encoder Using Arduino Hardware Interrupts
- Arduino Controlling 74C164 Shift Register
- Arduino Interface MC3479 Stepper Motor Controller
Serial LCD Display and assorted Sensors
- Arduino LCD Display using 74164 Shift Register
- Arduino LCD Display with DS18B20
- Arduino LCD Display with DHT11 Sensor
- Arduino with MM5451 LED Display Driver
- Arduino MAX7219 Operates 8X8 LED Matrix
- Arduino RTC Clock MAX7219 LED Display
- BCD Conversion with MAX7219
- Hatching Chicken Eggs with Arduino
- Arduino TMP37 Temperature Sensor
- Arduino TMP37 Temperature Sensor Tutorial
- Testing the Keyes IR Sensor Module with Arduino
- Arduino to MCP23016, LCD Display
- Time-Date with Arduino, LCD Display, DS1307 RTC
- Controlling Driveway Lights with the Arduino
- TSL230R Light to Frequency Converter
- Arduino with MCP23016 I/O Expander
- Arduino DS1307 Real Time Clock
- Arduino with 24LC08 Serial EEPROM
- MC3479 Stepper Motor Controller with Arduino
Web site Copyright Lewis Loflin, All rights reserved.
If using this material on another site, please provide a link back to my site.