Arduino Connecting Easy Driver Stepper Motor Controller
by Lewis Loflin
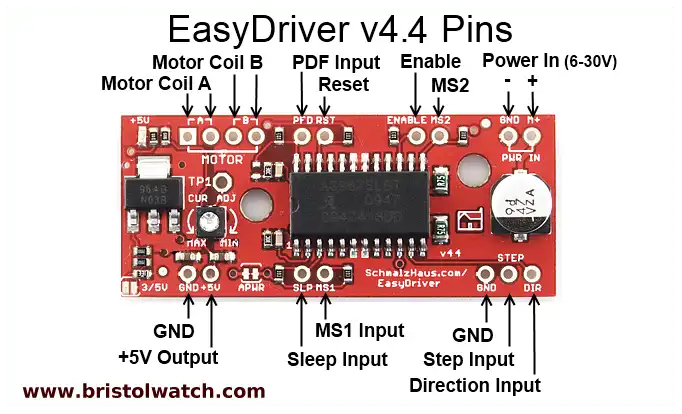
EasyDriver by Brian Schmalz is licensed under a Creative Commons Attribution 3.0 United States License. Based on a work at www.schmalzhaus.com/EasyDriver. Built on the Allegro A3967 it was a replacement for the UCN5804B stepper motor driver chip. I'm using it as a replacement for the equally hard to find and costly MC3479 stepper motor controller.
This really consists of a circuit board with a surface mount integrated circuit. The board costs between $10 to $15. While designed to operate low-power bipolar stepper motors with a current limit of about 700 mA, we can do a lot more.
- More YouTube Videos October 17, 2013:
- Easy Driver with Arduino Unipolar Stepper Motor
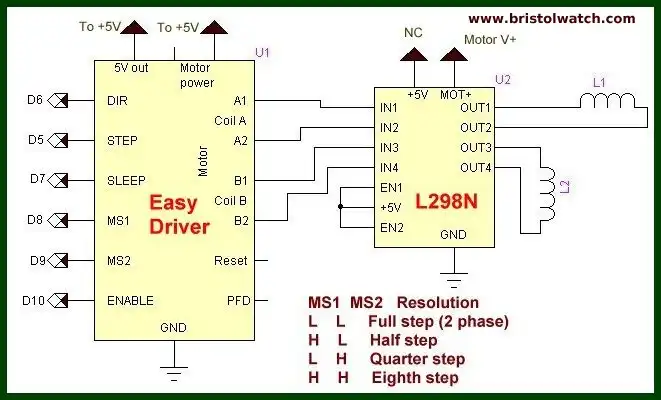
- Using Easy Driver with L298N - Arduino
- Serial Shift Register with a LCD Display
The four outputs for two motor windings (A and B) can drive power MOSFETs or bipolar transistors to operate in the unipolar mode. The power can be boosted by using the four outputs to drive a L298N bipolar type driver board.
Note that with the logic levels on MS1 and MS2 we can select from full step to one-eighth step. In the case of my test motor it was 1.8 degrees per step or 200 steps for 360 degrees of rotation. That same motor in half-step mode requires 400 steps; in quarter-step mode 800 steps; and in eighth-step mode requires 1600 step.
Each "step" requires a positive going pulse on the step pin. Direction is determined by a LOW or HIGH on the direction pin. Note that to reverse direction of rotation swap the wire pairs between A and B.
The advantage is the advanced hardware control simplifies programming and interfacing.
Sparkfun (www.sparkfun.com) a seller of Easy Driver says,
The EasyDriver is a simple to use stepper motor driver, compatible with anything that can output a digital 0 to 5V pulse (or 0 to 3.3V pulse if you solder SJ2 closed on the EasyDriver). EasyDriver requires a 7V to 30V supply to power the motor and can power any voltage of stepper motor. The EasyDriver has an on board voltage regulator for the digital interface that can be set to 5V or 3.3V.
Connect a 4-wire stepper motor and a micro-controller and you've got precision motor control! EasyDriver drives bipolar motors, and motors wired as bipolar. I.e. 4,6, or 8 wire stepper motors.
A3967 microstepping driver.
MS1 and MS2 pins broken out to change microstepping resolution to full, half, quarter and eighth steps (defaults to eighth).
Compatible with 4, 6, and 8 wire stepper motors of any voltage.
Adjustable current control from 150mA/phase to 750mA/phase.
Power supply range from 7V to 30V. The higher the voltage, the higher the torque at high speeds.
Enable Input (ENABLE). This active-low input enables all of the outputs. When logic high the outputs are disabled. Inputs to the translator (STEP, DIRECTION, Ms1, Ms2) are all active independent of the ENABLE input state.
Sleep Mode (SLEEP). An active-low control input used to minimize power consumption when not in use. This disables much of the internal circuitry including the outputs. A logic high allows normal operation and startup of the device in the home position.
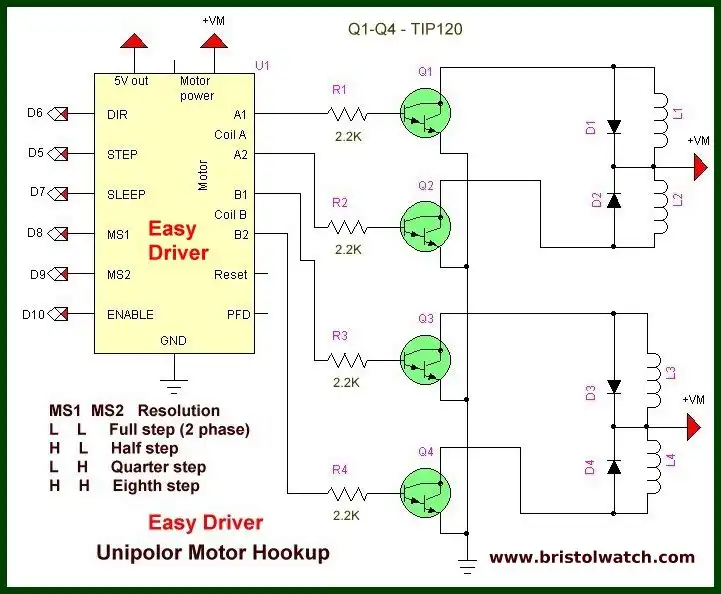
VM is the motor voltage. R1 - R4 are 1000-2200 ohms. While the module has a built in 5-volt regular don't use it to power other circuits because it gets hot.
If one decides to operate a unipolar (six wire) stepper motor in the bipolar (four wire) mode DOUBLE the winding voltage.
Sample Code
Download sample Arduino code stepper_easy_arduino.txt.
Related Stepper motor Pages:
- Arduino Stepper Motor Coil Winder
- Considerations for Using Stepper Motors
- How to Connect Easy Driver Micro-Stepper Controller to Arduino
- Using a Unipolar Stepper Motor with a Arduino
- Using the MC3479 Stepper Motor Controller with Arduino
- Connecting the Arduino to a L298N H-Bridge
- L298N Motor Controller Theory and Projects
- Quick navigation of this website:
- Basic Electronics Learning and Projects
- Basic Solid State Component Projects
- Arduino Microcontroller Projects
- Raspberry Pi Electronics, Programming
Stepper Motors
- Easy Driver Micro-Stepper Controller to Arduino
- Unipolar Stepper Motor with a Arduino
- Considerations for Using Stepper Motors
- Connecting the Arduino to a L298N H-Bridge
- L298N Motor Controller Theory and Projects
- TA8050 H-Bridge Motor Controller
- Battery Charger related:
- Solar Panel Charge Controller Using Arduino
- Solar Panel Battery Charge Controller Using Arduino
- Solar Panel Battery Charge Controller Switching Circuit
- Arduino AC Power Control Tutorial
- Rotary Encoder Using Arduino Hardware Interrupts
- Arduino Controlling 74C164 Shift Register
- Arduino Interface MC3479 Stepper Motor Controller
Serial LCD Display and assorted Sensors
- Arduino LCD Display using 74164 Shift Register
- Arduino LCD Display with DS18B20
- Arduino LCD Display with DHT11 Sensor
- Arduino with MM5451 LED Display Driver
- Arduino MAX7219 Operates 8X8 LED Matrix
- Arduino RTC Clock MAX7219 LED Display
- BCD Conversion with MAX7219
- Hatching Chicken Eggs with Arduino
- Arduino TMP37 Temperature Sensor
- Arduino TMP37 Temperature Sensor Tutorial
- Testing the Keyes IR Sensor Module with Arduino
- Arduino to MCP23016, LCD Display
- Time-Date with Arduino, LCD Display, DS1307 RTC
- Controlling Driveway Lights with the Arduino
- TSL230R Light to Frequency Converter
- Arduino with MCP23016 I/O Expander
- Arduino DS1307 Real Time Clock
- Arduino with 24LC08 Serial EEPROM
- MC3479 Stepper Motor Controller with Arduino
Web site Copyright Lewis Loflin, All rights reserved.
If using this material on another site, please provide a link back to my site.