
Arduino Raspberry Pi Interface with LCD Display
For an explanation on the operation of the LCD part of this page see Connect a Serial LCD Display to Raspberry Pi
For an explanation of how to read 16-bit code from Arduino without the use of I2C see Serial Read from Arduino to Raspberry Pi
The Arduino sketch is arduino_ds18b20X2.ino.
This program is a combination of the above two programs. Arduino operates any number of sensors while Raspberry Pi reads the integer results, does any conversions, and displays the result on a serial LCD display.
The program will reset Arduino and the sensor routines/calls are in the Arduino setup section. The return value is stored in a variable and read back by Raspberry Pi.
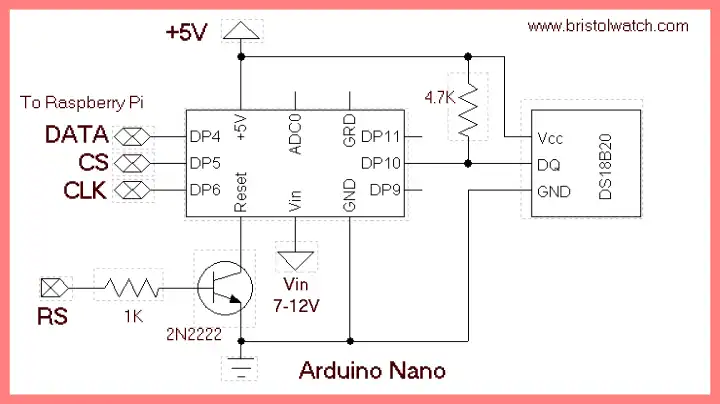
Arduino is programmed to operate as a 16-bit TLC548 ADC.

#!/usr/bin/env python # File rpi_arduino_lcd.py # use with sketch arduino_ds18b20X2.ino # http://www.bristolwatch.com/pport/index.htm # By Lewis Loflin - lewis@bvu.net # access to GPIO must be through root import RPi.GPIO as GPIO import time GPIO.setmode(GPIO.BCM) GPIO.setwarnings(False) # disable warnings CS = 18 CLK =23 dataBit = 24 Reset = 25 GPIO.setup(CS, GPIO.OUT) # CS to Arduino DP5 GPIO.setup(CLK, GPIO.OUT) # CLK to Arduino DP6 GPIO.setup(dataBit, GPIO.IN) # dataBit to Arduino DP4 GPIO.setup(Reset, GPIO.OUT) # Reset to Arduino Reset # Setup IO GPIO.output(CS, 0) GPIO.output(CLK, 0) GPIO.output(Reset, 0) Line1 = 0x80 # location LCD row 0 col 0 or line 1 Line2 = 0xC0 # location LCD row 1 col 0 or line 2 # Bit_out Pin 1-2 SN74164 yellow wire lcdBit = 15 # P3 # CLK Pin 9 SN74164 - clock bit - LOW to HIGH to LOW orange wire lcdClk = 23 # SCK # RS Pin 4 LCD - LOW command; HIGH ASCII white wire RS = 16 # P4 # E Pin 6 LCD - clock data into LCD - HIGH to LOW to HIGH brown wire E = 22 # P6 GPIO.setup(lcdBit, GPIO.OUT) GPIO.setup(lcdClk, GPIO.OUT) GPIO.setup(RS, GPIO.OUT) GPIO.setup(E, GPIO.OUT) # Setup IO GPIO.output(lcdBit, 0) GPIO.output(lcdClk, 0) GPIO.output(RS, 0) GPIO.output(E, 1) def pulseCLK(): GPIO.output(lcdClk, 1) # time.sleep(.01) GPIO.output(lcdClk, 0) return def pulseE(): GPIO.output(E, 0) # time.sleep(.01) GPIO.output(E, 1) return # MSB out first! def ssrWrite(value): for x in range(0,8): temp = value & 0x80 if temp == 0x80: GPIO.output(lcdBit, 1) # data bit HIGH else: GPIO.output(lcdBit, 0) # data bit LOW pulseCLK() value = value << 0x01 # shift left time.sleep(.001) GPIO.output(lcdClk, 0) GPIO.output(lcdBit, 0) return def initLCD(): GPIO.output(RS, 0) # RS LOW ssrWrite(0x38) # setup for 2 lines pulseE() ssrWrite(0x0F) # blinking cursor pulseE() clearLCD() Home() return def clearLCD(): GPIO.output(RS, 0) # RS LOW ssrWrite(0x01) # clear pulseE() return def Home(): GPIO.output(RS, 0) # RS LOW ssrWrite(0x02) # home pulseE() return def gotoLocation(val): GPIO.output(RS, 0) # RS LOW if val < 0x80: val = 0x80 ssrWrite(val) pulseE() return def writeString(myString): i = len(myString) GPIO.output(RS, 1) # RS - HIGH is ASCII for x in range(0,i): y = ord(myString[x]) ssrWrite(y) pulseE() GPIO.output(RS, 0) # RS LOW return # convert an 8-bit number to a binary string def convBinary(value): binaryValue = 'b' for x in range(0,8): temp = value & 0x80 if temp == 0x80: binaryValue = binaryValue + '1' else: binaryValue = binaryValue + '0' value = value << 1 return binaryValue def degC(val): return val * 0.0625 def degF(val): return (val * 0.0625) * 9 / 5 + 32 # Reset Arduino to perform whatever reading def resetArduino(): GPIO.output(Reset, 1) time.sleep(.001) GPIO.output(Reset, 0) time.sleep(3) def readArduino(): temp = 0 GPIO.output(CS, 1) # time.sleep(.002) for i in range(0,15): # loop here 15 times GPIO.output(CLK, 1) time.sleep(.001) temp = temp + GPIO.input(dataBit) GPIO.output(CLK, 0) temp = temp << 1 # shift 1 bit left GPIO.output(CLK, 1) time.sleep(.001) temp = temp + GPIO.input(dataBit) # get bit 16 GPIO.output(CLK, 0) GPIO.output(CS, 0) # clk one more time GPIO.output(CLK, 1) # time.sleep(.002) GPIO.output(CLK, 0) return temp initLCD() resetArduino() gotoLocation(Line1) writeString("Reading T:") TReading = readArduino() TempC = degC(TReading) TempF = degF(TReading) print TempC print TempF gotoLocation(Line1) writeString("TC = ") gotoLocation(Line1 + 5) writeString(str(TempC)) gotoLocation(Line2) writeString("TF = ") gotoLocation(Line2 + 5) writeString(str(TempF)) GPIO.cleanup() exit
- Connecting Raspberry Pi to Arduino with I2C Interface
- Connect Serial LCD to Raspberry Pi
- Serial Read from Arduino to Raspberry Pi
- Arduino Raspberry Pi Interface with LCD Display
- arduino_ds18b20X2.ino
- Raspberry Pi USB Audio Connection
- Build Your Own Raspberry Pi Arduino System
- WiringPi and Pulse-Width-Modulation with Raspberry Pi
- WiringPi for Raspberry Pi and MAX6675 thermal-couple sensor
- WiringPi Blink an LED Demo
- Interface I2C LCD to Raspberry Pi in C
- ADS1115 4-Channel ADC Uses I2C with Raspberry Pi
- MCP4725 12-Bit DAC Interface to Raspberry Pi
- Raspberry Pi with PCF8591 Analog To Digital Control in C
- Raspberry Pi PCF8591 AD-DA Sensor Python Interface
- Connect-Program Raspberry Pi and a MM5451 LED Display Driver
- Raspberry Pi and a MM5451 LED Display Driver YouTube
- Raspberry Pi Python RTC with MAX7219 Display Driver
- Raspberry Pi Python RTC with MAX7219 Display Driver YouTube
- Raspberry Pi and the 8-Digit LED MAX7219 Display Driver
- Programming Raspberry Pi and the 74HC595 Serial Shift Register
- Programming Raspberry Pi and the 74HC595 Serial Shift Register YouTube
- YouTube Videos:
- MCP4725 12-Bit DAC Interface to Raspberry Pi
- ADS1115 4-Channel ADC Uses I2C with Raspberry Pi
- Interface I2C LCD to Raspberry Pi in C
- Pulse-Width-Modulation with Raspberry Pi
- Using Geany Text editor C Programming
- Raspberry Pi Blink Demo
- MAX6675 Raspberry Pi Demo
- Add Zmixer ALSA Sound Control to Raspberry Pi
- Adding Lightweight Beaver Text Editor to Raspberry Pi
- Add Viewnior Lightweight Image Viewer for Raspberry Pi
- Setting up Openbox for Raspberry Pi
- Raspberry Pi Linux Permissions-Program Installations
- Connecting DS1307 RTC to Raspberry Pi
- Raspberry Pi Window Manager Control with Xinitrc
- Setup FSTAB, Symbolic Links for Raspberry Pi
- Change Background Wallpaper on Raspberry Pi with FEH
- Setup JWM Window Manager for Raspberry Pi
- Linux Videos
- Live Linux Distro for Using Printer Port with Electronics
- Using the powerful Rox-Filer system in Linux
- Use FEH under Linux for a Wallpaper Setter
- How to create Symbolic links in Linux
- Videos:
- Raspberry Pi, Arduino, and Learning Linux
- Raspberry PI Arduino Advanced Interface
- Tkinter with Raspberry Pi and PCF8591 AD-DA Sensor