
PCA9555 Demo Board
PCA9555 GPIO Expander with Arduino Using Interrupts
by Lewis Loflin
YouTube Video for this project: PCA9555 32-Bit GPIO Expander with Arduino
In this series I'll be connecting the PCA9555D 32-bit GPIO expander board to an Arduino micro-controller. First we started out simple with counting from 0 to 255 in binary on eight LEDs. See Part 1 for technical information and getting started.
Here in part three we will learn to use the interrupt pin to jump to the key scan routine only when a key is pressed. A BCD value is output on the eight LEDs.
In part two we learned to connect a 4X4 keypad to an 8-bit port. Using "polling" the routine getKey() we will check for a key press and return a BCD value from 0 to 16 displayed on the eight LEDs. See Part 2
In part four we will connect a type a HD44780 type LCD display and learn how to enter data and manipulate character date and strings. In addition to the LCD display we will scan a keypad, use hardware interrupts, all connected through a single PCA9555 module.
In addition I'll reveal some code little discussed with Arduino and we will convert/manipulate code for output to the LCD display. See Part 4
This differs from two only in the addition of interrupt use instead of polling.
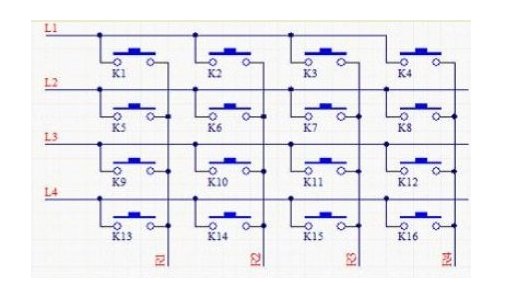
4X4 keypad used in this demo.
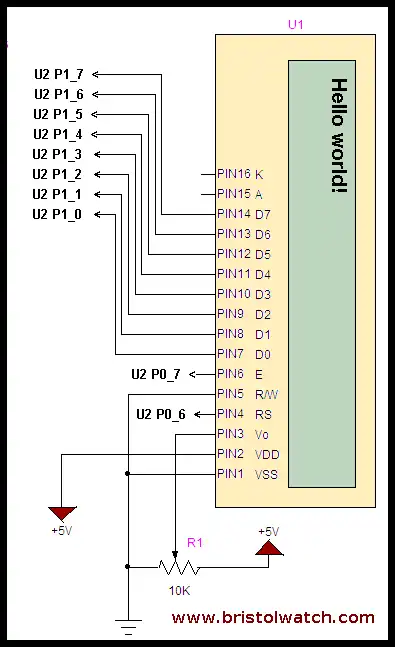
PCA9555 interfaced with HD44780 LCD display.
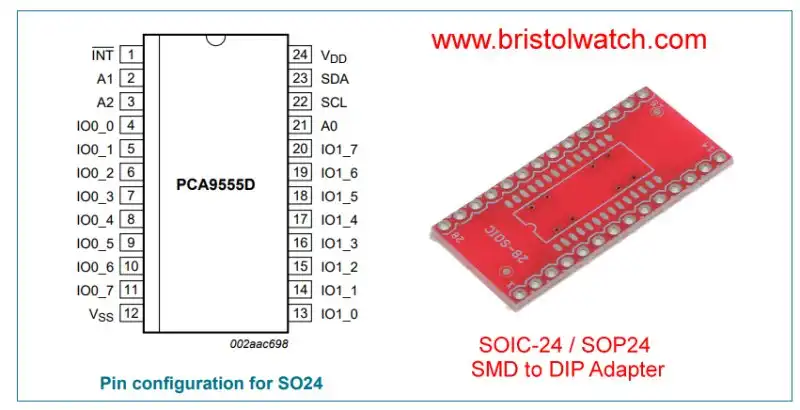
PCA9555 pin connections and Adapter Board
Update for 2023: the above demo board with two PCA9555s is no longer available. Because the PCA9555 only comes in surface mount, a conversion or Adapter board is needed along with 24, 2.5mm pin headers. (Two rows of twelve.)
For this project one will need two PCA9555s and two Adapter boards.
The "SOIC-24 / SOP24 SMD to DIP Adapter" (search Ebay) sells for $10 for a 10 pack. The PCA9555 sells for ~$2.50 each at www.mouser.com. They have 29,000 in stock as of March 2023.
- Arduino Interface PCA9555 GPIO Expander With Code
- PCA9555 GPIO Arduino, 4X4 Keypad
- PCA9555 GPIO Arduino Using Interrupts
- PCA9555 GPIO, Arduino, LCD Display
- Hardware Interrupts for Arduino Operation
Arduino code for this project: arduino_pca9555_irq.txt
- Quick navigation of this website:
- Basic Electronics Learning and Projects
- Basic Solid State Component Projects
- Arduino Microcontroller Projects
- Raspberry Pi Electronics, Programming
Stepper Motors
- Easy Driver Micro-Stepper Controller to Arduino
- Unipolar Stepper Motor with a Arduino
- Considerations for Using Stepper Motors
- Connecting the Arduino to a L298N H-Bridge
- L298N Motor Controller Theory and Projects
- TA8050 H-Bridge Motor Controller
- Battery Charger related:
- Solar Panel Charge Controller Using Arduino
- Solar Panel Battery Charge Controller Using Arduino
- Solar Panel Battery Charge Controller Switching Circuit
- Arduino AC Power Control Tutorial
- Rotary Encoder Using Arduino Hardware Interrupts
- Arduino Controlling 74C164 Shift Register
- Arduino Interface MC3479 Stepper Motor Controller
Serial LCD Display and assorted Sensors
- Arduino LCD Display using 74164 Shift Register
- Arduino LCD Display with DS18B20
- Arduino LCD Display with DHT11 Sensor
- Arduino with MM5451 LED Display Driver
- Arduino MAX7219 Operates 8X8 LED Matrix
- Arduino RTC Clock MAX7219 LED Display
- BCD Conversion with MAX7219
- Hatching Chicken Eggs with Arduino
- Arduino TMP37 Temperature Sensor
- Arduino TMP37 Temperature Sensor Tutorial
- Testing the Keyes IR Sensor Module with Arduino
- Arduino to MCP23016, LCD Display
- Time-Date with Arduino, LCD Display, DS1307 RTC
- Controlling Driveway Lights with the Arduino
- TSL230R Light to Frequency Converter
- Arduino with MCP23016 I/O Expander
- Arduino DS1307 Real Time Clock
- Arduino with 24LC08 Serial EEPROM
- MC3479 Stepper Motor Controller with Arduino
Web site Copyright Lewis Loflin, All rights reserved.
If using this material on another site, please provide a link back to my site.