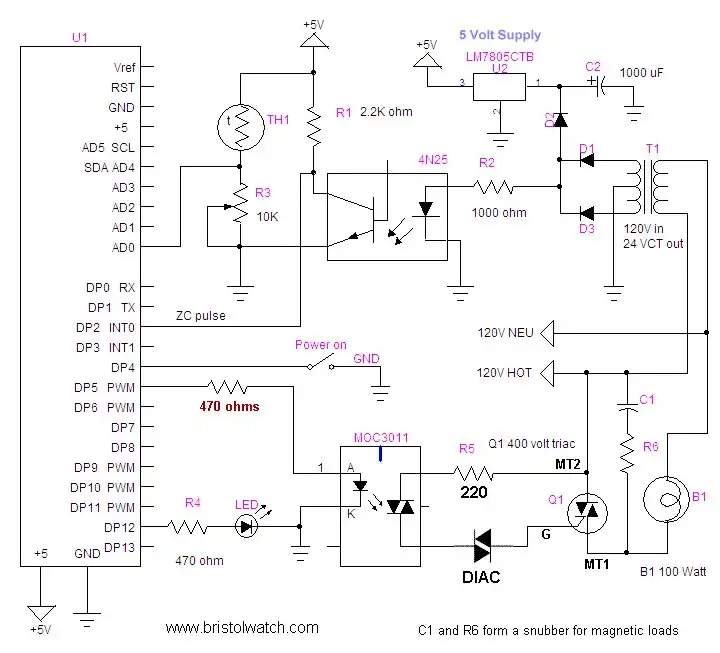
Basic schematic Arduino AC power control.
Hatching Chicken Eggs Utilizing Arduino
by Lewis Loflin
Some egg basics.
Chickens, like most birds, brood (sit on) their clutch of eggs to ensure that they develop properly. If the eggs are not maintained at 37 degrees C (99 degrees F) for 21 days, they will fail. Chickens lay one egg a day. The hen will delay brooding her eggs until she has accumulated her whole clutch of perhaps ten eggs. The first-laid eggs stay alive but do not develop at the lower temperature.
This ensures that all the eggs will hatch at about the same time, a tremendous advantage in the wild, where it is important to leave the nest soon after the chicks have hatched.
The eggs must be maintained at a constant temperature, the humidity must be high (70-80%), and the eggs must be turned at least three times a day. If the eggs are not turned, the embryo will usually adhere to the wall of the egg, and development will fail. Commercial incubators provide for all these environmental needs.
We are dealing with four factors; 37 degrees C (99 degrees F), turning the eggs three times a day, high humidity, and 110/220 volts AC. I'll address the issues and make suggestions. The factor that shocked me was turning the eggs three times a day. The 220 volts AC is no big problem as long as safety precautions are followed and the right parts ratings observed. If in the U.S. 120 volts is fine.
One must consider how to measure temperature and humidity and how to control it. A simple electrical thermostat is cheap, but a lot less accurate. Some solid state control with simple electrical system is better. Computer control is most accurate, but costs more and because it's also more complex, could create more problems if anything goes wrong. Then we can consider a combination of two or three.

Sample circuit for photocell or thermistor
connection to ADC (analog to digital converter) sensor pin.
The ATMEGA168/Arduino is perfect choice to control an egg incubator. Its low cost and ease of programming combined with the range of proven electronics that can be controlled makes this micro controller the way to go. In the above case as the temperature rises the resistance of Th1 decreases, increasing the voltage Ad0 producing a larger output number (0 to 1023) increasing the firing delay for turning on the triac.
This lowers the power output level until fully off. This is not on/off like a thermostat, but more like an smooth linear process. In a cheap mechanical thermostat power is all on or all off producing overshoot and undershoot. This is unacceptable in many applications.

Thermistor Temperature Chart
In the above illustration for the particular thermistor I'm using shows resistance in kilo-ohms versus temperature for Th1. At point Ad0 adjust R3 until the voltage is 2.5 volts at 100 degrees Fahrenheit. It's imperative the temperature not reach 104 degrees or the eggs could be damaged. This could also be compensated for by changing the following line in the program to assure the triac is fully off:
delayMicroseconds (analogValue * 10); // set value between 7 and 14
We are using a light inside a styrofoam cooler as a heat source. We could also install a fan for the controller to trip on if temperature gets too high and could build some type of electro-mechanical device to turn the eggs every 8 hours by a motor the controller could also operate.
Thermistor Spec Sheet Sure Electronics
MORE ON CHICKEN EGGS
The eggs you buy by the dozen at the market are very similar in structure and function to all other bird eggs in the world. Inside the hard shell are the yolk and the white. Several membranes keep various parts of the system separated from each other and from the environment. One additional structure in the egg is easily overlooked-a tiny white mass hardly larger than the head of a pin.
This single cell, called the ovum, is the living part of the egg. If the egg is laid by a hen that has not mated with a cock, the ovum will not develop. If the egg is fertile, the ovum will advance through a predictable sequence of dramatic changes that will eventually result in the emergence of a new live bird.
The egg yolk is stored food for the developing embryo and fetus. As the chick advances in size and complexity, the yolk is used up until it is almost totally consumed at hatching time. The egg white (albumen) is composed mostly of water with some dissolved protein (albumin). The primary function of the white is to keep the embryo moist and cushioned during the rigors of incubation.
A more detailed inquiry into the development of an egg and growth of the embryo reveals still more structures and features, all of which are exquisitely designed and complex in function. With amazing frequency they produce the expected outcome, a new chick.
Chickens are members of a clan of birds that have precocial chicks, meaning that the chicks are up and running in a matter of hours, covered with protective downy feathers, able to follow their mother, and capable of feeding themselves. Birds like robins have altricial chicks, meaning they are blind, naked, and helpless at the time of hatching.
They must be fed, kept warm, and defended against predators, or they will perish. There are degrees of precocial and altricial chicks; chickens have chicks that exhibit the highest level of independence at hatching.
Setting up the equipment. A reliable incubator is of utmost importance for successful egg hatching. A still-air incubator will do the job; circulated-air incubators generally cost quite a bit more.
Buy an incubator large enough to set at least a dozen eggs. A large picture window in the top of the incubator is especially nice, so a large number of students can gather around the incubator at one time to watch them hatch.
Be sure the incubator you purchase has a thermostat so the temperature will be closely regulated. Set the incubator up a few days before you get your eggs to make sure that it is functioning properly. It should maintain a temperature of 37 degrees C (99 degrees F), give or take a degree, when the thermostat is operating.
Usually a screw on the incubator adjusts the temperature. Always read the manufacturer's instructions that accompany the incubator you purchase and follow them to the letter for best results.
It is essential to turn the eggs for successful hatching; once they are set they should not be moved. Automated egg turners are available. They slowly rotate the eggs throughout the day and night, and take care of the eggs on the weekends so you will not have to return to school.
They usually give a higher rate of hatching 70% to 80%. The disadvantage is that students have less involvement with the eggs. Hatching rate should be at least 50 percent if you turn the eggs manually.
Eggs must incubate for 21 days. Eggs are rotated for the first 18 days, and lay still for the last 3 days. Perhaps the hen stops turning the eggs when she hears the chicks begin to peep inside the shell.
When the eggs are resting during the final 3 days, listen. A little hole or crack in the shell will be the first indicator of hatching. The process may take a day or more. Be patient. You may be tempted to help the chick cast off the shell, but resist the urge. Rule one: Don't touch the eggs during the hatching process. The chicks have to do it all by themselves!
Once the chicks have hatched, they need a brooding pen, food, and water. You can use a large cardboard box for a pen. The size of the box depends on how many chicks you are raising. They need plenty of room to grow. Put straw or sawdust in the bottom to absorb droppings.
Provide a warm area in the pen, especially right after the chicks hatch. Heat a large area of the pen with a lamp, but keep part of the area cool for the chicks to exercise in.
Buy an infrared lamp if you are heating a large pen. A 100-watt bulb in a short table lamp works fairly well in a smaller pen. Set up the pen and measure the temperature in several locations to be sure it is ready before the chicks hatch. The first week the chicks need the temperature at 37 degrees C (99 degrees F); you can reduce the temperature by 3 degrees C (5 degrees F) each week until it is down to 21 degrees C (70 degrees F).
Food and water should be available to the chicks at all times. You may want to purchase a feeding tray designed to keep the chicks out and the feed in. You can also purchase a water bottle with a narrow tray that provides a constant supply of water. Chickens can be very messy, so purchase special feeding equipment if you do not want to be constantly cleaning the food and water containers.
Basic handling of eggs. Always make sure that hands are clean before handling the eggs. The shell of the egg has many pores that allow gases and moisture in and out. Dirty, oily hands can block the pores and stop development of the chick.
If you want the eggs to start hatching on a Monday or Tuesday when students are in class, you should set them on a Tuesday (3 weeks before you want them to hatch). If the eggs arrive on a day other than Tuesday, keep them in a cool place 7 degrees to 15 degrees C (45 degrees to 60 degrees F)-until you are ready to put them in the incubator.
If you plan to turn the eggs yourself, use a pencil to mark each egg with an X on one side and an O on the other side to be sure you have turned all the eggs every time. The eggs should be placed on their side with the small end pointed slightly down. As the chick develops inside the egg, its head will be at the large end of the egg.
If the large end is down and the developing chick is standing on its head, it will die. The eggs need to be turned three times a day through the 18th day. The last 3 days the eggs should not be turned.
If you are using an automatic turner, follow the manufacturer's instructions for installing it in the incubator. Be sure to place the eggs in the turner with the small end pointed down. Take the turner out of the incubator at the end of the 18th day. The eggs no longer need to be turned, and taking out the turner will prevent injury to the newly hatched chicks.
The amount of moisture in an incubator is also critical for a good hatch. Most incubators have a trough to keep filled with water to ensure enough moisture. If the incubator has vent holes, keep them plugged for the first few days. After that open the small vents to allow air circulation through the incubator. Monitor and correct (if necessary) the temperature throughout the whole process.
Basic care of chicks. The class may be able to focus on little else as the eggs begin to hatch. This will be a very exciting time! The chicks should stay in the incubator until they are completely dry and fluffy.
It is also important to maintain a steady temperature in the incubator as the chicks hatch, so remove chicks to the brood pen only once a day. The newly hatched chicks will be tired from the hard work of breaking through the shell and probably won't eat for the first 24 hours.
Chicks instinctively begin pecking shortly after they hatch. Be prepared for some curious chick behaviors. For example, the first few days the chicks will be very active one moment, then fall in a heap with their heads on the ground as if they were taking their very last breath. A few moments later they'll be up and chirping once again.
Download the Arduino code eggs.txt.
LM334 CCS Circuits with Thermistors, Photocells YouTube
LM334 CCS Circuits with Thermistors, Photocells
- Basic Triacs and SCRs
- Triacs Part 2: Solid State AC Relays
- MOC30xx Opto-Coupler with Diac Output PDF file
- Hardware Interrupts Demo and Tutorial for ATMEGA168/Arduino
- Quick navigation of this website:
- Basic Electronics Learning and Projects
- Basic Solid State Component Projects
- Arduino Microcontroller Projects
- Raspberry Pi Electronics, Programming
Stepper Motors
- Easy Driver Micro-Stepper Controller to Arduino
- Unipolar Stepper Motor with a Arduino
- Considerations for Using Stepper Motors
- Connecting the Arduino to a L298N H-Bridge
- L298N Motor Controller Theory and Projects
- TA8050 H-Bridge Motor Controller
- Battery Charger related:
- Solar Panel Charge Controller Using Arduino
- Solar Panel Battery Charge Controller Using Arduino
- Solar Panel Battery Charge Controller Switching Circuit
- Arduino AC Power Control Tutorial
- Rotary Encoder Using Arduino Hardware Interrupts
- Arduino Controlling 74C164 Shift Register
- Arduino Interface MC3479 Stepper Motor Controller
Serial LCD Display and assorted Sensors
- Arduino LCD Display using 74164 Shift Register
- Arduino LCD Display with DS18B20
- Arduino LCD Display with DHT11 Sensor
- Arduino with MM5451 LED Display Driver
- Arduino MAX7219 Operates 8X8 LED Matrix
- Arduino RTC Clock MAX7219 LED Display
- BCD Conversion with MAX7219
- Hatching Chicken Eggs with Arduino
- Arduino TMP37 Temperature Sensor
- Arduino TMP37 Temperature Sensor Tutorial
- Testing the Keyes IR Sensor Module with Arduino
- Arduino to MCP23016, LCD Display
- Time-Date with Arduino, LCD Display, DS1307 RTC
- Controlling Driveway Lights with the Arduino
- TSL230R Light to Frequency Converter
- Arduino with MCP23016 I/O Expander
- Arduino DS1307 Real Time Clock
- Arduino with 24LC08 Serial EEPROM
- MC3479 Stepper Motor Controller with Arduino
Web site Copyright Lewis Loflin, All rights reserved.
If using this material on another site, please provide a link back to my site.