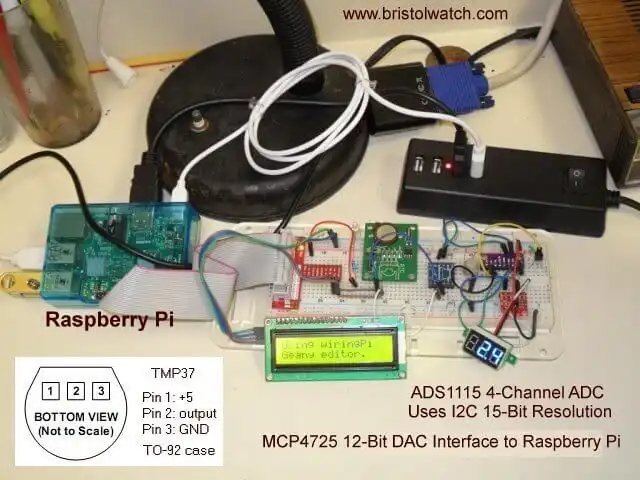
Arduino with MCP4725 12-bit Digital-to-Analog Converter Demo
by Lewis Loflin
In this demo Arduino reads the value of a potentiometer connected to ADC0 which is a 10-bit value. This is multiplied by 4 to a 12-bit values then written through an I2C connection produces an out voltage from 0-5V based on the pot value.
Arduino sketch for this project: mcp4725_demo.ino
/*

 By Lewis Loflin lewis@bvu.net
 http://www.sullivan-county.com/main.htm
 Electronics website:
 http://www.bristolwatch.com/index.htm

 Reads pot on Arduino ADC0 (10-bit) then multiplies by 4.
 Transmits via I2C numeric values controls
 the output voltage on a MCP4725 DAC
 measured with a voltmeter.

 Configuration bytes:
 // 12-bit device values from 0-4095
 // page 18-19 spec sheet
 buffer[0] = 0b01000000; // control byte
 // bits 7-5; 010 write DAC; 011 write DAC and EEPROM
 // bits 4-3 unused
 // bits 2-1 PD1, PD, PWR down P19 00 normal.
 // bit 0 unused

 buffer[1] = 0b00000000; //HIGH data
 // bits 7-0 D11-D4

 buffer[2] = 0b00000000; // LOW data
 // bits 7-4 D3-D0
 // bits 3-0 unused
*/

#include <Wire.h> // specify use of Wire.h library
#define MCP4725 0x62 // MCP4725 base address

unsigned int val;
byte buffer[3];

void setup()   {

  Wire.begin(); // begin I2C

}  // end setup

void loop() {

  buffer[0] = 0b01000000; // control byte
  val = analogRead(0) * 4; // read pot
  buffer[1] = val >> 4; // MSB 11-4 shift right 4 places
  buffer[2] = val << 4; // LSB 3-0 shift left 4 places

  Wire.beginTransmission(MCP4725); // address device
  Wire.write(buffer[0]);  // pointer
  Wire.write(buffer[1]);  // 8 MSB
  Wire.write(buffer[2]);  // 4 LSB
  Wire.endTransmission();

  // just an indicator
  digitalWrite(13, HIGH);
  delay(100);
  digitalWrite(13, LOW);
  delay(100);

} // end loop
- Arduino IF Statement Code Examples
- Arduino Solid State Relay Motor Enable Control
- Arduino XOR Blinks LED
- Arduino Projects Revisited Revised
- Programming ADS1115 4-Channel I2C ADC with Arduino
- Arduino uses ADS1115 with TMP37 to Measure Temperature
- Connect Arduino to I2C Liquid Crystal Display
- Arduino Reads Temperature Sensor Displays Temperature on LCD Display
- Arduino with MCP4725 12-bit Digital-to-Analog Converter Demo
- Videos
- Arduino with ADS1115 4-Channel 16-bit Analog-to-Digital Converter
- Arduino with MCP4725 12-Bit DAC
- Using Zero-Crossing Detectors with Arduino
- Hardware Interrupts Demo and Tutorial for Arduino
- In Depth Look at AC Power Control with Arduino
- Micro-controller AC Power Control Using Interrupts
- Light Activated SCR Based Optocouplers Circuit Examples
- Solid State AC Relays with Triacs
- YouTube
- Zero-Crossing Detectors Circuits and Applications
- Zero-Crossing Circuits for AC Power Control
- In Depth Look at AC Power Control with Arduino
- Micro-controller AC Power Control Using Interrupts
- YouTube Video for Arduino AC Power Control
- Arduino
- Arduino PWM to Analog Conversion
- Arduino Analog Digital Conversion Voltmeter
- Better Arduino Rotary Encoder Sensor
- Simple 3-Wire MAX6675 Thermocouple ADC Arduino Interface
- YouTube:
- 3-Wire MAX6675 Thermocouple ADC Arduino Interface
- Arduino ADC Voltmeter YouTube video
- Arduino PWM to ADC YouTube video
- Arduino Nano Test Template
- Arduino Solid State Relay Motor Enable Control
- Arduino Blink LED Tutorial
- Arduino SSR Power Enable Program
- SSR Based High Voltage H-Bridge
- Arduino H-Bridge Motor Control Program with LCD Display
- Arduino XOR Blinks LED
- Arduino Motor Control Program Using IF
- ULN2003A Darlington Transistor Array with Circuit Examples
- Tutorial Using TIP120 and TIP125 Power Darlington Transistors
- Driving 2N3055-MJ2955 Power Transistors with Darlington Transistors
- Understanding Bipolar Transistor Switches
- N-Channel Power MOSFET Switching Tutorial
- P-Channel Power MOSFET Switch Tutorial
- H-Bridge Motor Control with Power MOSFETS
- More Power MOSFET H-Bridge Circuit Examples
- Build a High Power Transistor H-Bridge Motor Control