Basic NAND Gate SR Latch Circuit
by Lewis Loflin
View all of my You Tube Videos
Also visit and subscribe to My YouTube Channel
Back to Hobby Electronics What to Know
Here we will learn to build a SR latch from NAND gates. Then we will use that to build a D flip-flop.
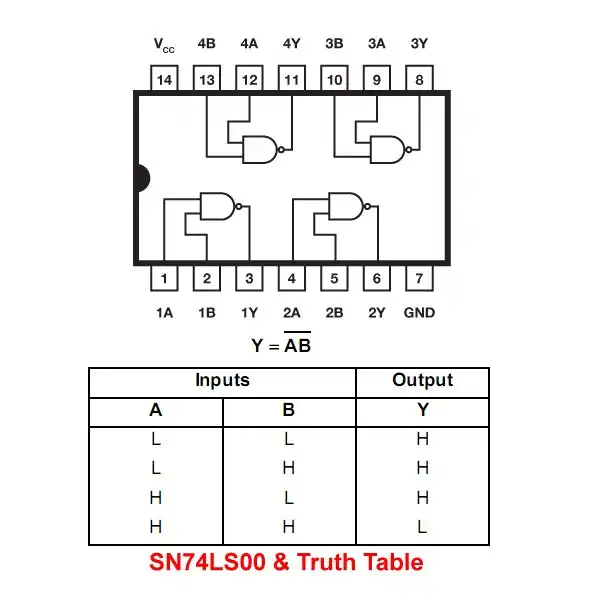
A SR latch is a form of a bistable multivibrator. It has two stable states, as indicated by the prefix bi in its name. Typically, one state is referred to as set and the other as reset. The simplest bistable device, therefore, is known as a set-reset, or S-R, latch. To create an S-R latch, we can wire two NAND (or NOR) gates in such a way that the output of one feeds back to the input of another, and vice versa.
Here I will address the NAND gate version.
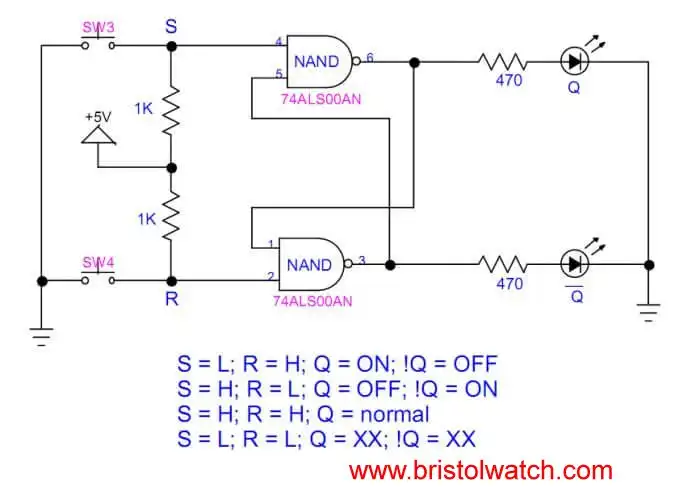
The Q and not-Q outputs are supposed to be in opposite states. But both forms of SR latches have illegal input states. For a NAND gate latch both inputs LOW turns ON both output LEDs.
Having both S and R equal to 0 is called an invalid or illegal state for the S-R Latch. Otherwise, making S=1 and R=0 "sets" the multivibrator so that Q LED is ON and !Q LED is OFF Conversely, making R HIGH and S LOW "resets" the latch in the opposite state. When S and R NAND latch inputs are both equal to 1, the outputs "latch" in their prior states.
This is opposite for a NOR gate based SR Latch. Both input HIGH turns both LEDs OFF. See Basic NOR Gate SR Latch Circuit.
Ref. Wiki
Normally the inputs are left at HIGH, but are normal LOW in the NOR gate version. This created differing input electrical connections.
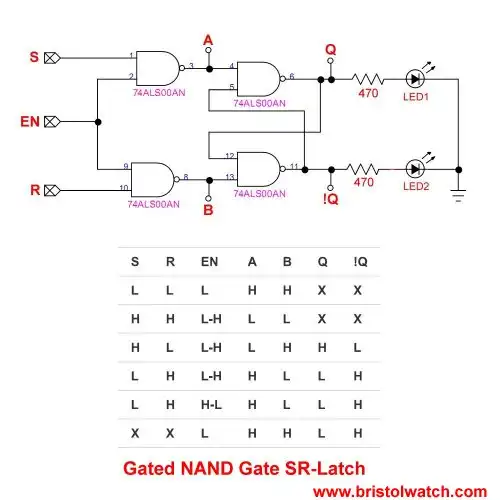
Here we use two NAND to create a clocked SR Latch. With a 74LS00 the 4 NAND gates allow a single component to be used to create the gated latch. In the NOR gate version we had to use a separate 74LS08 integrated circuit.
Note the truth table. With S and R both HIGH the NAND gates convert this to LOW at A and B. That is still an illegal condition.
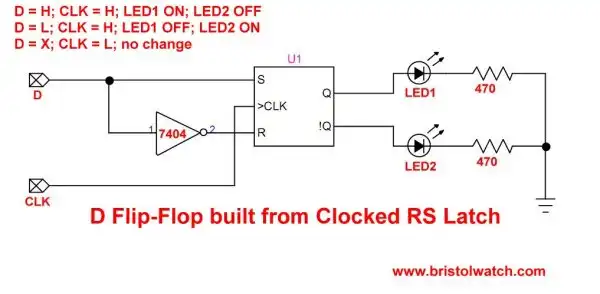
Above we added an inverter between S and R. This prevents S and R from both being HIGH or LOW. This forms a D flip-flop. Note the following table:

Note the change happens when CLK goes LOW to HIGH then LOW. The state of Q and !Q at the H-L transition is stored.
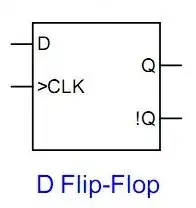
Finally if built from NAND or NOR gates the final D flip-flop is identical.
- Digital Circuits:
- Simple Schmitt Trigger SN74HC14 Square Wave Generator
- Introduction to RC Differentiator Circuits and Uses
- SN74HC14 Square Wave Generator uses SN7476 JK Flip-Flop
- Three Output Pulse Generator Circuit for Digital Circuits
- Astable CD4047 Geiger Counter Power Supply
- CD4047 Monostable Multivibrator Circuit
- Basic TTL Tri-State Buffer Circuit Examples
- Tutorial NOR Gate SR Latch Circuits
- Tutorial NAND Gate SR Latch Circuit
- Tutorial OR-NOR Circuits Including Monostable Multivibrator
- Brief Tutorial of XOR and XNOR Logic Gates
- LM555-NE555 One-Shot Multivibrator AC Power Control
- YouTube:
- Three Output Digital Pulse Generator
- Using Zero-Crossing Detectors with Arduino
- Hardware Interrupts Demo and Tutorial for Arduino
- In Depth Look at AC Power Control with Arduino
- Micro-controller AC Power Control Using Interrupts
- Light Activated SCR Based Optocouplers Circuit Examples
- Solid State AC Relays with Triacs
- YouTube
- Zero-Crossing Detectors Circuits and Applications
- Zero-Crossing Circuits for AC Power Control
- In Depth Look at AC Power Control with Arduino
- Micro-controller AC Power Control Using Interrupts
- YouTube Video for Arduino AC Power Control
- Exploring Solid State Relays and Control Circuits
- Comparing Photo Triac, Photo SCR Opto-Couplers
- Light Activated SCR Based Optocouplers Circuit Examples
- Silicon Controlled Rectifier Review and Circuits
- Silicon Controlled Rectifiers Connected as Power Triacs
- Insulated Gate Bipolar Transistor IGBT Circuits
- Current Limiter Circuits for Opto-Coupler LEDs
- VOM1271 Photovoltaic MOSFET Driver Circuits
- Current Limiter Allows Safe Testing of Zener Diodes, LEDs
- 3 Amp LM741 Op-Amp Constant Current Source
- Bidirectional Solid State Relay Circuits
- Simple Solid State Relay for Low Power LED 120V Lamps
- Build High Power MOSFET Directional Switch Relay
- Optical Isolation of H-Bridge Motor Controls
- All NPN Transistor H-Bridge Motor Control
- Basic Transistor Driver Circuits for Micro-Controllers
- ULN2003A Darlington Transistor Array with Circuit Examples
- Tutorial Using TIP120 and TIP125 Power Darlington Transistors
- Driving 2N3055-MJ2955 Power Transistors with Darlington Transistors
- Understanding Bipolar Transistor Switches
- N-Channel Power MOSFET Switching Tutorial
- P-Channel Power MOSFET Switch Tutorial
- Build a Transistor H-Bridge Motor Control
- H-Bridge Motor Control with Power MOSFETS
- More Power MOSFET H-Bridge Circuit Examples
- Build a High Power Transistor H-Bridge Motor Control
- H-Bridge Motor Control with Power MOSFETS Updated
- Opto-Isolated Transistor Drivers for Micro-Controllers
- Comparator Theory Circuits Tutorial
- Constant Current Circuits with the LM334
- LM334 CCS Circuits with Thermistors, Photocells
- LM317 Constant Current Source Circuits
- TA8050P H-Bridge Motor Control
- All NPN Transistor H-Bridge Motor Control
- Basic Triacs and SCRs
- Comparator Hysteresis and Schmitt Triggers
- Comparator Theory Circuits Tutorial
- Photodiode Circuits Operation and Uses
- Optocoupler MOSFET DC Relays Using Photovoltaic drivers
- Connecting Crydom MOSFET Solid State Relays
- Photodiode Op-Amp Circuits Tutorial
- Optocoupler Input Circuits for PLC
- H11L1, 6N137A, FED8183, TLP2662 Digital Output Optocouplers
- Optical Isolation of H-Bridge Motor Controls
- All NPN Transistor H-Bridge Motor Control
© Copyright 2019 Lewis Loflin E-Mail